All Shopify themes have a signup form with Name, Email, and Password fields. So, do you really need the Shopify custom registration form?
In reality, every brand wants to collect more information from customers when they sign up. BSS Shopify Service will help stores have better marketing and sales strategies in the future.
Therefore, it is easy to see that you absolutely need the Shopify custom registration form as an online store owner. We have come up with two ways to easily create a custom registration form with that in mind. But what is the best way for you?
Let’s get started now!

Contents
Is Shopify Customer Registration Default Form Enough For Your Store?
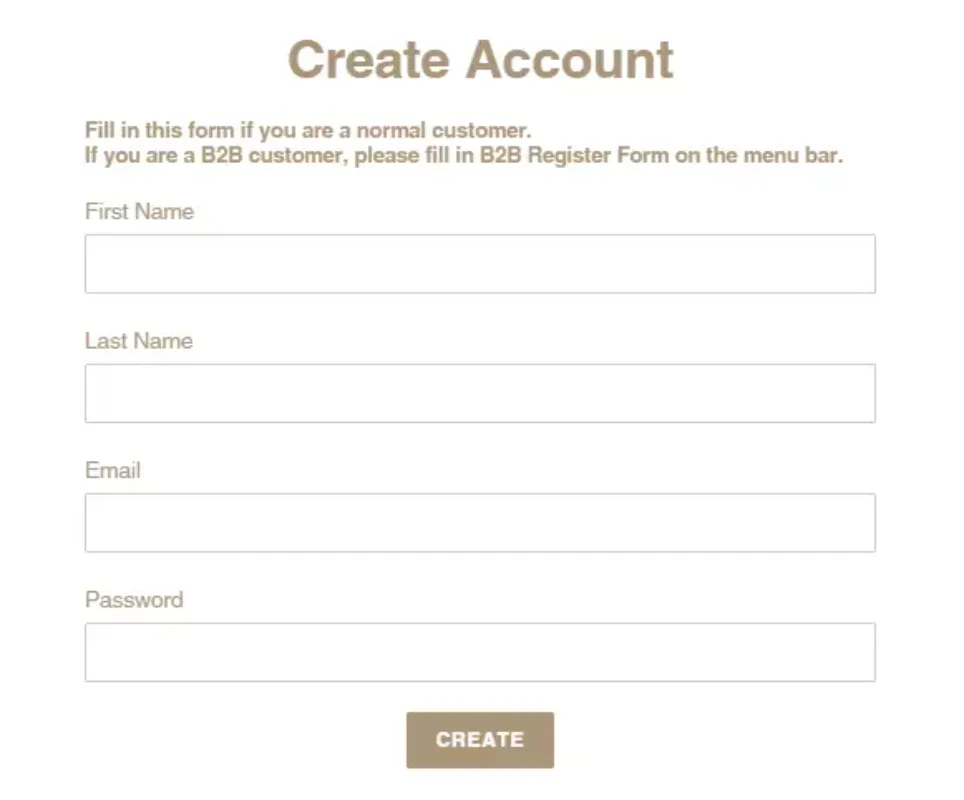
Shopify is becoming increasingly ideal for starting an online business from scratch. However, does Shopify provide an effective custom registration form for your store? Especially when running a B2B website is far more complicated and time-consuming than running a typical B2C website. Consider the Shopify default registration form builder below.

The Basic Shopify plan, by definition, includes a simple registration form, as shown above. It appears sufficient for B2C visitors to register an account in less than a minute or be ready to buy.
Nonetheless, the Shopify add fields to the customer registration form are insufficiently detailed to authenticate your B2B/wholesale customers. Not to mention that virtually anyone can join up for an account if a signup option is available on the storefront. Then, you risk managing an unending number of trash accounts and exposing your important wholesale-specific material to non-targeted clients!
As a result, you need to create a Shopify custom registration form consistently and effectively; at least, you have to get a lot of information from customers successfully. Especially if you run a B2B website, you will want to monitor customers carefully when they register. You will also need to gather other information to validate their accounts.
In this case, the best option for you is third-party apps such as B2B/Wholesale Solution. Specifically, you can use the Wholesale Registration Forms feature in the B2B/Wholesale Solution app, which is accessible on several plans:
- Free
- Basic: $4.90/month
- Advanced: $43.90/month
- Enterprise: $93.90/month

B2B/Wholesale Solution helps you add more custom fields to the Shopify default form or create complete Shopify custom registration forms. With just a few clicks, you will get the most effective automated features, which can be mentioned as:
- Add more helpful customer fields in 9 distinct input types to the basic form.
- Create additional Registration forms in addition to the default forms.
- Manage all registrations in the grid for further action and insights.
- Before creating a Shopify client account, review and approve registrations.
- Add a tag for approved customers to help you find them quickly.
- Sync customers’ information from Shopify custom registration forms to Shopify Customer Notes.
Get The App Today to Boost Your B2B eCommerce!

Alternatively, you can also create a Shopify customer registration form manually, such as by editing the code in Customer Fields. For more detailed instructions and a review of the pros and cons of each, let’s go down below.
For a quick & cost-effective way of running your online store let’s check out Shopify Plus Development Service – Top e-Commerce solution in 2023.
How To Customize the Shopify Customer Registration Form?
As mentioned above, there are two ways to create a Shopify custom registration form. Each method has its advantages and disadvantages. So, for the most comprehensive look, you and I will go through instructions on how to do it both ways.
Way 1: Edit Code
First, you can manually add the desired criteria like vat validation, email, etc. However, remember this method requires you to have coding knowledge. So, make sure you understand how to deal with these codes before starting.
The Liquid form tag and the accompanying ‘create customer’ argument can be added to the primary Shopify customer registration form. You must include the following within the form tag block:
| Input | Type | Name |
| First name | text | customer[first_name] |
| Last name | text | customer[last_name] |
| text | customer[email] | |
| Password | text | customer[password] |
Shopify has a plethora of themes available. As a result, the file structure can be different. The following instructions will show you how to replace the default registration form in your Shopify store theme.

Step 1: Open Shopify Admin panel
The first step to creating a Shopify custom registration form is to open the Shopify Admin panel.
Step 2: Edit code
Now, in the Shopify admin, navigate to the Online Store. Then, the Themes (Published theme) page will appear. To the right of the page, select action to begin editing the code.

Select the online store on the left side of the admin dashboard to edit the code of the Shopify custom form.
Next, open the file customers/register.liquid under Templates.
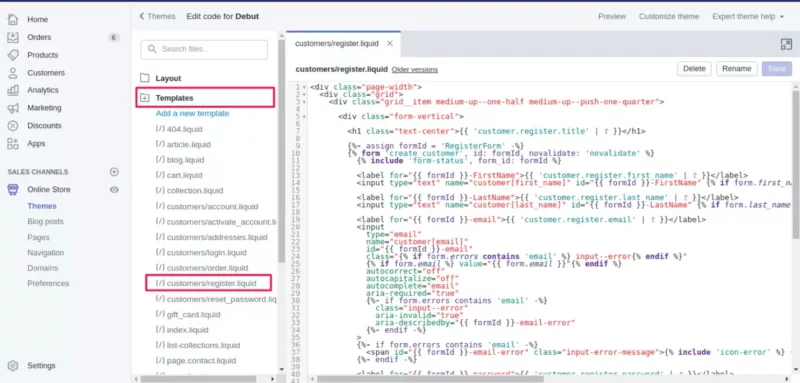
How to create the Shopify custom form (Source: Avada.io)
The next part will be more complicated as you will need to work with code sequences, so again, you need to make sure you understand the coding and don’t mess up your online store, which is running normally.
Step 3: Find the schema tag
Locate the schema element “{% form ‘create_customer’ %}” and “{% endform %}” in the file. Specifically, you can see this in the picture below.
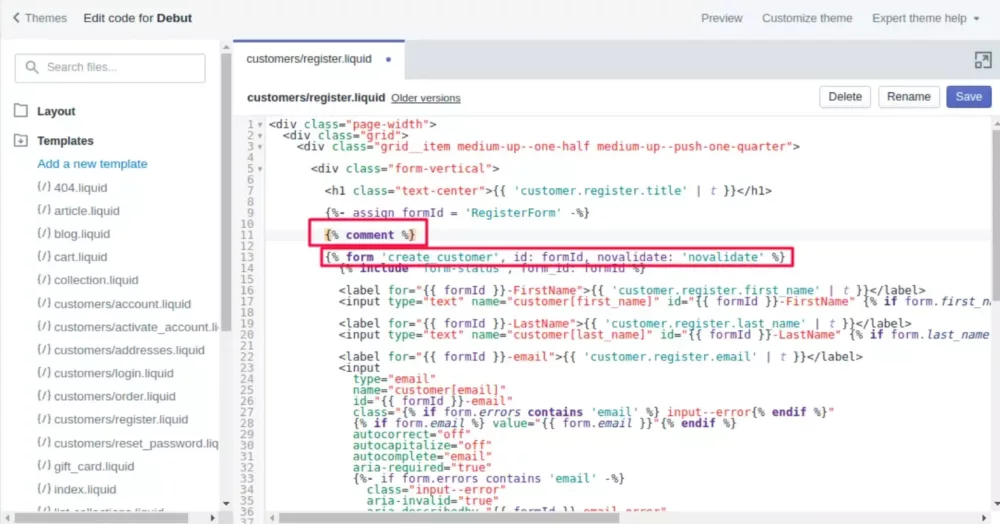
Identify the schema element “{% endform %}” and “{% form ‘create_customer’ %}” (Source: Avada.io)
Step 4: Paste new code to the contact form code
The contact form code can be located between the Liquid tags discovered in the previous phase. The default form fields are located, with each area separated by an empty line. Each theme is unique, but in general, a client registration form field looks like this:
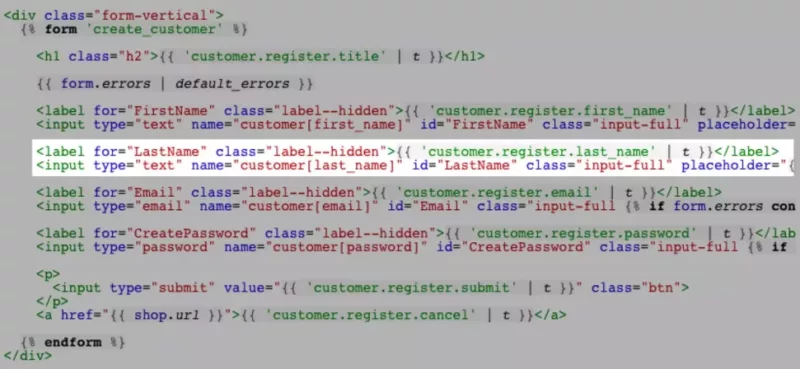
Shopify custom form with code editing (Source: Avada.io)
Depending on your preference, the code for the Shopify custom registration form will be pasted after, before, and between available areas. The code you provide will be determined by the sort of form field you want to generate.
Some of the categories of form fields that you can apply, such as:
Please copy and modify the following code to create a text box for the client registration form.
- Text field:
| <label for=”CustomerFormAllergies”>Allergies</label> <input type=”text” id=”CustomerFormAllergies” name=”customer[note][Allergies]” placeholder=”Allergies”> |
- Radio buttons:
| <label>Do you prefer tea or coffee?</label><br> <input type=”radio” id=”CustomerFormTea” name=”customer[note][Tea or Coffee]” value=”Tea” /> Tea<br> <input type=”radio” id=”CustomerFormCoffee” name=”customer[note][Tea or Coffee]” value=”Coffee” /> Coffee |
- Drop-down menu:
| <label for=”CustomerFormFlavor”>Choose a flavor</label> <select id=”CustomerFormFlavor” name=”customer[note][Flavor]”> <option>Chocolate</option> <option>Vanilla</option> <option>Strawberry</option> </select> |
- Check box:
| <label for=”CustomerFormKitten”>Would you like a free kitten?</label><br> <input type=”checkbox” id=”CustomerFormKitten” name=”customer[note][Kitten]” value=”Yes, please!” /> Yes, please! |
Step 5: Save
Finally, you just need to choose to save after adding the code for the custom registration form, and you have a new Shopify custom registration form.
Pros:
- Editing your theme is completely free.
Cons:
- Coding knowledge is required. However, if you lack coding knowledge, you can still hire an expert (of course, it will cost more money).
- Extra fields on the registration form end up as “notes” for the customer. Saving unique customer data to the customer note limits the freedom of the data with which that data can be used or segmented.
- If you change the registration form for everyone, your different sorts of clients (for example, wholesale and retail, if applicable) will use the same registration form. By making the other fields optional, you can still take the form usable for everyone.
- When consumers register, there is no choice but to be alerted.
Way 2: Use A Dedicated Shopify App
In addition to being free, editing code has a lot of disadvantages, especially for medium- and large-scale stores. Therefore, using the third-party app will be the most comprehensive and fastest way to create a Shopify custom registration form.
Among the apps on Shopify, B2B/Wholesale Solution offers the most freedom of adjustment, and it is even a complete wholesale solution. Therefore, using the app saves money and helps you to own useful automated features.
Specifically, the Shopify B2B/Wholesale Solution app lets you construct unique registration forms and add fields effortlessly. Account approval can be enabled, clients can be auto-tagged, and you can receive email notifications when consumers create or update their accounts.
The installation is also straightforward and does not require any coding knowledge. Let’s go into the details now!
Step 1: Enable the Wholesale Registration Form feature.
Go to Apps > B2B/Wholesale Solution > Dashboard and enable the Wholesale Registration Form feature to construct a registration form.
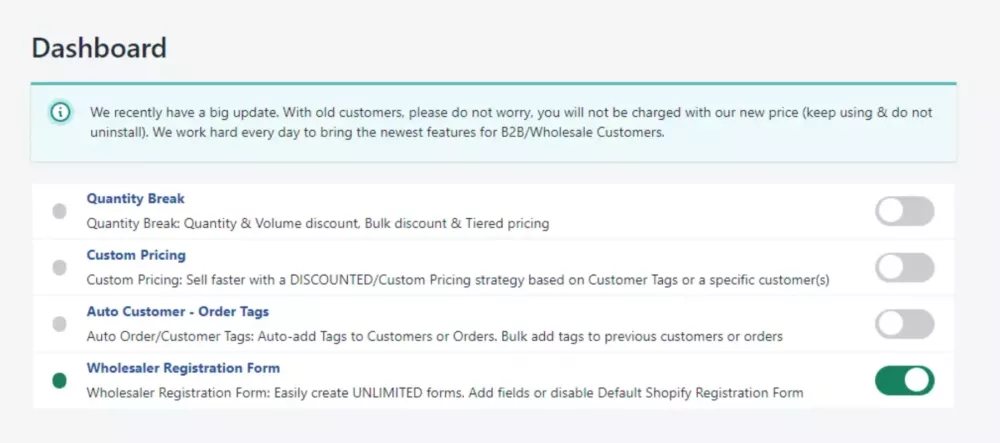
You can fully enable the features you want instead of using them all simultaneously.
Then, scroll down to the Wholesale Registration Form on the Admin Panel.
Step 2: Instructions for each use
Since it is an advanced application, it provides three ways to create a Shopify custom form. Therefore, this article will guide you in detail with each method:
1. Expand the Default Form of Shopify
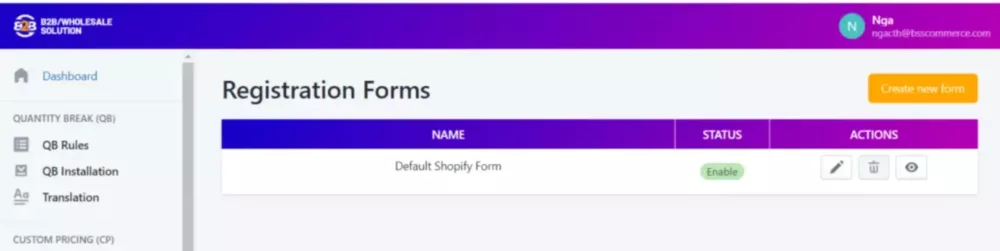
The Shopify Registration Form contains a few standard fields, such as First name, Last name, Email, and Address. As a result, simply covering client information is insufficient. You may now add more fields to the form.
First, go into the Forms section.

Then, select the “Edit” in the Actions section to make a Shopify custom registration form.
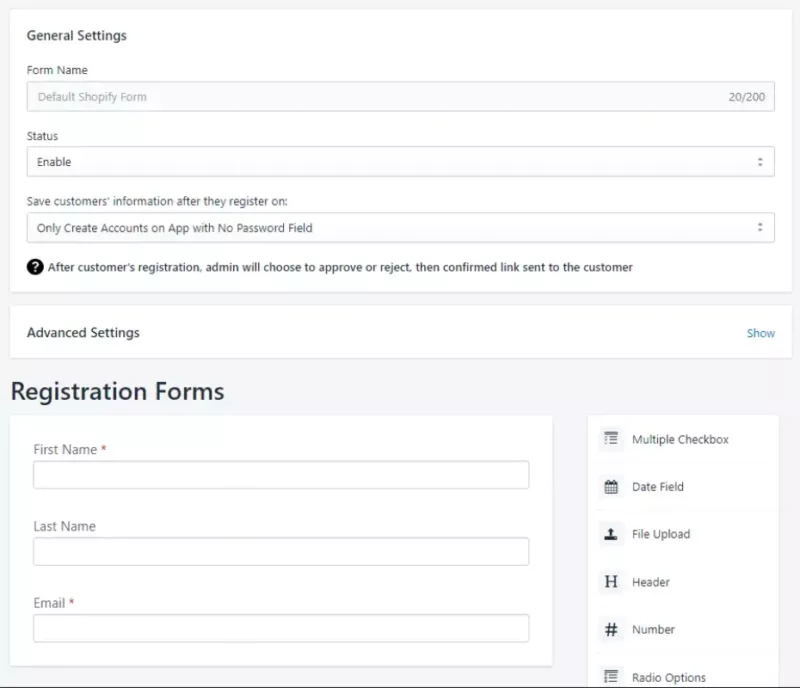
By default, all registrations are active, which is inconvenient for managing B2B/Wholesale accounts. At that point, you have four options for managing registration information:
- Create Accounts on Shopify and the App: When consumers complete the signup process, their accounts are automatically approved with a specific tag (s)
- Only create accounts on the app with no password field: When consumers complete signup, their registrations are saved for review. Then, authorized buyers will receive an email invitation to set up their account with a password later.
- Only Create Accounts in the App Using the Password Field: Customers’ registrations will be saved for evaluation once they have completed the signup process. Then, an email notification will be sent for approved consumers, and they will be able to access the website from there.
In addition, you can also perform advanced settings such as redirecting customers to a custom page after registration, adding tags for customers’ accounts, auto-exempt tax, sending emails to customers, adding Google reCAPTCHA To Your Registration Form. You can even edit the design of the form to suit your brand, with checkboxes; dropdown; radio options; date; text, and so on.
How to create Shopify custom registration form
👉 For detailed instructions, check out How to create a registration form?
2. Create a New Registration Form
If you wish to split registrations from the start and automatically apply a tag for each group, you may easily construct numerous forms.
The methods to construct a registration form are similar to those described except that the new registration form will be generated as a Shopify Pages.

3. Email Configuration
Moreover, you can configure an email to be sent to your store’s email address to notify you of new registrations. This email can help you manage your clients’ accounts more quickly and increase sales in your store.
First, locate the “WHOLESALER REGISTRATION FORM” on the app admin page.
Then, click Email Configuration and then edit the desired email template.
Next, enable this option under Status if you wish to send this type of email automatically. Enter your email address under “Send to” to receive alerts of new registrations.
Under Email Subject and Email Body (HTML), you can change the message or leave it as is. Finally, to activate the rule, click Save.
Furthermore, the Shopify B2B/Wholesale Solution app also offers advanced features. Notable among them is auto-add tags functionalities. By combining our Registration Forms, you may automatically add tag(s) to new registrations.

In addition to the registration form builder, B2B/Wholesale Solution offers auto-add tags functionalities with intelligent conditions.
Specifically, this feature automatically adds tags and notes for you based on customer and order actions or Custom Fields created by B2B Forms. In addition, it bulk entirely updates tags for existing customers without your effort.
👉 Read More: How to add tags based on custom fields with B2B Registration Form & Auto-add Tags?
Pros:
- Extremely simple to set up
- Forms can be placed almost anywhere in your shop (no coding required)
- Choose whether to generate customer accounts automatically in Shopify or require admin approval before creating an account.
- Create separate forms for distinct customer groups, or use conditional logic to show/hide fields on a single document for other users.
- When the form is completed, you will receive a notification via email!
- There are other advanced characteristics.
Cons:
If you have problems with the setup, the support team will help you 24/7. Therefore, this method almost eliminates all the limitations of the first methods.
FAQs About How To Create The Shopify Custom Registration Form
1 – What Fields Are Recommended In Shopify Wholesale Registration Form?
It depends on why you wish to collect large amounts of data. Because wholesale transactions necessitate significant trustworthiness, you will almost always want proof of identification showing the customers are a genuine firm. Furthermore, the registration information will aid in the ordering or customs clearing.
As a result, you can include the following fields in your Shopify wholesale order form:
- Tax identification number
- Company portfolio
- Shopify custom registration form
- VAT number
- And so on.
2 – Why Do I Need More Than One Registration Form On My Shopify Store?
If your website serves both B2B and B2C consumers, it is critical to manage their access first and foremost to provide superior service quality.
You can quickly classify your customers with the B2B/Wholesale Solution app by generating another registration form, allowing the Shopify default form and the Shopify custom form to function together on your website. For example, the Shopify default form will serve as a form for regular consumers. You may privately send a bespoke registration form builder to your B2B wholesalers and manage their information from the record.
3 – How To Make Your Shopify B2B Website For Member-Only?
After you have approved the Shopify wholesale customer accounts, you must grant them access to wholesale-specific information and the ability to make purchases. Meanwhile, rejected accounts are barred from accessing such vital information.
Shopify B2B Login/Lock & Hide Price is the perfect choice for you in this case. This app helps you restrict private pages, hide price, hide product, secret shop, personal link, subscribe to access pages are all at your fingertips, especially if your website is for Wholesale B2B or members only.
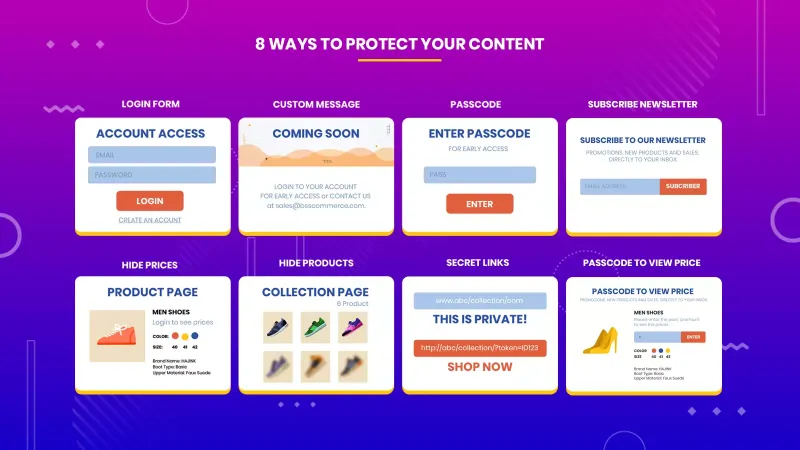
It offers up to 8 ways to create product pages exclusively for authorized customers, including member-only.
👉 TRY THE FREE TRIAL NOW: B2B LOGIN/LOCK & HIDE PRICE
Bottom Line
Shopify custom forms are essential for any Shopify business to receive more helpful information from customers.
Therefore, we hope you will have the right choice with two ways to create a Shopify custom registration form. However, remember that it is not always cheaper or easier to do manually. For example, if you have no coding knowledge and hire experts, you have to spend even more money than taking advantage of a third-party application.
In addition, manually editing the code also makes your website look unprofessional. Customers today have a lot of choices online, so you should consider and choose the most profitable way for your store.
Finally, we hope you can successfully create a registration form builder without much effort with this article!
👉 Don’t miss How To Set Up Shopify Tax-Exempt For B2B/Wholesale Customers In EU if your Shopify store is located in the European Union and your business is VAT-registered.