 for Magento 2 (2)")
This is a tutorial on setting up Amazon CDN for Magento 2 via Apache2 server.
Before going insight into step by step to configure Amazon CloudFront CDN for Magento 2 (Magento 2 on AWS) , get a brief overview of Amazon CloudFront and how it helps to improve website performance first.
Amazon CloudFront is a content delivery network (CDN) supplied by Amazon to deliver static and dynamic data, applications, videos, and APIs worldwide at higher speeds and low latency. On integrating Magento 2 with Amazon CloudFront CDN, you make it faster for customers to access the server since they can access the closest server instead of Hosting or VPS of your website.
 works")
How Amazon CDN (CloudFront) works to speed up the user experience
Step 1: Sign up AWS Account to Set Up Amazon CDN (CloudFront) for Magento 2
Table of Contents
After you successfully create an account at https://aws.amazon.com please activate your account and enter your credit in the payment section. Then, expand the Services menu and select CloudFront.
Next, click on the Create Distribution button.

Please go to Services ⇒ CloudFront ⇒ Create Distribution
Step 2: Create a Distribution
Select one delivery method that fits your situation the best; either of Web or RTMP. Then, hit Get Started button. Here I choose Web.

Select one delivery method for Amazon CloudFront CDN
In Origin Settings tab:
- Origin Domain name: Insert your domain website
- Origin Path: Insert the path of static. Remember to create two relevant Distributions for Static and Media folders at your Magento website. For example: /pub/static
- Origin Protocol Policy: It depends on your web settings. If your Magento 2 website is using SSL, please choose HTTPS only. However, you want Distribution to be compatible with both HTTP and HTTPS, then select Match Viewer instead.

Create Distribution at the 2nd step of setting up Amazon CloudFront CDN for Magento 2
In Default Cache Behavior Settings tab:
- Viewer Protocol Policy: Choose the policy you want viewers to use in order to access your content. We recommend using the Viewer Protocol Policy relevant to Origin Protocol Policy.
- Allowed HTTP Methods: Choose suitable methods. We recommend selecting the last option GET, HEAD, OPTIONS, PUT, POST, PATCH, DELETE to compatible with your Magento 2 website the most.

Default Cache Behavior Settings of Amazon CloudFront CDN
In Distribution Settings tab:
- Alternate Domain Names (CNAMEs): Enter the subdomain you want to replace the domain name (* .cloudfront.net). If you select this option you need to access the configuration of the domain then add the subdomain pointing to (* .cloudfront.net)
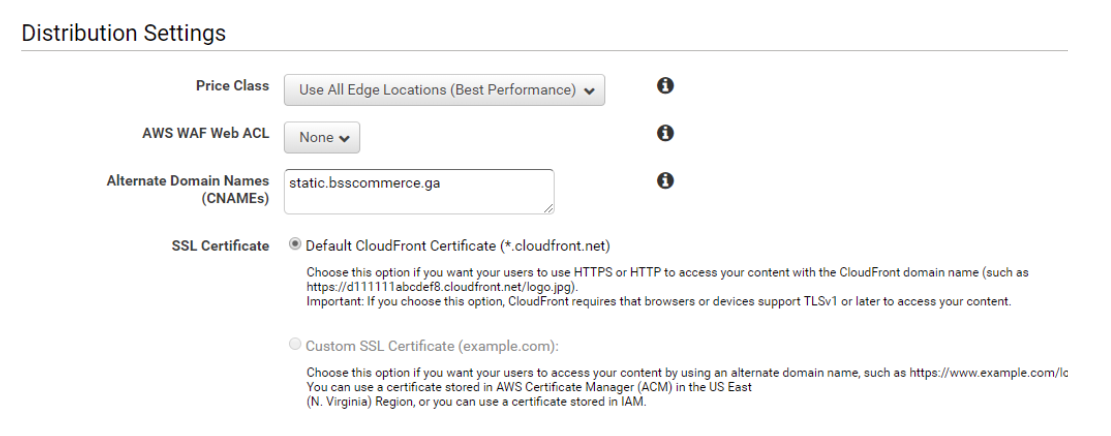
Create a Distribution: Distribution Settings tab
Finally, choose the Create Distribution button.
It typically takes around 15 to 40 minutes for CloudFront service to complete the deployment. Afterward, the display will be like the following:

The successful creation of distribution in setting up Amazon CDN (CloudFront) for Magento 2
Select the relevant ID link to check the detail of the distribution created.

Review the distribution settings and make edition if necessary
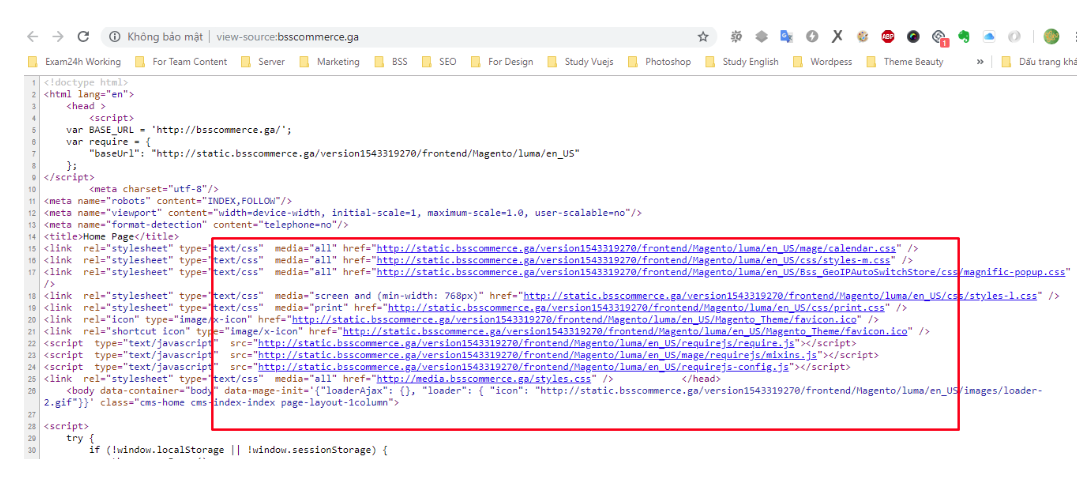
You can access to review whether the settings are proper. For example:
- Origin Path: http://bsscommerce.ga/pub/static/version1543319270/frontend/Magento/luma/en_US/mage/calendar.css
- The domain name created at the CloudFront http://d4823dpoob0l1.cloudfront.net will replace the origin path http://bsscommerce.ga/pub/static
- Please access to check: http://d4823dpoob0l1.cloudfront.net/version1543319270/frontend/Magento/luma/en_US/mage/calendar.css

Test the Distribution created
If the file content is the same as the origin file, then you have set up Amazon CloudFront successfully.
In case you want to replace the domain http://d4823dpoob0l1.cloudfront.net with the subdomain of your Magento 2 website, please access the configuration of the domain and create a CNAME of the subdomain pointing to the above domain:

Create subdomain of your website pointing to the domain
Then check the access to http://static.bsscommerce.ga/version1543319270/frontend/Magento/luma/en_US/mage/calendar.css

Check the subdomain
Now, it is time to set up Amazon CloudFront CDN for Magento 2
Step 3: Set up Access-Control-Allow-Origin for the static files and media
pub/static
The path to modify the configuration of pub/static is pub/static/.htaccess
The original file:
<IfModule mod_headers.c>
   <FilesMatch .*\.(ico|jpg|jpeg|png|gif|svg|js|css|swf|eot|ttf|otf|woff|woff2)
gt; Header append Cache-Control public </FilesMatch> <FilesMatch .*\.(zip|gz|gzip|bz2|csv|xml)
gt; Header append Cache-Control no-store </FilesMatch> </IfModule>
Please change to:
<IfModule mod_headers.c>
<FilesMatch .*\.(ico|jpg|jpeg|png|gif|svg|js|css|swf|eot|ttf|otf|woff|woff2|html|json)
gt; Header set Cache-Control "max-age=604800, public" Header set Access-Control-Allow-Origin "*" Header set Access-Control-Allow-Methods "GET, OPTIONS" Header set Access-Control-Max-Age "604800" Header set Access-Control-Allow-Headers "Host, Content-Type, Origin, Accept" </FilesMatch> <FilesMatch .*\.(zip|gz|gzip|bz2|csv|xml)
gt; Header append Cache-Control no-store </FilesMatch> </IfModule>
Please note that the extension of the file will change two extensions including html and json. To ensure that the html extension works, the configuration Catalog Store needs reviewing, which might relate to security issues.
pub/media
The path pub/media/.htaccess is used to change the header of media files.
The original file is as follow:
<IfModule mod_headers.c>
   <FilesMatch .*\.(ico|jpg|jpeg|png|gif|svg|js|css|swf|eot|ttf|otf|woff|woff2)
gt; Header append Cache-Control public </FilesMatch> <FilesMatch .*\.(zip|gz|gzip|bz2|csv|xml)
gt; Header append Cache-Control no-store </FilesMatch> </IfModule>
Please change the content of <IfModule mod_headers.c> into:
<FilesMatch .*\.(ico|jpg|jpeg|png|gif|svg|js|css|swf|eot|ttf|otf|woff|woff2)
gt; Header append Cache-Control max-age=604800 Header set Access-Control-Allow-Origin "*" </FilesMatch>
After changing these two configurations, your Magento 2 website is ready for the new distribution of static files and media from Amazon CloudFront.
Step 4: Create New URL for Static and Media
Please go to Configuration ⇒ Web ⇒ Base URLs and Base URLs (Secure).
Set Base URL for Static View Files and Base URL for User Media Files to the domain created.

Create new URL for Static Files after setting up AWS CloudFront CDN for Magento 2 (Magento 2 on AWS)
Follow above, you have almost finished setting up Magento 2 on AWS CloudFront CDN. Just one more step to be done …
Save all configurations file and clear the cache.
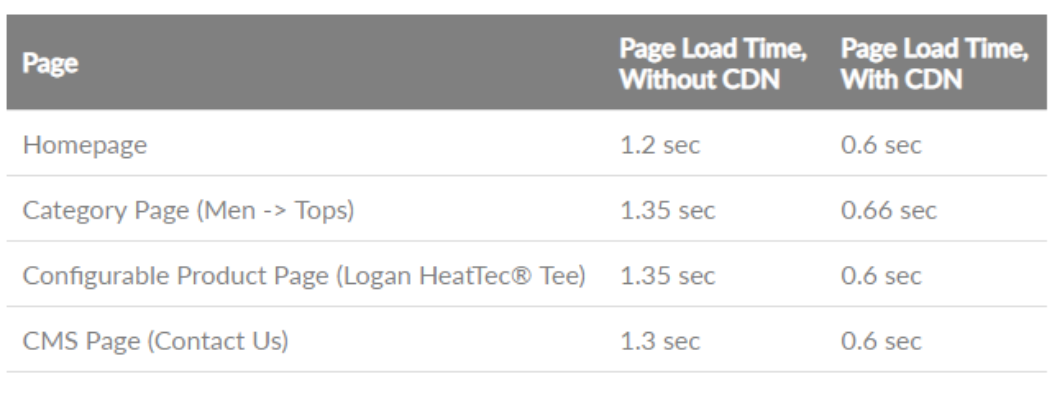
Access the homepage to check the result. All static files and media are replaced with the new domain through Amazon CloudFront.
After setting up Amazon CloudFront for Magento 2, you can immediately see the improvement in loading page.
Fastening website performance means lightening the customer experience and as a result, boosting sales significantly. Before this article, this task might be a hard. But by intergrating Amazon CDN (CloudFront) in your Magento 2, it is solved quickly and soundly.
DOWNLOAD NOW Magento 2 Defer JavaScript to speed up your website.
If you get any inquiry, let us know in the comment section below.
Want to digest more? Try this one >>> How To Solve Magento Website Speed Problems? [Inforgraphic]