
Tired of skimming hundreds among 34,500,000 online pieces floating on how to set up Magento 2 but yet failed to set up? Scan this article right now to find out how to install Magento 2 in the clearest way of stating installation steps and simplified focusing on what you need to handle during the process.
What is included? – Magento 2 Xampp installation and CentOs 7 for Magento 2 installation.
Let’s begin.
1. Pack your must-need-items for Magento 2 installation “job”
Before reading further on how to set up Magento 2, you should notice:
Magento 2 is compatible with all systems: Windows, Linux (RHEL, CentOS, Ubuntu, Debian…), Mac OS, etc.
Read this list to note down 4 things you should prepare:
- PC with operating systems.
- Programs to create a local webserver:
- For Windows, you can download and install Xampp;
- For Linux, you can find online resources to know how to install Apache (2.2/ 2.4) of Nginx (1.8 and above).
(You can find set up a web server on Windows and CentOS7 practice tutorials in index 2 of this article.)
- Your public server IP and a minimum 2GB RAM – use swap file if your system weighs less than that.
- 1 version of Magento CE. I use 2.2.4 sample data to tutor. You can conduct on alternative Magento CE, find the latest version on Magento download page https://magento.com/tech-resources/download
There may be people questioning “Why are there sample data and no sample data?”
So what is a sample data? It is a Magento version that Magento suppliers have already added database: category, product, customers, etc., Sample data version is somewhat more useful for developers. No sample data is a version without any sample database, just like the name.
👉 You can install Magento 2 with simple conditions above. In the next part, I will instruct you on how to install Magento step by step.
2. Roll into operation
2.1. Install Magento 2 via Xampp on Windows
Step 1: Set up web server – Install Magento 2 Xampp as an alternative for Apache HTTP server, which is not supported on Windows. Xampp is a packed software of Apache, MySQL, PHP, and Pearl.
Download Xampp here. Run the setup wizard. Install to another destination than C:\Program Files (x86) or deactivate User Account Control with msconfig after set up to optimize the Magento 2 Xampp feature without any restrictions.
E.g: Set installation folder C:\Xampp for not to deactivate UAC.
Xampp Control Panel enables user to start and stop activities of Apache HTTP and MySQL.

Extract file and rename
ALSO CHECK NOW >>> How to Install/Uninstall Magento 2 extension?
Step 2: Download Magento file from this link https://magento.com/tech-resources/download. Extract the downloaded file and put them in folder xampp/dhtdocs in Magento 2 Xampp. For better and quicker recognition, the folder should be renamed.
Step 3: Input database for Website.
After completing Xampp set up, you start to operate Apache and MySQL to have a virtual host on your computer.

Start Apache and MySQL on Xampp
MUST CHECK NOW >>> Don’t Debut Without Meeting Magento 2 System Requirements
Open your browser and enter this link: http://localhost:8080/phpmyadmin. In this scope of the article, I use tool adminer.php which shares identical operation flow with phpmyadmin. Log on to Mysql using default username: “root”, password: ”.”

Log on to MySQL
Choose Create Database in Mysql to input database for Magento website. I name my database m224prefix.

Create database m224prefix
👉You have created Database for your website successfully. Now we move on to Magento 2 installation.
Step 4: Install Magento 2
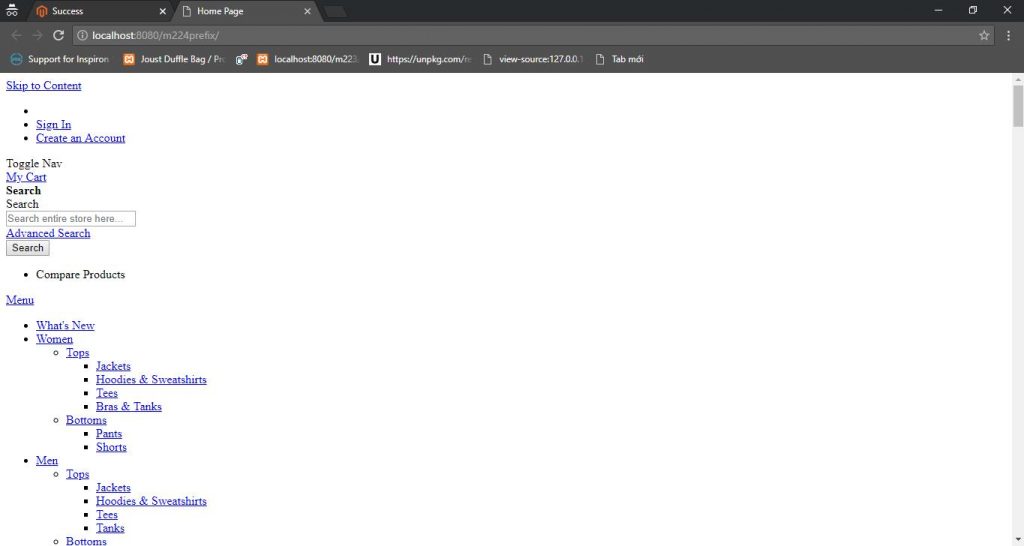
Open a new private/incognito window, type navigation link localhost:8080/m224prefix to begin installation process. Please note that the link is localhost:8080/ and replace m224prefix by your Magento folder name in htdocs which you have extracted and renamed in the previous step.

localhost:8080/m224prefix
After navigating to the URL, there appears a Magento notification asking you to confirm terms and conditions before installation. Click Agree and Setup Magento to be loaded to:
i: Readiness check
In this step, Magento checks installation statics, PHP version, PHP extensions, file permission in your main server to assess conformity to Magento. If you conforms, you will be informed to move on the next steps. If errors occur, please find solutions in Appendix of this article providing some common errors during the installation timeline.

Readiness check
ii: Add database
In this step, you put in database for Website.

Add database
iii: Web configuration
This step determines frontend and backend‘s URLs

Web configuration
iv: Customize your store
You can configure website‘s statistics such as time zone, default currency, store language, etc. If you are a developer, you might pass this step and move on to the next one.

Customize your store
v: Create admin account
In this step, you set the admin account of the website by username, password, email. Don’t forget to remember that information, of course.

Create admin account
vi: Click Install Now button
It takes 15 to 40 minutes to have a Magento CE full function website.

Install Now
👉 Complete Magento 2 installation “job” on Windows
After 6 entire steps are done, you complete your Magento website with customized settings as you wish. Magento will help you check your website’s configuration.
2.2. Install Magento 2 on CentOS 7
It is a recommended prerequisite to have a server running CentOS 7 for Magento 2 installation (you might also install Magento 2 via centos 6.) In this article, I use MySQL, you can have MariaDB which is found in the repository instead.
Step 1: Root access to your account. If you are logged in as non-root user, enter this command to login as a root user
sudo su
Step 2: Update the package:
yum -y update
Step 3: Install Apache as web server and MySQL by finding Magento 2 CentOS 7 repository.
- Find Apache (https) in default CentOS 7 repository. Enter this command to install the package:
yum -y install httpd
- Verify the installation to see the version
http -v
- MySQL has been removed from CentOS 7 repository, retrieve (download) from MySQL Yum repository here and add MySQL to the repository
yum install -y https://dev.mysql.com/get/mysql80-community-release-el7-1.noarch.rpm
- Start Apache and MySQL, enable them to automatically start on boot, enter following commands separately:
systemctl start httpd
systemctl start mysqld
systemctl enable httpd
systemctl enable mysqld
Configure to use mod_rewrite and .htaccess for Apache:
- Open by entering
vi /etc/httpd/conf/httpd.conf
- Find this line
Include conf.modules.d/*.conf
- Add this line right below
LoadModule rewrite_module modules/mod_rewrite.so
- Look for the following line
Options IndexesFollowSymLinks
Change the value of AllowOverride None to AllowOverride All
- Save file
:wq
- Set a temporary password for MySQL, enter:
grep ‘temporary password’ /var/log/mysqld.log
- Secure MySQL setup, enter:
mysql_secure_installation
Step 4: Install PHP 7, enter
- Retrieve and install PHP 7, enter:
yum install -y http://dl.iuscommunity.org/pub/ius/stable/CentOS/7/x86_64/ius-release-1.0-14.ius.centos7.noarch.rpm
- Update the changes
yum -y update
- Now install PHP7 with all necessary modules with the command below:
yum install php php-mcrypt php-cli php-gd php-curl php-mysql php-ldap php-zip php-fileinfo
- Verify the installation version of PHP
php -v
- Edit php configuration file, enter
vi/ etc/php.ini
Edit line memory limit, line date.timezone, currency, etc. for example
memory_limit = 2048M
date.timezone = America/Washington
language: en_US
Step 5: Save the file and restart Apache after changing settings
systemctl restart httpd
Step 6: Create Database
- Test the installation by entering the command:
mysql -u root -p
- Sample output:
Welcome to the MySQL monitor.  Commands end with ; or \g.
Your MySQL connection id is 45
Server version: 5.6.19-0ubuntu0.14.04.1 (Ubuntu)
Copyright (c) 2000, 2014, Oracle and/or its affiliates. All rights reserved.
Oracle is a registered trademark of Oracle Corporation and/or its
affiliates. Other names may be trademarks of their respective
owners.
Type 'help;' or '\h' for help. Type '\c' to clear the current input statement.

mysql>
- Enter the MySQL root user’s password when prompted
- Enter the following commands in the order shown to create a database instance named Magento with username Magento:
create database magento;
create user magento IDENTIFIED BY 'magento';
GRANT ALL ON magento.* TO magento@localhost IDENTIFIED BY 'magento';
flush privileges;
- To quit the command prompt, enter
exit
- Verify the database:
mysql -u magento -p
- Check database, enter:
show database
If the MySQL monitor displays, you created the database properly. If an error displays, repeat the preceding commands. Then type exit to exit.
Step 7: Install composer
- Check if Composer is available or not by entering any of the two commands:
composer --help
composer list --help
- if Command helps displays, Composer is already installed. If error displays, install Composer as the following guidance:
- Enter following commands
curl -sS https://getcomposer.org/installer | php
mv composer.phar /usr/local/bin/composer
- Verify composer installation
composer -v
Step 8: Install Magento 2
- Change user to Magento user
sudo su - magento
- Download Magento file to start the installation, enter
composer create-project --repository-url=https://repo.magento.com/ magento/project-community-edition /opt/magento/public_html
- Copy key from your Magento marketplace account store them in the auth.json file to have the same key when update installation.
Example output
Authentication required (repo.magento.com):
Username: b506ec6795d940530ac246e4e209c35e
Password:
Do you want to store credentials for repo.magento.com in /opt/magento/.config/composer/auth.json ? [Yn]
- Check interface of your Magento store, enter following sample in the navigation bar
IP/admin
- Log in to the backend to check the database, configuration, etc.
Step 9: Setup Magento Cron
- Enter the following command as Magento user;
php ~/public_html/bin/magento cron:install
- Verify cron installation
crontab -l
Appendix. Resolve some common errors while installing Magento 2 on Windows
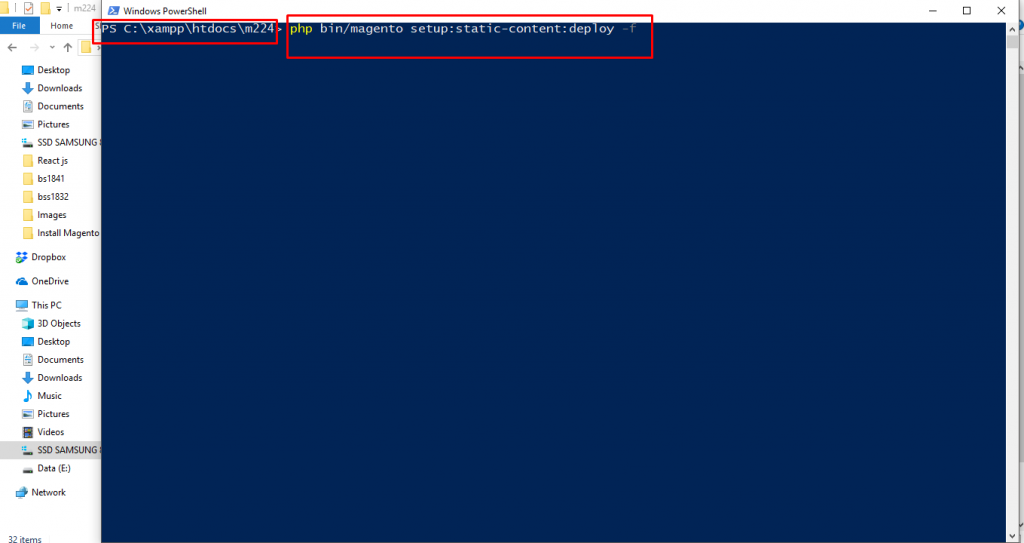
- After set up is done, some of you might get confused to look at your website. It might not be the interface you expected. You may suppose that you have done wrongly and reinstall, yet similar the web interface repeated. The cause to this problem is of initial set up, CSS file has yet changed into pub file, view_processed.
- It is easy to fix this error. Magento provides you a command in cmd. Open cmd in file code m224prefix that you have put into xampp/htdocs by using keystroke “shift” + right click “Open PowerShell Window here”. In cmd display, enter this command line:
For v2.2 and above:
php bin/magento setup:static-content:deploy –f
For v1.1.9 and below:
php bin/magento setup:static-content:deploy
2. While installing Magento – readiness check, an error message could appear: Magento requires some Php extensions in Xampp versions on your computer.
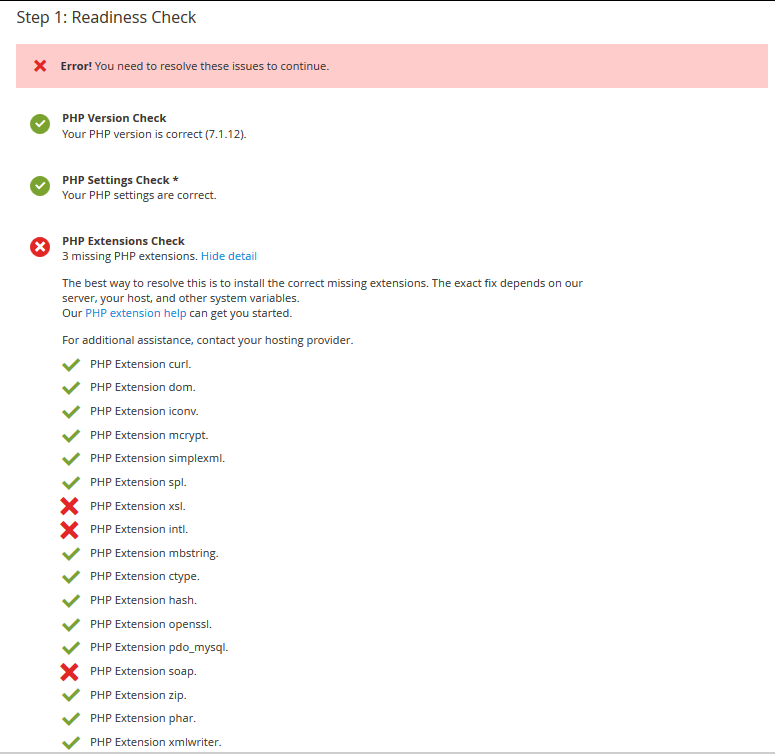
To fix this error, go to Magento 2 Xampp -> (Apache) – Config -> php.ini and delete semicolon “;” at the beginning of each extension in php.ini file.
3. Installing might keep pending at 60% or 67% as follows:
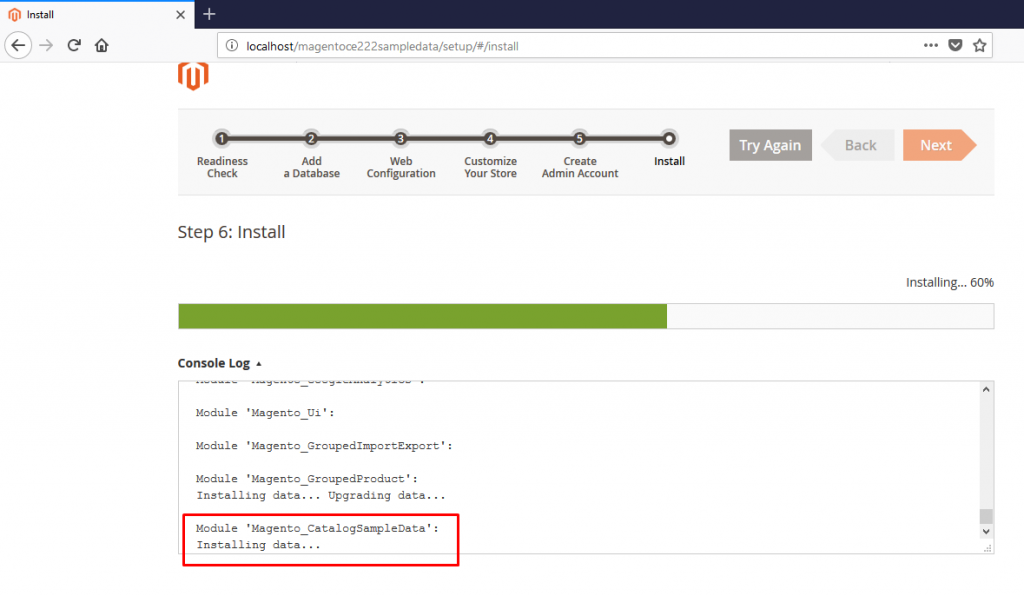
It is popular to meet this situation in between the process, in fact, the installation still runs, you could wait and reload the page after 40 minutes to complete the website’s installation.
Feel free to CONTACT NOW BSS Commerce for any further help.
We are one of the leading Magento extension providers and web development services in the world. With experienced and certified Magento developers, we commit to bring high-quality products and services to optimize our business effectively. Let us know about your problems. We are willing to support you every time.