
Error notifications on Magento 2 checkout page are essential for dealing with online customer errors.
If prospects can’t figure out what to do next, you will lose sales. Thus, it’s critical to identify potential trouble areas by studying how your consumers act and optimizing as feasible, for example, by auto-formatting spaces for credit card numbers.
However, no matter how error-free your fields appear to be, mistakes are likely to occur. As a result, you must verify that each area contains the necessary error messaging.
We’ll go through the four rules in detail in this post. Also, talk about improving your error messaging to fewer misunderstandings and mistakes.
Rule 1: Notify Users Right Away If They Make A Mistake
Table of Contents
If a user makes an error in the previous field, inform them before going to the following area. This should be done immediately after the user exits the field on Magento 2 checkout page. The user hasn’t had time to enter anything; thus, showing an error message when they click into a field isn’t a positive experience.
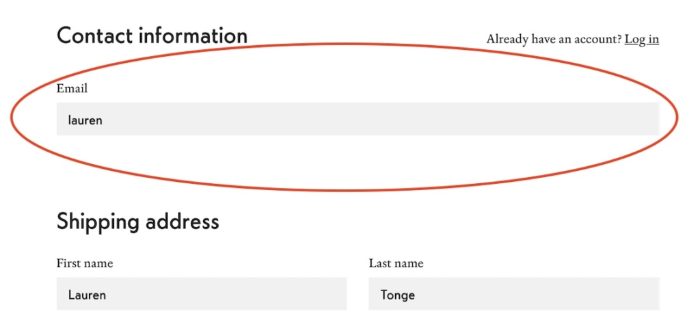
The customer could continue to the following field in the example above without receiving confirmation (positive or negative) that their input was correct. Ideally, you should tell customers that the email lacks a @ and a domain. For example, a message like “Please provide a valid email including @ and domain (example@email.com).”
When a visitor clicks out of a field, you can provide validation to let them know they’ve made a mistake so they can repair it right away. In contrast to informing visitors when they attempt to submit information or proceed to the next page of the Magento 2 checkout page, it increases friction because the user is ready to move.
Rule 2: Make Errors Visible
A subtle inaccuracy is readily overlooked – and causes visitors to become irritated. Highlight the field in red and show error messaging in red if a user makes a mistake.
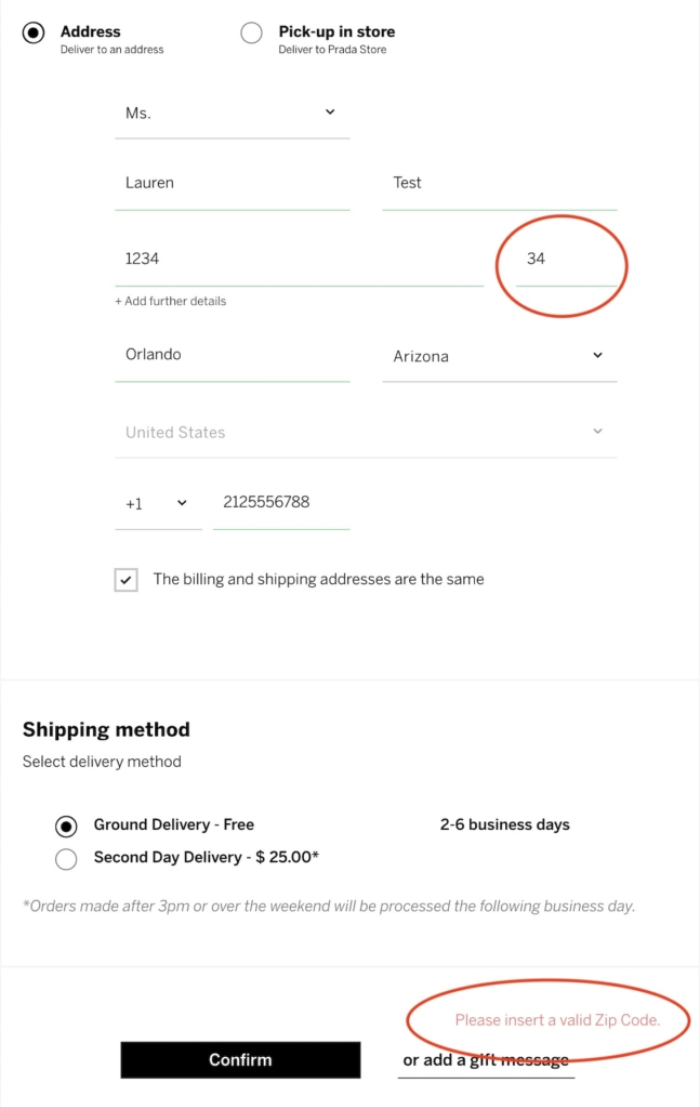
For instance, in the image above, there is also an error despite receiving a visual indication that having filled out correctly (green lines under the areas).
This Magento 2 checkout page may clarify this error message by positioning the copy near the impacted area and marking it red. However, it’s too faint that hard to notice the messaging near the “Confirm” button. It’s challenging to detect a problem briefly by looking at this website. We want visitors to immediately recognize the problem and understand where they need to go to resolve it.
Rule 3: Contextualize Error Messages
You should place an error message next to the impacted field. This way can reduce the requirement for visitors to look up the problem and then browse around to reach the area where they can fix it. While some platforms, such as Magento, already perform this at the checkout, your custom checkout design might not.
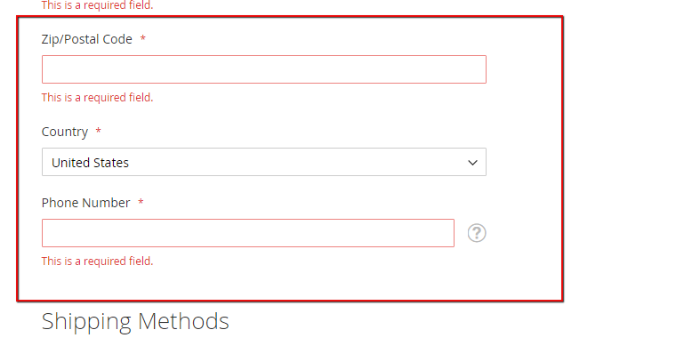
The error notice is immediately under the affected field in the Magento 2 checkout page example above. It contrasts with presenting all problem notices at the top or bottom of the checkout, making it challenging to locate the field that needs to be corrected.
If an error message appears after submitting a form and the relevant field is not visible in the viewport, the screen should instantly scroll the user to that field. Visitors aren’t even aware that they have a problem if they do not scroll up and look. They may become frustrated and depart if they do not realize they have an error and continue to try to complete their checkout.
Rule 4: Ensure That Messages Are Simple To Comprehend And Useful
Fixing and updating a field is frequently simple. However, there are times when a visitor is unaware of the problem with their input.
Ensure that all of your error messages are simple to comprehend and use.
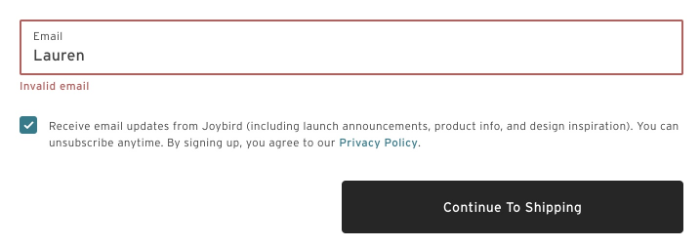
Visitors who believe they submitted a valid email or zip code will be confused by copies like “Invalid email” or “Enter a valid zip code.”
For example, messages like “Please enter an email including @” are more relevant and valuable to visitors than “invalid email” because it tells them exactly what they need to fix.
Moreover, this message is especially critical for sensitive Magento 2 checkout pages like the payment forms. Visitors may enter their credit card information erroneously or submit their CVV or expiration date in a format that is not correct. They will require instructions on how to fill out the field precisely (ideally, the areas should auto-format or mention the valid format in the first place).
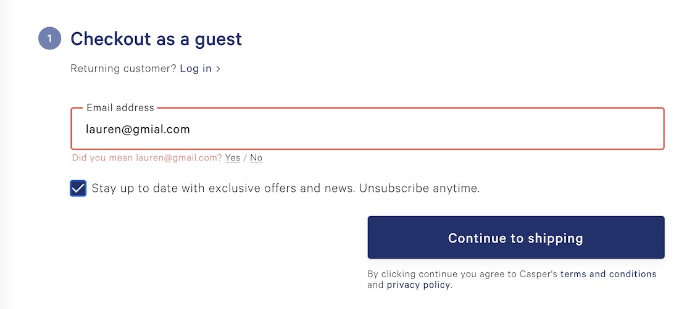
Let’s look at how excellent Casper’s checkout assists the user when they make a mistake. In the event of an error, they provide a suggested email address. We can just click “yes” to have our email automatically changed with the proper spelling. As a result, adjusting the field is a relatively painless task.
Want to provide valuable fields to smoothen the checkout process and gather more information? DOWNLOAD Magento 2 checkout page custom fields now!
How To Validate Forms In Magento 2 Checkout Page?
Below is the step-by-step process for validating forms on Magento 2 checkout page.
Step 1: Connect the validator to your form
To use the built-in or custom validate rule, you must add the following attribute to your form tags. If not, every action you do is meaningless.

The above validation alias will call the JavaScript file lib/web/mage/validation/validation.js, which includes the validation algorithm in general.
Step 2: Add a validation rule in input fields
The next step is to include a validation rule in the input fields.
On Magento 2 checkout page, there are now four methods for adding validation rules to form input fields.
- Use rule name as an attribute
![]()
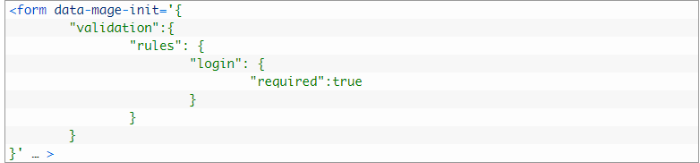
- Set rule in a data-mage-init attribute of the form tag
- Use rule name as class name
![]()
- Use the “data-validate” attribute
![]()
Step 3: Add a custom validation rule (Optional)
- Create Js file with custom validate rule
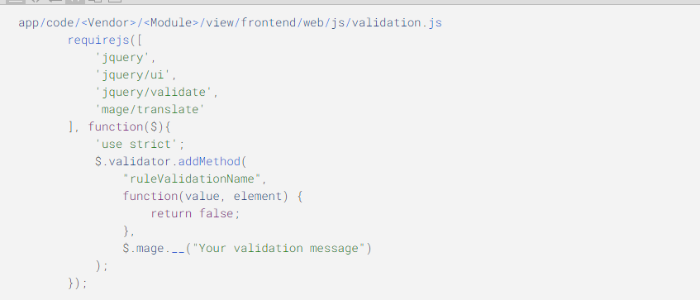
Above, we have used the “addMethod” mode to add custom validation on Magento 2 checkout page. This method needs two-parameter, which are rule name and one true-false function, respectively. If the result is false, your customer will receive an error message. In this example, we validate not to enter the “0” value.
- Connect to validator
Depending on your objectives, you can do it in various methods. However, the easiest way is to connect js in the layouts where they should be used as the validator.
![]()
Add the validator to the needed element once it’s been generated. We explained how to do that in step 2.
Read more: 9 Common Types Of Magento Customizable Options [Must Read]
Additional Considerations For Keeping Customers In The Magento 2 Checkout Page
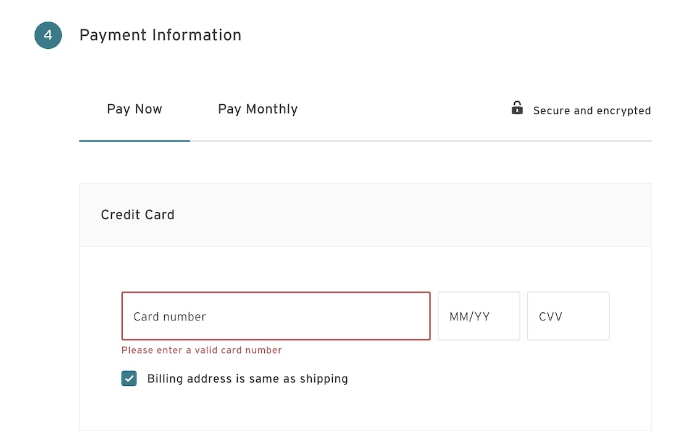
If users see an error message but haven’t interacted with the field, they may become concerned that something has gone wrong.
For instance, in some cases, even though we hadn’t engaged with the credit card area when arriving at the payment phase, it was already asking me to provide a valid card number. The messaging appears too soon in this scenario. Fortunately, it’s a simple repair.
If a user selects a location not available for checkout, this should be made apparent elsewhere on the site. And as soon as the customer chooses that location in the checkout.
Furthermore, you should propose advising clients about shipping restrictions far earlier in the process. It’s annoying when the customer chooses their delivery location but realizes that your store does not ship there. People will be frustrated if they spend time shopping and checking out to be unable to purchase.
Wrapping Up
Consider this scenario: A visitor has seen your marketing effort and is compelled to visit your store. Then they find something they wish to buy and move to the checkout process, ready to pay with their credit card.
But, what exactly is this? Nothing happens when they click the “Complete Your Order” button. They had input their credit card number incorrectly by one digit, but they weren’t notified of the issue. This situation leads to revenue loss and also reduces customer satisfaction.
As a result, you have to go through your Magento 2 checkout page and see if you can find a way to “break” it. If you type fields improperly, don’t use the required format, use symbols, or enter the wrong state zip code.
Take note of how to notify visitors of errors and how simple it will be for them to correct them. No matter how flawless your checkout procedure is, an excellent checkout experience requires dealing with humans’ inevitable mistakes.
BSS Commerce is one of the leading Multi-platform eCommerce solutions and web development services providers globally. With experienced and certified developers, we commit to bringing high-quality products and services to optimize your business effectively.
CONTACT NOW to let us know your problems. We are willing to support you every time.