
Either as a store owner or as a marketer who tries to market the product’s content to customers, we all have headaches trying to personalize our marketing campaigns and emails to fit with each subscriber, which will eventually take all of our time and efforts that we could spend on more important tasks.
Trust me, I’ve been through that, and it’s not a pretty sight to adjust to all your customers while also managing your products, and handling your deliveries, and many complete many tasks to keep your store up and running.
Mailchimp is the all-in-one marketing solution that will lessen your effort by turning your audience insights into personalized email marketing. Magento 2 Mailchimp are basically Mailchimp that are integrated into Magento 2, which will offer you numerous features to manage your store marketing.
CLICK NOW Magento 2 Mailchimp in comparison with other marketing tools.
Connect or Disconnect Mailchimp for Magento 2
Table of Contents
Before learning about how to connect or disconnect Mailchimp for Magento 2, there are some things you should know:
- Get yourself familiar with Magento Module Manager in order to install Magento 2 Mailchimp, as the code extends Magento 2 capabilities to custom or install modules.
- Mailchimp for Magento 2 doesn’t support custom, bundled, grouped, or gift card product types.
After understanding the necessary tools and limitations of the extension, we will guide you through the Magento 2 Mailchimp configurations to integrate Mailchimp in your Magento store.
Step 1: Download and Install Mailchimp for Magento 2
Download the extension Mailchimp for Magento 2 on Magento Marketplace. Then log in to your Admin Panel in Magento backend, Start the Magento Module Manager, and press Sync. After you run the Magento Module Manager, proceed to finish your Mailchimp installation, and you’re half-way ready to integrate it to your store!
Step 2: Magento 2 Mailchimp configuration and connect
The next step is to finish the configuration to create a Mailchimp store inside Magento and change some settings. Then you can connect that store with your Magento and decide which information should be shared between two apps.
Add API Key
First, you need to add or create a Mailchimp API Key and then include it into your Magento 2 account.
- Navigate to your Magento 2 Admin Panel
- Choose Mailchimp > Configuration
- Input your Mailchimp API Key in the API Key list (global) under the Mailchimp General Configuration section.
- Click Save Config.
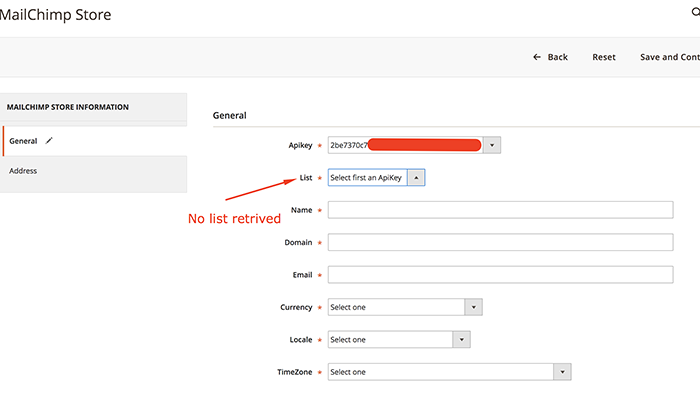
Create a Mailchimp store in Magento
A Mailchimp store in your Magento will allow you to input your store details and customize your settings, set the group or audience that you want to sync to your store, and which information that you want to deliver to them.
To create a Mailchimp store, you will need to perform the following Magento 2 Mailchimp configurations:
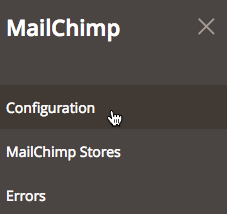
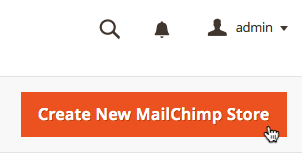
- Go to Mailchimp on the Magento Admin Panel, click Mailchimp Stores.
- Click Create New Mailchimp Store.
- Under the General section, click the drop-down menu to choose your API Key and the audience you want to sync.
- Fill in other details, add your contact information in the Address section, and then click Save.
Connect to Magento
To connect your Mailchimp store to Magento, you still have a few little steps to complete.
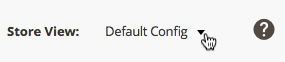
- Go to Mailchimp > Configuration.
- Click on the Default Config, and then choose the store view that you wish to connect to your Mailchimp store.
- Confirm to the message that you’ve made changes to your Mailchimp store.
- Choose the API Key you added from the API Key(store view) drop-down.
- Save Config.
Additional Options
Some additional options can aid store owners in controlling the information pass between Magento and Mailchimp.
You can go to the configuration in the Mailchimp section in the Magento Admin Panel to change these Magento 2 Mailchimp configurations.
- Untick Use Default to choose a store instead of the default configuration.
- Click Yes to Enable two-way sync is going to pass subscription status from your Mailchimp account to your Magento 2 account.
- In the Customer Fields Mapping section, insert a Magento merge tag value, and click a corresponding drop-down menu to choose a Magento customer field. The setting will sync your customer information with the correct audience field in Mailchimp.
- Choose Available Groups, then enter Group Description and Success Message to show to your customer after checkout.
- In Ecommerce Configuration, set your preferences to the e-commerce data that passed through Mailchimp.
- In the Abandoned Cart Configuration, you can set your preference for an abandoned cart email in Mailchimp.
After you adjusted your additional options to your liking, then click Save Config.
About Mailchimp Groups and Audience
Audience Definition:
The audience includes subscribed, non-subscribed, and unsubscribed contacts:
The Mailchimp subscriber and unsubscriber are the ones who signed in to receive your marketing emails or the ones who used to sign up for your emails, but recently they stop and might’ve listed your mail as spams.
The non-subscriber audience is the ones who interacted with the store but didn’t opt-in to receive your marketing emails.
How to create an Audience
To create an audience, you should first have a Mailchimp account. The Mailchimp account will require you some information to comply with anti-spam practices and track your performance. This information will allow Mailchimp to get your audience started.
Your audience will be built from your contacts, so you have to collect some contacts for Mailchimp to get your audience started. You can add in your subscribers one-by-one, importing from a spreadsheet, or sync them through your Magento store integration.
Mailchimp forbids users from sending a purchased, rented, or contact list from a third party, so remember to check the audience’s requirements of Mailchimp before you start.
Tracking your audience behavior
The audience dashboard will give you a chance to learn about your audience, based on their behavior and the channel of approach they’re likely to perceive. So looking at the dashboard data will help you understand what your contacts expect to get from your store, and how to talk to them.
If you want to learn more, then read Learn more about the audience dashboard for Mailchimp.
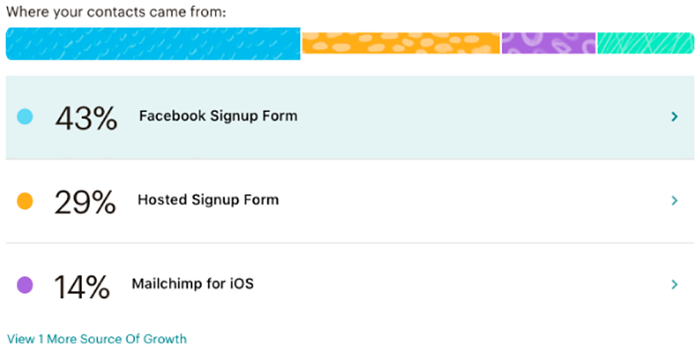
Other than the audience dashboard, the stats also show the click rates, the change in the number of subscribed contacts over time, and compare up to your last 30 email campaign performance.

Look at All about the audience stats to understand more about this function of Magento 2 Mailchimp.
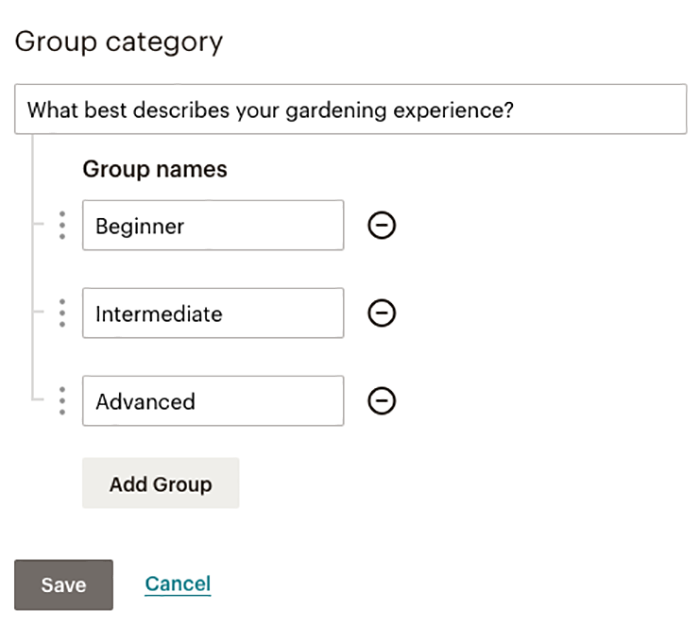
Group definition
A group is a contact collection that categories based on their common characteristics. A group often has two elements: the group category and group name. The group category will indicate the classification of that group, while the group name is the options chosen by you and by your contact. You can think of a group name as a sub-category to help you in searching and filtering your contacts.
How to create a group
In order to create a group within your audience, you should add your group category and name on Mailchimp, then Save the questions that your contacts will see when they want to choose their group. After your contacts have chosen their group, you can then send personalized emails for each group.
Add subscriber into a Group or an Audience
When someone permits you to add them into the subscribing list, add your Mailchimp subscriber using the Audience tab in your Mailchimp account. You should follow the steps below:
- Locate the Audience tab on your Mailchimp account
- If you have more than one audience, click on the Current Audience drop-down menu, then choose the audience you want to add them in.
- Click on Manage Audience and choose to Add a Subscriber.
- Fill the information about the subscriber, and then tick on the confirmation “This person gave me permission to email them” checkbox.
- Choose Subscribe.
In case you wish an update on your Mailchimp subscriber who already existed in the audience, then tick “If this person is already on my list, update their profile” box.
If you wish to add more than one subscriber to your Magento 2 Mailchimp store, then you can see how to import multiple subscribers to an existing audience.
- With a group, you can add an individual by clicking on the search icon.

- Enter the email address or the name then search for the subscriber information. Choose the View Profile action to see the subscriber’s profile.
- Go to the Group section in the profile, click Edit.
- Choose the group that you want the subscriber belongs to, then click Save.

To understand more about segmentation in a Group, or an Audience:
VISIT HERE at Mailchimp Magento segmentation for a successful promotional campaign.
Utilize Groups to find Subscribers preferences
You can group your subscribers’ preferences through two aspects of your Mailchimp subscribers: their interests and their mailing preferences.
With the group organized by their personal interest, you can tailor the email content that will be sent to them. For example, with the Mailchimp subscriber group ‘Travel,’ then we can send them deals about tours or hotel discounts.
The second subscribers’ preferences group is divided by email preferences. These subscribers can choose how often they want to receive their emails. This can help you adjust the amount of email that you send to your subscribers and avoid them turn into spams.
After setting up your group, your subscriber can then choose their group preferences through the signup form. You can also add existing subscribers into different groups. Read How the form builder works, and Manage Audience and Signup Form Fields, to understand more about the Signup forms for Magento 2 Mailchimp group preferences.
If your subscribers want to update their choices regards to group preferences, then you can check the guide to add an Update Profile Link, which will be included in the email campaign with Mailchimp *|UPDATE_PROFILE|* merge tag, and allow the subscriber to change their preferences.
Automation for subscribers
For e-commerce websites, automation emails are time-saver and sales booster. Magento 2 Mailchimp and other e-commerce integrated platforms with Mailchimp all provide a free automated email system from welcome messages, abandoned cart notifications, and order receipts. If choosing the right automation, your order can increase 16 times at your store.
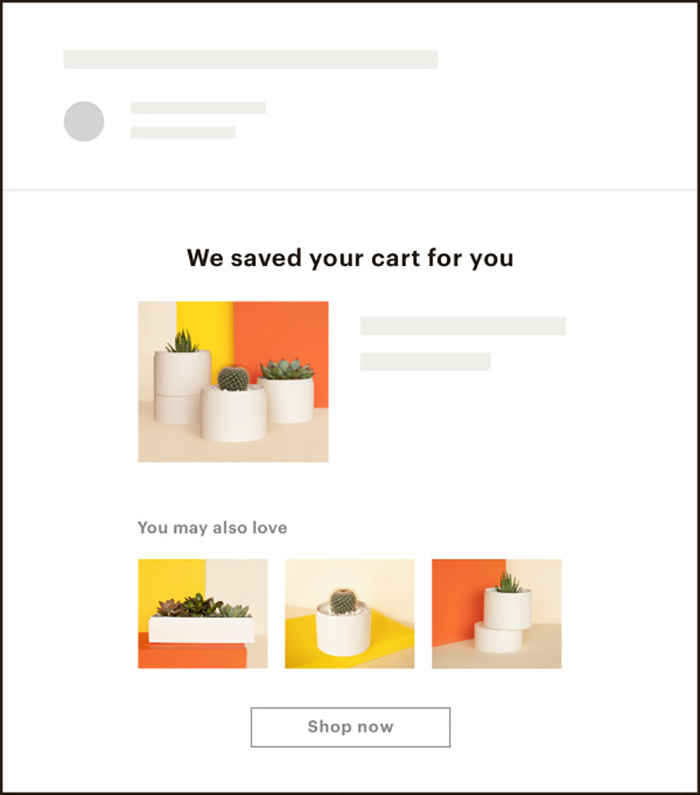
- Magento 2 Mailchimp allows you to automate your e-commerce website by set-up abandoned cart emails to send subscribers or customers who abandoned their cart on your shopping website. This could help them reconsider the decision, hence boosting sales.
- The second function on Magento 2 Mailchimp automatic mails is sending a series of welcome emails to your subscribers when they sign in for your website. What’s better to encourage people to come back and buy your stuff than a warm-welcoming message?
To see the guide on how to create an automatic welcome email.
Wrap Up
This is the conclusion of the guide to all you need to know about Magento 2 Mailchimp subscribers’. If you have any questions regarding Mailchimp and its functions, please send it to us.
BSS Commerce is one of the leading Magento extension providers and web development services in the world. With experienced and certified Magento developers, we commit to bring high-quality products and services to optimize your business effectively.
CONTACT NOW to let us know your problems. We are willing to support you every time.

MAGENTO 2 EXTENSIONS | FULL WEBSITE DEVELOPMENT SERVICES