
In Magento 2, testing is a mandatory part of various processes: upgrading the Magento platform developing extensions, making customizations, and many more to detect introduced bugs early and improve the code quality.
Though testing can be performed manually or automatically, Magento 2 automation tests are highly recommended. Thanks to automation tests in Magento 2, testers can:
- Simplify Magento QA testing procedures
- Save precious time and human resources
- Take the full management over the test result
- Good for Magento a/b testing
- Adjust the test’s input data or preconditions freely
- Re-run Magento 2 automation tests dynamically
In this post, we will have a brief introduction of the Magento 2 automation test installation and how to create a test case in several simple settings. This guide is especially useful for Magento 2 developers as well as for PHP developers, Magento QA testing specialists, Magento A/B testing experts, and system integrators.
I. Installation:
A. Adjust configuration:
1. Edit phpunit.xml to configure PHPUnit
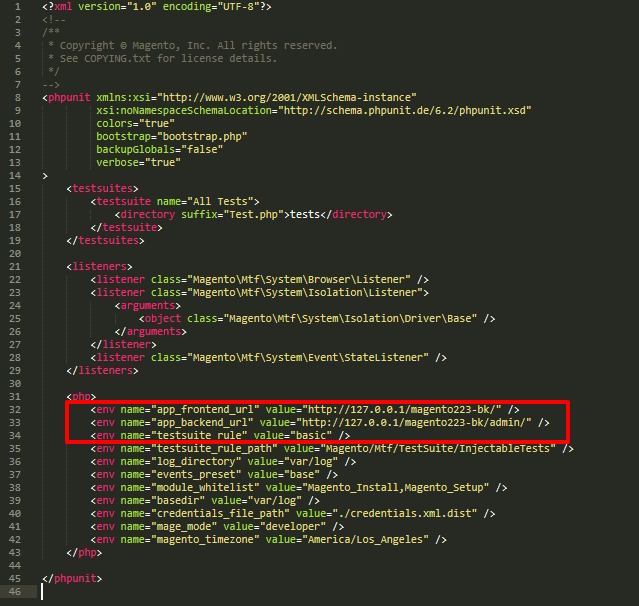
In <magento2_root_dir>/dev/tests/functional, please find phpunit.xml and open it in editor.
If you cannot find phpunit.xml, create it from phpunit.xml.dist.
Set URL for Magento storefront under test
Find <php> element.
For name=”app_frontend_url” set value that is your actual URL for Magento storefront under test.
Example:
http://127.0.0.1/magento223-bk/”/>
Set URL for Magento Admin URL under test
For name=”app_backend_url” set value that is your actual URL for Magento Admin URL under test.
Example:
http://127.0.0.1/magento223-bk/admin/”/>
2. Edit config.xml to configure Magento Functional Testing Framework
It is recommended to edit the code on the Magento functional testing framework.
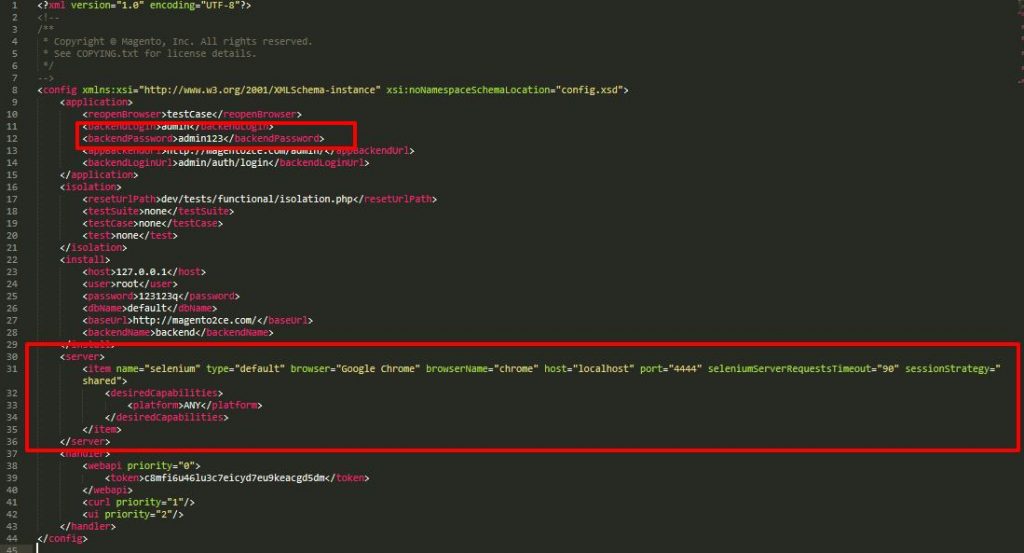
In <magento2_root_dir>/dev/tests/functional/etc, find config.xml and open it in editor.
If you cannot find config.xml, create it from config.xml.dist.
Set credentials for Magento Admin under test
In <application> element, find elements <backendLogin> and <backendPassword>. Change content of these elements to your actual credentials for Magento Admin URL.
Set browser that the FTF will use for tests
Copy <server> element from <magento2_root_dir>/dev/tests/functional/vendor/magento/mtf/etc/config.xml> and paste it in <magento2_root_dir>/dev/tests/functional/etc/config.xml after <install> element.
Enter actual data in <browserName> and <browser> attributes.
If set in Google Chrome:
<server> <item name=”selenium” type=”default” browser=”Google Chrome” browserName=”chrome” host=”localhost” port=”4444″ seleniumServerRequestsTimeout=”90″ sessionStrategy=”shared”> <desiredCapabilities> <platform>ANY</platform> </desiredCapabilities> </item> </server>
B. Prepare Magento application:
1. Change WYSIWYG settings
Please follow Stores ⇒ Configuration ⇒ General ⇒ Content Management ⇒ WYSIWYG Options
Set Enable WYSIWYG Editor to Disabled Completely
Remember to Save Config

You might also WANT TO READ NOW >>> How to Create and Use Widget in Magento?
2. Change security settings
Please follow Stores ⇒ Configuration ⇒ Advanced ⇒ Admin ⇒ Security
Set Admin Account Sharing to Yes
Set Add Secret Key to URLs to No

3. Refresh page cache
4. Apache
Copy /dev/tests/functional/.htaccess.sample to /dev/tests/functional/.htaccess.
C. Prepare environment for test run:
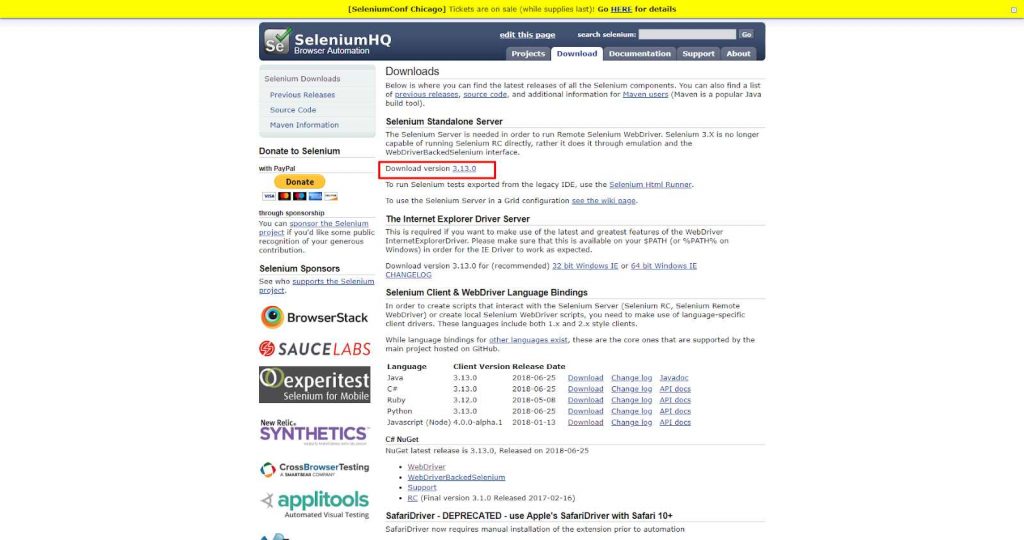
1. Install Java
2. Download Selenium Standalone Server
https://www.seleniumhq.org/download/
Enter in terminal:
java -jar <path_to_selenium_directory>/<name-of-selenium-server>.jar
3. Download geckodriver
https://github.com/mozilla/geckodriver/releases
4. Run generator
Enter in terminal:
cd <magento2_root_dir>/dev/tests/functional/utils
php generate.php
D. Test run:
1. Run all tests
Enter in terminal:
cd <magento2_root_dir>/dev/tests/functional
vendor/bin/phpunit
2. Run particular test
Enter in terminal:
cd <magento2_root_dir>/dev/tests/functional vendor/bin/phpunit –filter <name of test>
Example:
Let’s check the creation of new category. For this we should run <magento2_root_dir>/dev/tests/functional/tests/app/Magento/Catalog/Test/TestCase/Category/CreateCategoryEntityTest.php. To run this test enter the following script in your terminal:
cd <magento2_root_dir>/dev/tests/functional
vendor/bin/phpunit –filter CreateCategoryEntityTest
E. See logs for failed tests:
All failed tests are logged in <magento2_root_dir>/dev/tests/functional/var/log.
All Magento errors are logged in <magento2_root_dir>/var/log.
II.Create Test Case:
A. Example test case:
Variation 1:
-
-
Log in to Admin
-
-
-
Browse to Marketing ⇒ SEO & Search ⇒ Search Synonyms
-
-
-
Click the New Synonyms Group button
-
-
-
Enter data in the Synonyms field
-
-
-
Click the Save Synonym Group button
-
-
Verify the synonym group saved successfully
Variation 2:
-
-
Log in to Admin
-
-
-
Browse to Marketing ⇒ SEO & Search ⇒ Search Synonyms
-
-
-
Click the New Synonyms Group button
-
-
-
Select All Store Views in the Scope field
-
-
-
Enter data in the Synonyms field
-
-
-
Click the Save Synonym Group button
-
-
Verify the synonym group saved successfully
Variation 3:
-
-
Log in to Admin
-
-
-
Browse to Marketing ⇒ SEO & Search ⇒ Search Synonyms
-
-
-
Click the New Synonyms Group button
-
-
-
Select Default Store View in the Scope field
-
-
-
Enter data in the Synonyms field
-
-
-
Click the Save Synonym Group button
-
-
Verify the synonym group saved successfully
B. Test:
Enter in your terminal:
cd <magento2_root_dir>/dev/tests/functional/utils php -f generateFixtureXml.php — –name synonym –entity_type search_synonyms –collection Magento\\Search\\Model\\ResourceModel\\Query\\Collection
Copy folder code to magento2_root_dir
https://github.com/BssGroup/custom-test-case-create-synonym
Detail: https://devdocs.magento.com/guides/v2.2/mtf/create_test/create_new_test.html
Enter in your terminal:
php <magento2_root_dir>/dev/tests/functional/utils/generate.php
cd <magento2_root_dir>/dev/tests/functional
vendor/bin/phpunit –filter CreateSynonymEntityTest
See log:
-Terminal:

– Folder <magento2_root_dir>/dev/tests/functional/var/log.
(include image).

Above is the step-by-step guide to install the Magento 2 automation test with a detailed test case to cut time on Magento QA testing and Magento A/B testing.
If you find this sharing is useful, please Like, Share, and leave Comment below.
EXPLORE NOW more built-in solutions from BSS Commerce:
We are one of the leading Magento extension providers and web development services in the world. With experienced and certified Magento developers, we commit to bring high-quality products and services to optimize our business effectively. Let us know about your problems. We are willing to support you every time.