
During the process of developing products in Magento 2, we have received many questions about how to add a custom field/fieldset at Product Edit Page in the Backend of Magento 2. This is a quite important demand when you desire to use extra information on your page which default Magento 2 doesn’t include. If you are also facing that problem, this following article is your solution.
Step 1: Create file etc\adminhtml\di.xml. This file will declare the module’s UI provider to Magento system.
<?xml version="1.0" encoding="UTF-8"?>
<config xmlns:xsi="http://www.w3.org/2001/XMLSchema-instance" xsi:noNamespaceSchemaLocation="urn:magento:framework:ObjectManager/etc/config.xsd">
    <virtualType name="Magento\Catalog\Ui\DataProvider\Product\Form\Modifier\Pool">
        <arguments>
            <argument name="modifiers" xsi:type="array">
                <item name="customTab" xsi:type="array">
                    <item name="class" xsi:type="string">
            Bss\Customfield\Ui\DataProvider\Product\Form\Modifier\NewField
            </item>
                    <item name="sortOrder" xsi:type="number">70</item>
                </item>
            </argument>
        </arguments>
    </virtualType>
</config>
Step 2: Create Ui\DataProvider\Product\Form\Modifier\NewField.php. This class will create field and fieldset for you.
<?php
namespace Bss\Customfield\Ui\DataProvider\Product\Form\Modifier;
use Magento\Catalog\Model\Locator\LocatorInterface;
use Magento\Catalog\Ui\DataProvider\Product\Form\Modifier\AbstractModifier;
use Magento\Ui\Component\Form\Fieldset;
use Magento\Ui\Component\Form\Field;
use Magento\Ui\Component\Form\Element\Select;
use Magento\Ui\Component\Form\Element\DataType\Text;
class NewField extends AbstractModifier
{
    private $locator;
    public function __construct(
        LocatorInterface $locator
    ) {
        $this->locator = $locator;
    }
    public function modifyData(array $data)
    {
        return $data;
    }
    public function modifyMeta(array $meta)
    {
        return $this->meta;
    }
}
In which:
modifyMeta() – creating field, fieldset.
modifyData() – adding data when product edit page is loaded.
locator – getting product’s information by using $this->locator->getProduct().
For example, we create 1 fieldset and 1 field select yes/no, the content of modifyMeta will be:
    public function modifyMeta(array $meta)
    {
        $meta = array_replace_recursive(
            $meta,
            [
                'custom_fieldset' => [
                    'arguments' => [
                        'data' => [
                            'config' => [
                                'label' => __(Custom Fieldset'),
                                'componentType' => Fieldset::NAME,
                                'dataScope' => 'data.product.custom_fieldset',
                                'collapsible' => true,
                                'sortOrder' => 5,
                            ],
                        ],
                    ],
                    'children' => [
‘custom_field’ => $this->getCustomField()
],
                ]
            ]
        );
        return $meta;
    }
As you see, 1 fieldset in product page edit with label “Custom Fieldset”, the fields in this fieldset will be listed in ‘children’ item as an array. We only need to add 1 field with id custom_field through a function getCustomfield().
    public function getCustomField()
    {
        return [
            'arguments' => [
                'data' => [
                    'config' => [
                        'label' => __('Custom Field'),
                        'componentType' => Field::NAME,
                        'formElement' => Select::NAME,
                        'dataScope' => 'enabled',
                        'dataType' => Text::NAME,
                        'sortOrder' => 10,
                        'options' => [
                            ['value' => '0', 'label' => __('No')],
                            ['value' => '1', 'label' => __('Yes')]
                        ],
                    ],
                ],
            ],
        ];
    }
In addition, we can add the other fields such as text, checkbox, fileupload, so on.
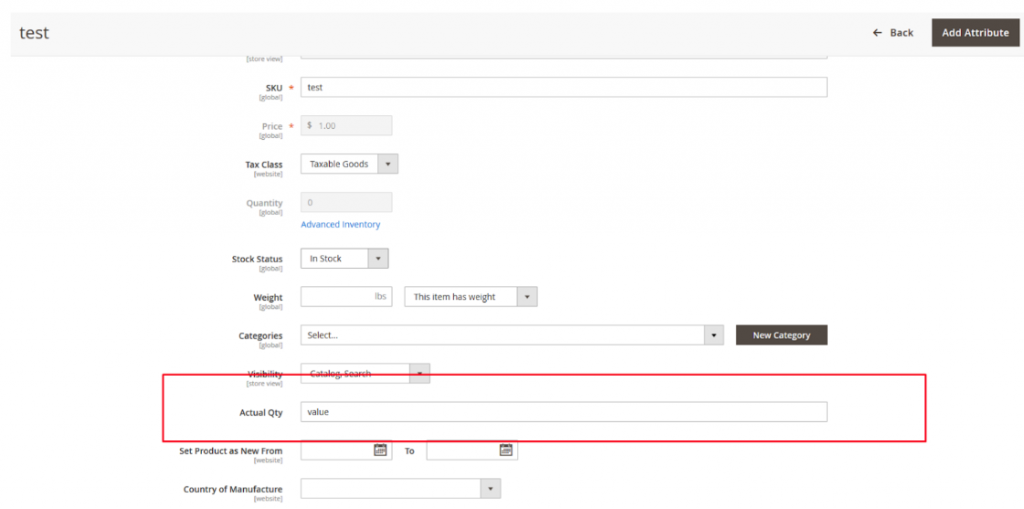
Finally, we get the following result at the product edit page:

Bonus: If you want to create Custom Text Field, please add the following code:
public function getCustomField()

{

     return [

         'arguments' => [

             'data' => [

                 'config' => [

                     'label' => __('Custom Field'),

                     'componentType' => Field::NAME,

                     'formElement' => \Magento\Ui\Component\Form\Element\Input::NAME,

                     'dataScope' => 'enabled',

                     'dataType' => Text::NAME,

                     'sortOrder' => 10,

                 ],

             ],

         ],

     ];

}
Here we get the result:
To assign value to the newly created field, just insert the code as below:
 public function modifyData(array $data)

{

     $data = array_replace_recursive(

         $data,

         [

             $productId => [

                 'product' => [

                     'enabled' => 'your_value'

                 ]

             ]

         ]

     );

     return $data;

}
In a nutshell, with the Custom field/fieldset you can extra product’s information as your desire and I hope that this tutorial will help you understand clearly about custom field/fieldset at Product edit page in Backend of Magento 2.
Updated:
As some readers asked us how to add the custom field inside the advance inventory is to declare Magento 2 Ui Component form, we decide to update the detailed instruction to make it fast and easy:
In the <vendor>\<module>\view\adminhtml\ui_component\product_form.xml please add:
<?xml version="1.0" encoding="UTF-8"?>

<form xmlns:xsi="http://www.w3.org/2001/XMLSchema-instance"
xsi:noNamespaceSchemaLocation="urn:magento:module:Magento_Ui:etc/ui_configuration.xsd">
    <modal name="advanced_inventory_modal">
        <fieldset name="stock_data">
            <argument name="data" xsi:type="array">
                <item name="config" xsi:type="array">
                    <item name="label" xsi:type="string" translate="true">Stock Configuration</item>
                    <item name="dataScope" xsi:type="string"/>
                    <item name="sortOrder" xsi:type="number">100</item>
                    <item name="collapsible" xsi:type="boolean">false</item>
                </item>
            </argument>
            <field name="custom_toggle">
                <argument name="data" xsi:type="array">
                    <item name="config" xsi:type="array">
                        <item name="sortOrder" xsi:type="number">3000</item>
                        <item name="dataType" xsi:type="string">boolean</item>
                        <item name="formElement" xsi:type="string">checkbox</item>
                        <item name="source" xsi:type="string">category</item>
                        <item name="prefer" xsi:type="string">toggle</item>
                        <item name="label" xsi:type="string" translate="true">Custom Label</item>
                        <item name="notice" xsi:type="string">Custom description.</item>
                        <item name="valueMap" xsi:type="array">
                            <item name="true" xsi:type="string">1</item>
                            <item name="false" xsi:type="string">0</item>
                        </item>
                        <item name="validation" xsi:type="array">
                            <item name="required-entry" xsi:type="boolean">false</item>
                        </item>
                        <item name="default" xsi:type="string">0</item>
                    </item>
                </argument>
            </field>
        </fieldset>
    </modal>
</form>
Then, flush the cache and check the result.

Please update full code, its not working for me, throwing error
Thanks for your remind. We’ve updated the code. Please try again and let us know if there is anything wrong.
how to add this field inside the advance inventory after is_in_stock filed.and this data is not saving in database
Dear,
Please check the Updated to get the step by step instruction to add field inside the advanced inventory as wanted.
New value doesn’t save when I click on “Save”
Is there a function missing?
In this article, we only focus on creating the custom field, there is no function to save or provide data to the form. Saving and showing exactly saved data require more server-side PHP function and Custom Database, which is not available yet.
i dont understand on where to insert the codes please help
You mean what codes? Please give us more information so we can help you out easily