
As we know, each Magento 2 product type has various prices. The logic and display of Price on the frontend are dependent on many variables and calculations in each config.
To make it clearer, we will list the main configurations that will affect the price (display and calculation) on Magento 2.
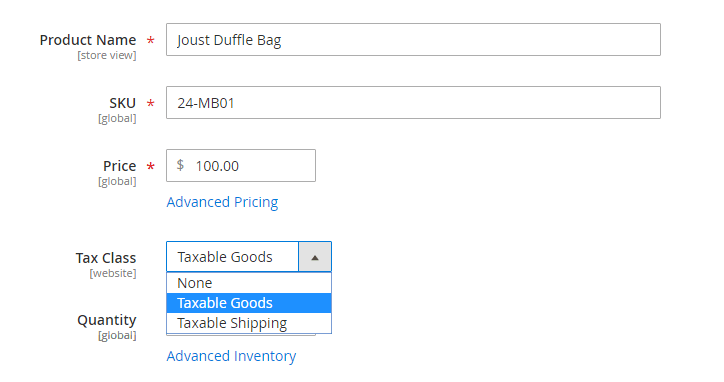
1. Regular Price and Advanced Pricing
Regular price: is the product’s original price which is used to calculate discounts.
Advanced pricing: allows store owners to offer Magento 2 special price of the product based on customer groups, sales, or quantity. There are some kinds of Advanced pricing for store owners to set up:
- Magento 2 Special price: is the discounted price in a specific time period
- Group price: specify promotional price set up for each customer group
- Manufacturer’s Suggested Retail Price: is the price suggested by manufacturers
- Actual price
*Note: Advanced pricing works well with simple, bundle, virtual, and downloadable products. Grouped, configurable products and gift card are except.
1.1. Price Display Settings
To set up price display, please navigate to Admin ⇒ Stores ⇒ Configuration ⇒ Sales ⇒ Tax.
1.1.1. Configure Price Display Settings
Expand the Price Display Settings Section.
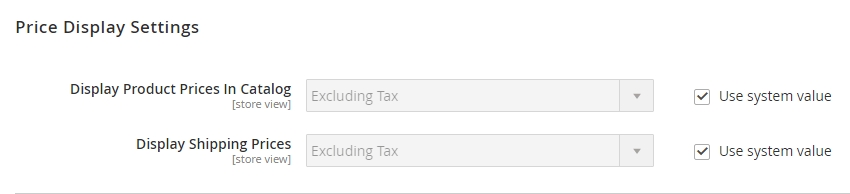
In Display Product Prices In Catalog and Display Shipping Prices: You decide whether product prices are included tax or not when showing them on the frontend.
- Excluding tax
- Including tax.
- Including and Excluding Tax
1.1.2. Shopping Cart Display Settings
In the Tax section, you continue to expand the Shopping Cart Display Setting section.

In Display Prices, Display Subtotal, and Display Shipping Amount: select Including Tax, Excluding Tax, or Including and Excluding Tax to determine how prices are displayed in terms of tax.
In Include Tax In Order Total: choose Yes or No to decide whether tax is included in Order Total or not.
In Display Full Tax Summary: choose Yes or No to decide whether full tax summary is displayed in the shopping cart.
In Display Zero Tax Subtotal: choose Yes or No to display or hide zero tax subtotal in the shopping cart.
1.2. Price Decimal
In default Magento 2, price is always enclosed with decimal. However, in case your product prices are even numbers, you want to remove the decimal from price to make them more user-friendly. Hence, you need an extension called Magento 2 Price Decimal to customize prices as you desire.
2. Special Price
2.1. Definition
Beside running price rules to discount products, you can also use Magento 2 special prices to give promotional product prices for customers during a specific period of time. Magento 2 special prices are displayed on the product pages and category pages, and more highlighted than the regular prices. For Magento 2 configurable product prices, special prices are shown on the product pages when customers select custom options.
*Note: In Magento Commerce edition, you can schedule Magento 2 special price on a period by using Scheduled Update configurations.
2.2. Debug
If Magento 2 special prices do not appear on the frontend, you should check the following issues:
- Reindex to update in the database if prices in the catalog are not correct.
- Cache is flushed or not?
- Customers have system cache or not?
- Prices are affected by other variables or not? (like store view, currency,…)
2.3. Customization
As you know, you just enter a fixed amount to determine a special price for a product. If you want to use a fixed percentage, and also display this discount percentage on the product page, Magento now does not support it. Hence, you can consider installing Product Label extension to add labels for products or use code to change the logic in the template. Please read this topic on Stack exchange to know how it can be resolved.
Most conveniently, you can now grant different prices of each product to a specific customer or customer group. With Price per Customer, price segmentation becomes a piece of cake, and your customers are given the treat they deserve!
3. Tier Price and Group Price
3.1. Definition
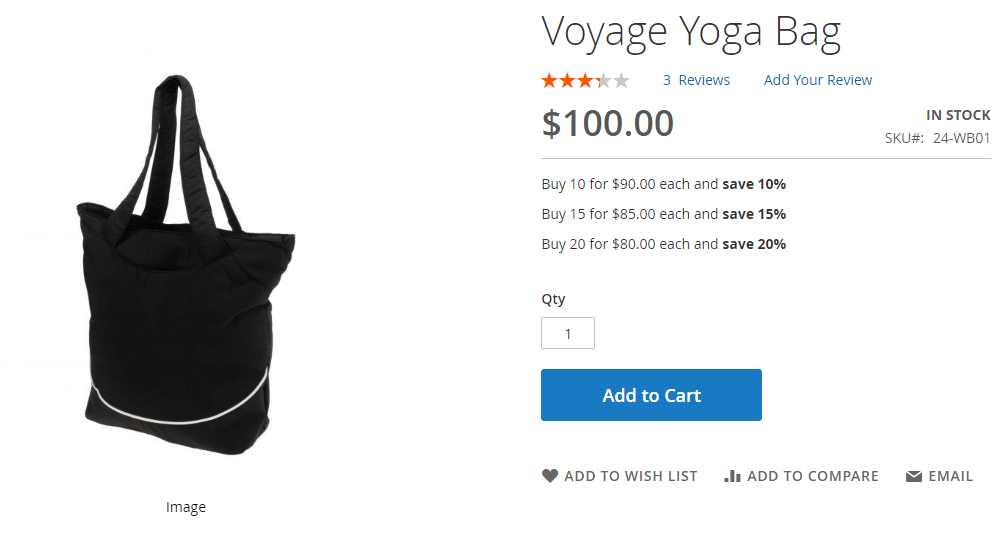
Tier Price: allows you to provide a quantity discount for products from the catalog list or product page details. This kind of discount is applied to store views and customer groups.
In Magento 2, you cannot find out the Tier price settings as in Magento 1 because it is changed into Customer Group Price.
⇒ For example: Tier prices are displayed on the frontend as below:
*Note: Default Magento 2 supports importing Customer Group Price via the Import function. Read more HERE!
Group Price: is the discount price for specific customer groups. It is also a component of tier price with the same settings. However, customer group price is used for quantity as 1.
3.2. Customization
If your store does sell configurable products, you can customize Magento 2 configurable product price: the way to calculate tier prices for children products. By using Magento 2 Configurable Product Wholesale Display, Grid Table View or Matrix View extension, tier prices are calculated based on the total quantity of children products added to cart.
4. Option Price
4.1. Add price for custom options
Adding custom options offers customers choices of options to make a specific product. These custom options are selected under input types including text, selection, and date. Custom options should be used when store inventory is simple and even no need to be managed.
To price custom options, you navigate to Customizable Options in the Product Edit Page of the backend.
Click Add Option to make New Option section appear.
Enter the option name into Option Title box and select Option Type
Then continue to click Add Value button and enter the option title name which defines a specific option
In Price type, choose how to calculate prices of custom options according to the base price – Fixed or Percentage.
In Price, determine a number to specify the price of custom options or the percentage to calculate the option price based on the base price (as mentioned above).
4.2. Customization
In the default Magento 2, custom options prices are added into the product prices. Hence, when customers buy a number of products, the total prices of custom options are equal to the product quantity multiply the price value of this option.
⇒ For example:
Product A: $50
Custom option of Color: Red – $10
If customers purchase 3 products, the total product price is: ($50×2)+ ($10×2) = $120.
However, we found that a lot of store owners demand another solution. They want to give an absolute price for custom options, which means the total price of custom option is not dependent on the product quantity.
In the case of that example, if the custom option of Red color has an absolute price value is $15. The total product price is now: ($50×2) + $15 = $115.
⇒ To make it real, this Magento 2 Custom Option Absolute Price and Quantity extension will be an ideal solution for you.
Additionally, if you want to create unlimited dependent children options on the parent custom option, don’t miss out Magento 2 Dependent Custom Options extension! This module allows customers to select size S and M when they choose Red color, but customers can only select size L when they choose Blue color.
5. Price Scope
5.1. Currency
More than 200 currencies are accepted on your website with the support of Magento. In case your store includes multi-currencies, customers can switch currencies via a drop-down list in the header.
- Base currency: is used to set up product prices and processed online transactions.
- Default Display Currency: is used to display product prices in the store view.
- Allowed Currencies: choose one or multiple currencies to be accepted in the store view. Please make sure that you have selected the base currency.
5.2. Price Scope
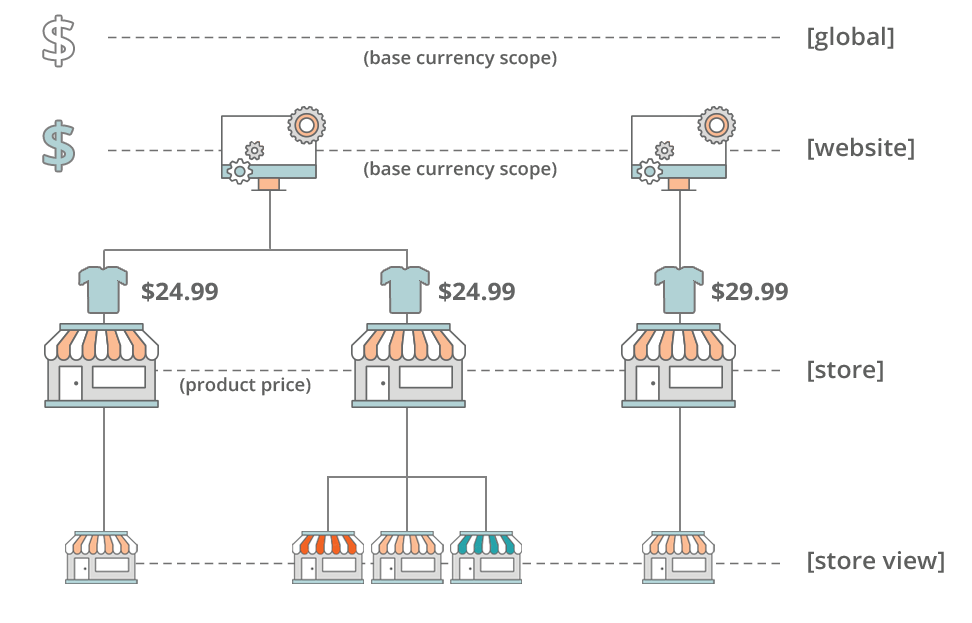
The scope of the base currency in Magento is Global or Website level. Hence, if you set the scope as Global, all store hierarchy uses the same price for a product. If you set the scope as Website, a product can have different prices at stores from different websites.
For get more understanding, let’s take a look at the following image:
5.3. Customization
For websites with multiple stores or store views, they mainly target to global customers. This makes optimizing shopping experience for international purchase extremely essential and necessary, especially languages and currencies. French customers should not check out with US Dollars, right? Hence, Magento 2 store owners often demand more customization related to user experience, currencies, prices as well. Let’s take a look at some possible customization and corresponding solutions:
| Wanted Customization | Solutions |
| Checkout with display currency of each store view | Checkout with Display Currency |
| Set up different prices for the same product per store view | Multiple Store View Pricing |
| Auto redirect customers to the right store view based on
IP address, and switch to corresponding currency. |
GEO IP Store Switcher |
Additionally, you can freely hide the price of specific products or categories from a chosen customer group. With Hide Price, you should be able to tailor a friendly message for customers to log in or contact admin for the product price, and increase interaction with customers.
6. Tax
Default Magento 2 lets store owners set up a tax system to aim at taxing customer groups, products, and specific places.
6.1. Tax rule
A tax rule is constituted by product class, customer class, and tax rate.
Each customer belongs to a specific customer group and is assigned to a customer class. Each product is also assigned to a product class. The default Magento checks the shopping cart of each customer, then calculate the complete tax based on customer class, product class, and the region (shipping address, billing address).
It can be said that the tax rule is created after product class, customer class and tax rate settings are completed.
6.1.1. Product Class, Customer Class, and Tax Zones & Rates
Product Tax Class: determines which tax rate is applied in the shopping cart. If you create a new product, it can be assigned to a particular product tax class.
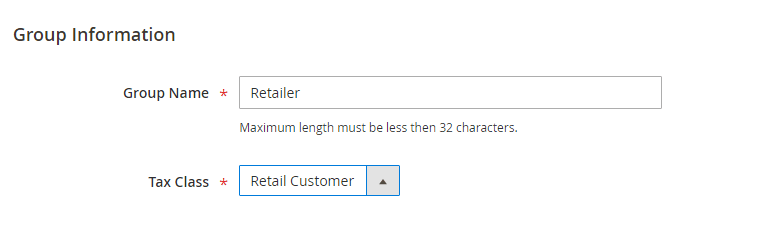
Customer Tax Class: determines which tax rate is applied to each customer group. You can assign tax class for a customer group by going to Customers ⇒ Customer Groups.
Click Add New Group or edit an available group.
In Tax Class, select an appropriate class.
*Note: To create a new product and customer class, you have to create a new tax rule. Hence, I will explain later in tax rule detailed settings.
Tax Zones and Rate: As mentioned above, geographic is one of the factors used to calculate taxes in Magento. Tax zones and rates allow store owners to specify the tax rate for a corresponding geographical area and determine whether that area is taxed or non-taxed.
⇒ How to create a tax zone and rate?
- Method 1: Navigate to Store ⇒ Taxes ⇒ Tax Zones and Rates.
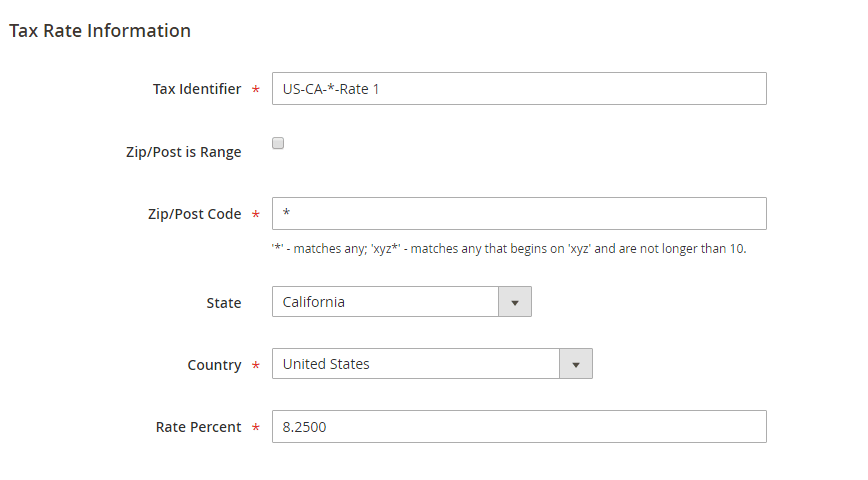
Click Add New Tax Rate button.
In Tax Identifier: enter the name of tax (no space and can separate by “-” or “_”). Naming a tax helps to distinguish tax rates in case a lot of tax rates are applied to an area.
In Zip/Post Code is Range: if ticked, the tax rate is applied in a range. Enter the first and last ZIP or postal code to define the range.
Otherwise, enter a specific postcode in the Zip/Post Code section.
Select a State to apply the tax rate. If the state is not determined, select *.
Select a Country to apply the tax rate.
Enter the Rate Percent to be used to tax calculation.
- Method 2: Import Tax Rates
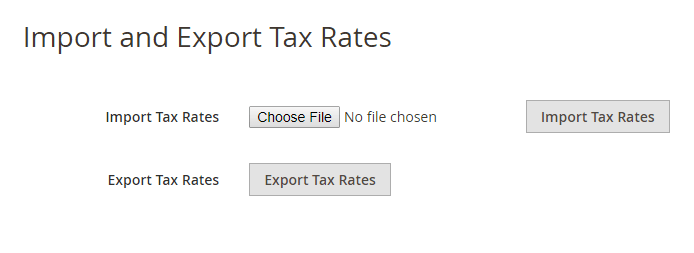
Navigate to System ⇒ Data Transfer ⇒ Import/Export Tax Rates.
Click Choose File to upload the CSV file containing tax rates information.
Then click Import Tax Rate to start processing.
Also, you are also able to export tax rates for other purposes.
6.1.2. Create a Tax rule
Go to Store ⇒ Taxes ⇒ Tax Rules.
Click Add New Tax Rule.
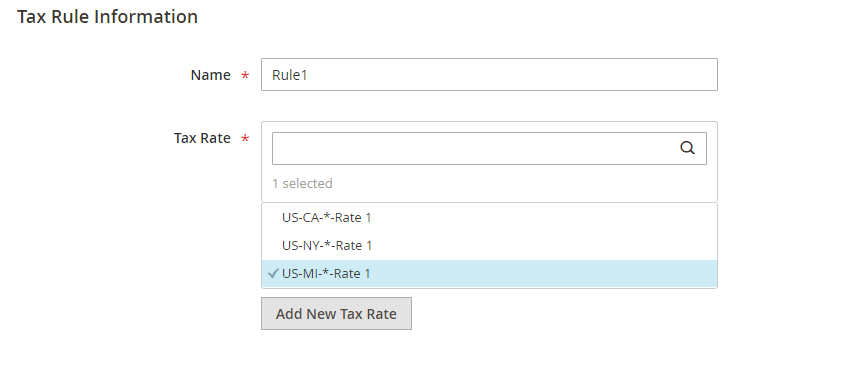
In Name: enter the name of the tax rule.
In Tax Rate: select one tax rate to apply the rule. You are able to add a new tax rate here.
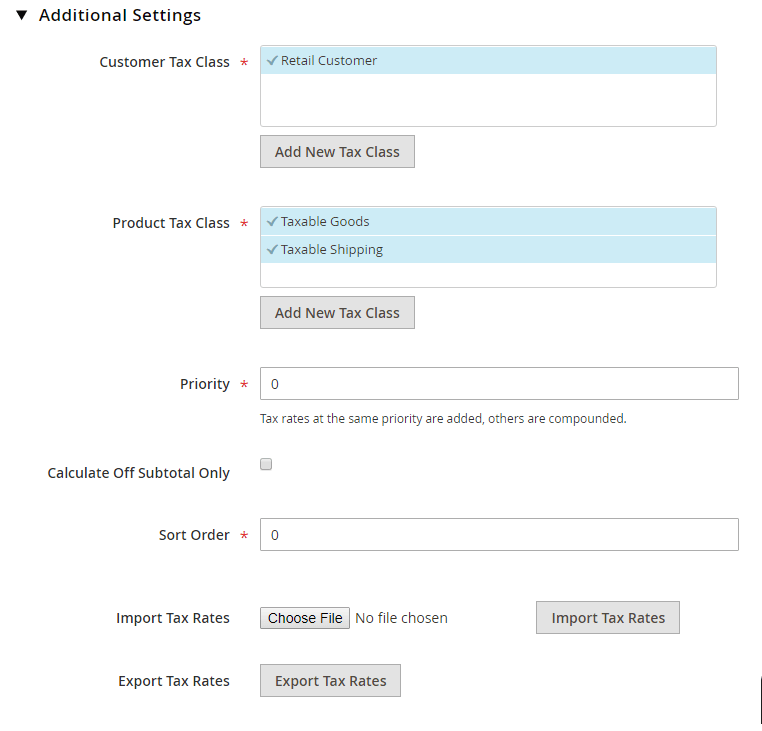
In Customer Tax Class: choose one class to which the rule applies. Click Add New Tax Class to create a new one easily.
In Product Tax Class: choose one class to which the rule applies. Click Add New Tax Class to create a new one easily.
In Priority: enter a number to indicate the priority of this tax, when more than one tax applies. The number for the highest priority is 0, and the higher number is, the lower priority becomes.
*Note: In term of Tax priority, you had better consider the two following cases:
- Case 1: If 2 taxes have the same priority, the tax is separately calculated based on subtotal, then added together.
⇒ For example:
Product price: $100
2 taxes with similar priority are applied for this product
Tax A: rate = 10%
Tax B: rate = 15%
⇒ Total tax = ($100×10%) + ($100×15%) = $25
- Case 2: If 2 taxes have different priorities, the tax is compounded. It means that the tax is calculated and then respectively added depending on the priority number value (Priority equal to 0 – the highest priority is firstly added).
⇒ For example:
Product price: $100
2 taxes with different priorities are applied for this product
Tax A: rate = 10% & priority = 0
Tax B: rate = 15% & priority = 1
⇒ Total tax = ($100×10%) + ($100 + $100×10%)x15% = $26.5
In Calculate Off Subtotal Only: if ticked, the tax is only calculated based on the subtotal and skips priority.
In Sort Order: determine the position of the tax rule in the tax lits.
6.2. System configs affect tax display and tax calculation
Navigate to Store ⇒ Configuration ⇒ Sales ⇒ Tax.
- Expand Tax Classes section:
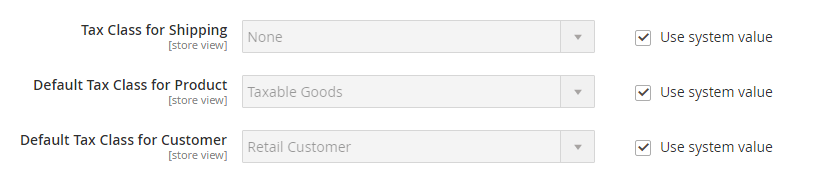
In Tax Class for Shipping: select a tax class to be applied for shipping.
In Default Tax Class for Product: select a tax class to be applied for all products.
In Default Tax Class for Customer: select a tax class to be applied for all customer groups.
- Expand Calculation Settings:
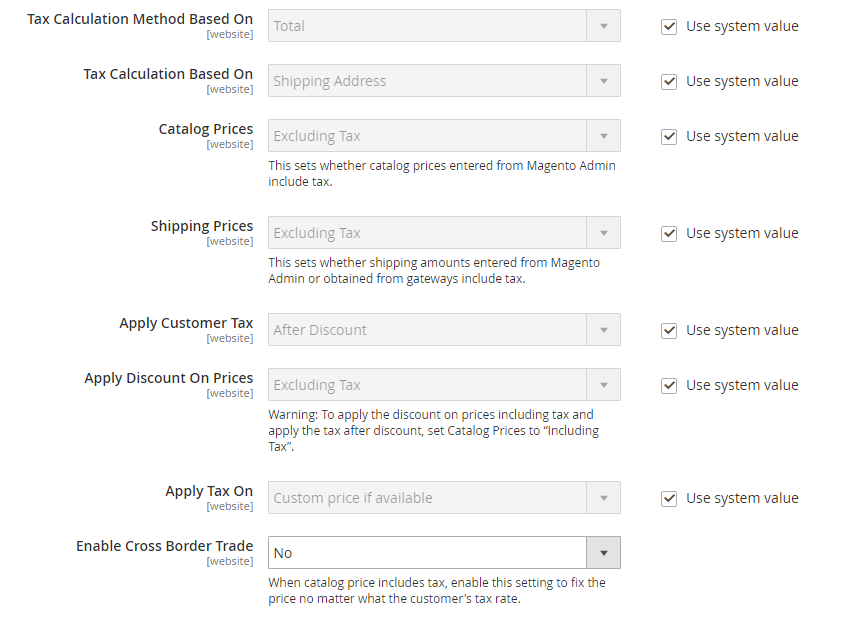
In Tax Calculation Method Based On:
+ Unit Price: Tax is calculated for each product based on the unit price.
+ Row Total: Tax is calculated for each row of products in the shopping cart.
+ Total: Tax is calculated based on the subtotal of all products in an order.
In Tax Calculation Based On:
+ Shipping Address: Tax is calculated based on the shipping address of the order.
+ Billing Address: Tax is calculated based on the billing address.
+ Shipping Origin: Tax is calculated based on the point of origin for the store.
In Catalog Price:
+ Excluding Tax: Prices in the backend don’t include tax.
+ Including Tax: Prices in the backend include tax.
In Shipping Prices:
+ Excluding Tax: Shipping prices in the frontend don’t include tax.
+ Including Tax: Shipping prices in the frontend includes tax.
In Apply Customer Tax: select After Discount or Before Discount to determine which price is applied to calculate taxes.
In Apply Discount on Prices: select After Discount or Before Discount to determine which price is applied to calculate taxes.
In Apply Tax On: Select Set to Custom price if available or Original price only
In Enable Cross Border Trade:
+ Yes: If the catalog price is set as Including tax, this config helps to fix product prices (including tax) equal to the product price in the backend, no matter how much tax rate is.
+ No: allows changing product prices based on tax rates.
7. Final Price
The final price is the total price of products and depends on each product type.
- For simple, virtual, and downloadable products: the final price is the lowest price among regular_price, catalog_rule_price, special_price, and tier_price.
- For configurable products (Magento 2 configurable product price): the final price is the lowest price among base_price, tier_price, index_price, and catalog_rule_price of selected products.
- For grouped products: the final price is the lowest price among all options.
8. Catalog Price Rule
Store owners use catalog price rules to discount products based on conditions. No coupon code is necessary at all, and product prices are directly discounted on the catalog and product pages.
8.1. Add a new catalog price rule
To create a new catalog price rule, navigate to Marketing ⇒ Promotions ⇒ Catalog Price Rule.
Tab Add New Rule button.
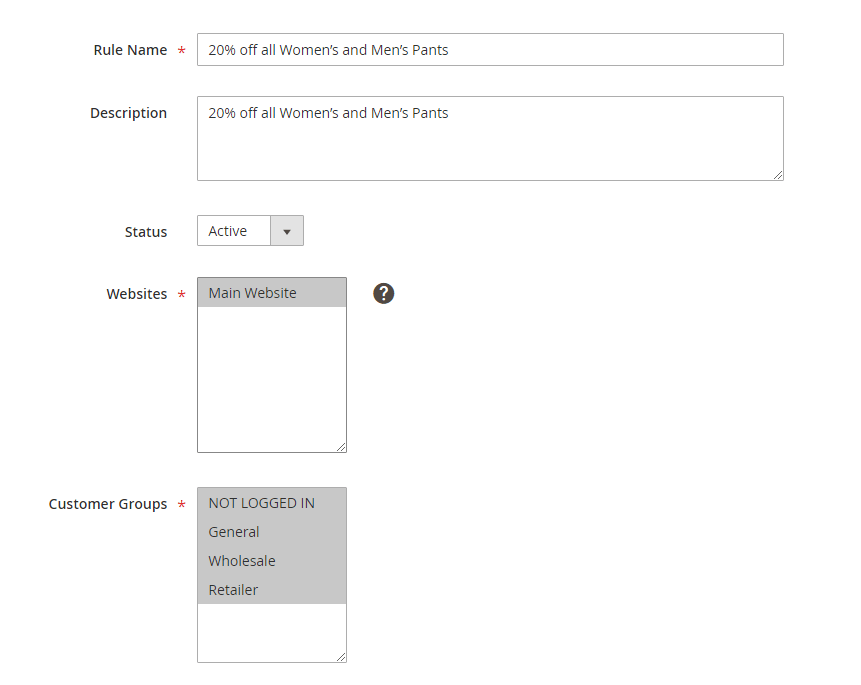
- In Rule Information section: Enter the information for a rule including Rule Name, Description, Status, Websites, Customer Groups, Priority.
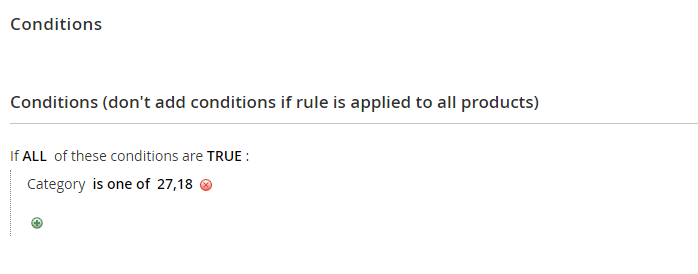
- In Conditions: Based on your promotions, you define proper conditions by using product attributes or combining conditions.
- In Actions:
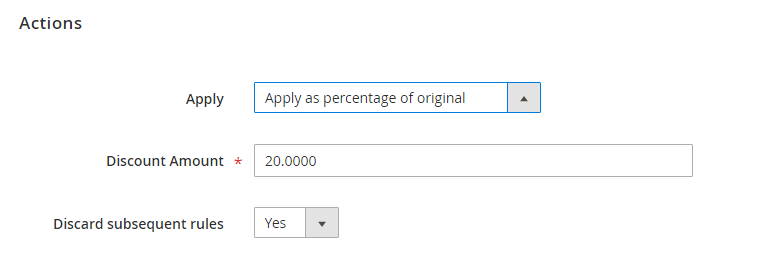
+ Apply: choose one of the following ways to determine how to calculate the discount.
| Apply as percentage of original | Final Price = Regular Price – (Price x the percentage) |
| Apply as fixed amount | Final price = Regular Price – Fixed amount |
| Adjust final price to this percentage | Final price = Old Price x the percentage |
| Adjust final price to discount value | Final price = Fixed discounted amount |
- Enter the Discount Amount
- Discard subsequent rules: Set Yes to stop further processing with other discounts.
⇒ Save the rule and check results on the frontend.
8.2. Customization
As we can see, Catalog Price Rules only apply for the Website and Global scope. Therefore, if your website has multi-stores or multi-store views and you desire to run different catalog price rules per store/store view, you need to step for one more customization by using a module called Catalog Price Rule per Store View.
Custom Pricing adds yet another way for you to display special prices for every single product to different customers or customer groups. It also works with price rules and you can freely pick your products and customers.
9. Cart Price Rule
Unlike Catalog Price Rule, Cart Price Rules are used to discount products in the shopping cart based on specific conditions. This rule can be automatically applied if conditions are met or customers enter a valid coupon code in the shopping cart. Also, customers also know the discount amount under the subtotal in the cart.
9.1. Add a new cart price rule
To create a new shopping cart price rule, navigate to Marketing ⇒ Promotions ⇒ Cart Price Rule.
Tab Add New Rule button.
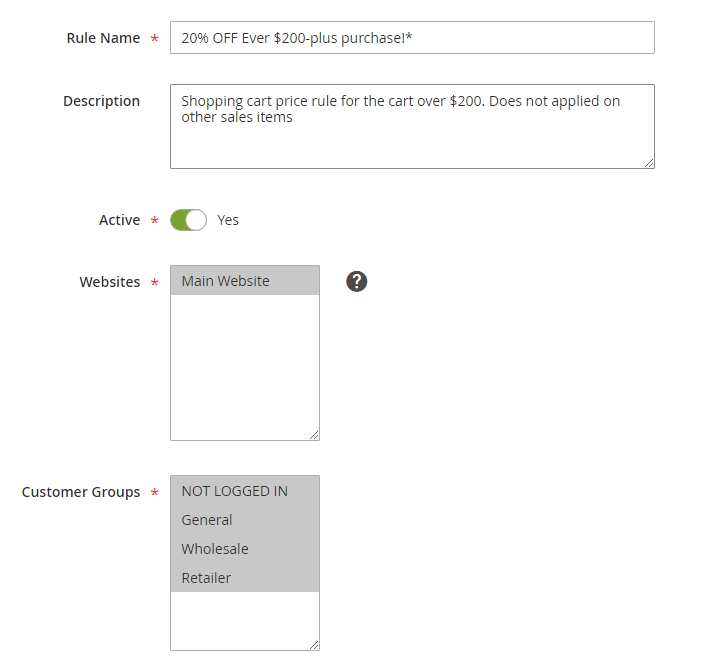
In Rule Information section: Enter the information for a rule including Rule Name, Description, Status, Websites, Customer Groups, and Priority.
In Coupon:
If your rule is automatically applied without any coupon code, choose No coupon
If you want to provide customers with a specific coupon code, select Specific Coupon and then enter coupon code.
- Uses per coupon: specifies how many times the coupon code can be used. If there is no limit, leave the field blank.
- Uses per Customer: specifies how many times the coupon code can be used by the same registered customer belonging to any of the selected customer groups. The setting only applies to Logged in customer groups, not for guests or for customers shopping without logging in. If there is no limit, leave the field blank.
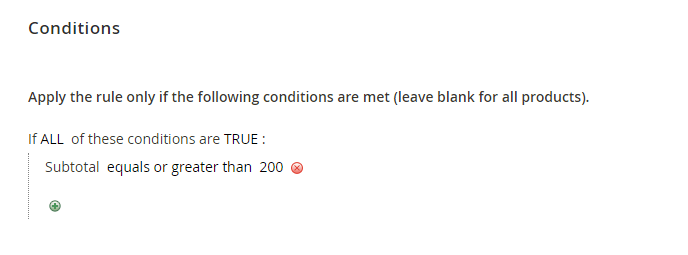
In Conditions section: Based on your promotions, you define proper conditions by using cart attributes or combining conditions.
In Actions section:
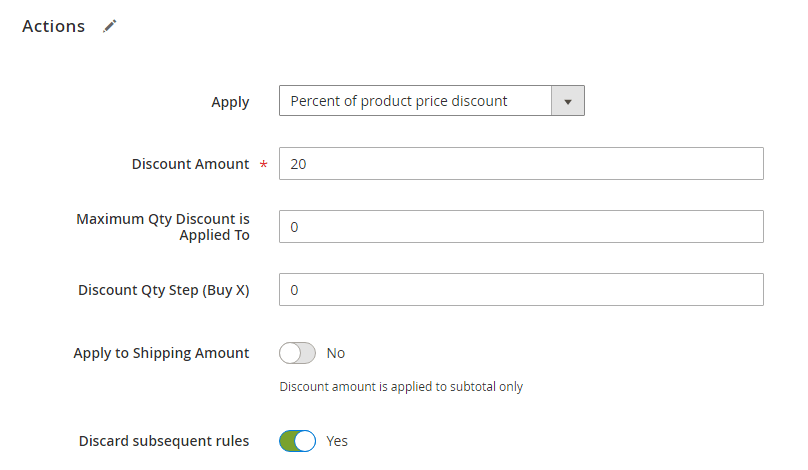
+ Apply: choose one of the following ways to determine how to calculate the discount.
| Percent of product price discount | Discounts item by subtracting a percentage from the original price.
The discount applies to each qualifying item in the cart. |
| Fixed amount discount | Discounts item by subtracting a fixed amount from
the original price of each qualifying item in the cart |
| Fixed amount discount for the whole cart | New total cart total = Original total cart order – a fixed amount |
| Buy X get Y free | Defines a quantity that the customer must purchase to
receive a quantity for free. (The Discount Amount is Y.) |
Enter the Discount Amount as a number to specify a percentage or a fixed amount depending on your choice.
In Maximum Qty Discount is Applied To: enter the maximum quantity of the same product that can qualify for the discount in order.
If you set up Buy X get Y free, you need to enter the quantity in the Discount Qty Step (Buy X) to determine how many products customers have to buy for receiving a discount.
In Apply to Shipping Amount: set Yes or No to apply/not apply the discount for the shipping amount.
In Discard subsequent rules: Set Yes to stop further processing with other discounts.
In Free shipping: If you want to apply free shipping for orders matching conditions, set Free Shipping to one of the following:
| For matching items only | Free shipping applies to items meeting the rule conditions |
| For shipment with matching items | Free shipping applies to shipments that include matching items. |
| No | Not apply free shipping |
Finally, save configs and check results on the frontend.
* Note: You can create a cart price rule to offer a percentage discount based on a minimum purchase. For example, if a customer can receive a 30% discount, he/she purchases products belonging to a category with a subtotal over $1500.
9.2. Customization
To run various cart price rules for each store view, you need to install Magento 2 Shopping Cart Price Rule per Store View extension.
In addition, Special Occasion Coupon module helps to auto-generate coupon code randomly and sending email to customers.
10. Price Box
Price box is responsible for displaying the product price on the frontend. It is recommended that you should install this Magento Catalog extension to manage price box better.
Normally, the product price displayed on the frontend is the final price, the module will call getDisplayValue() function in the Magento\Framework\Pricing\Render\Amount class of both category and product pages. For products with more complicated price display (for Magento 2 configurable product price), there is an additional JS solution to change the price when customers choose various children products. When changing options to make a child product, the module calls updatePrice function in the JS file “Magento_Catalog/js/price-box.js” to update price display. JS component manages price rendering on the frontend.
10.1. Price Priority
The following is a list of Magento prices with the ascending priority:
- Product Price
- Tier Price
- Group Price
- Special Price
- Catalog Rule Price
10.2. Add new price type
- Step 1: Create a module including a di.xml file as below:
<?xml version="1.0"?>

<config xmlns:xsi="http://www.w3.org/2001/XMLSchema-instance" xsi:noNamespaceSchemaLocation="urn:magento:framework:Module/etc/module.xsd">

   <virtualType name="Magento\Catalog\Pricing\Price\Pool" type="Magento\Framework\Pricing\Price\Pool">

       <arguments>

           <argument name="prices" xsi:type="array">

               <item name="my_price" xsi:type="string">MyVendor\MyModule\Pricing\Price\MyPrice</item>

           </argument>

       </arguments>

   </virtualType>

</config>
- Step 2: To add a calculation for the new price type, you need to create a class implement Magento\Framework\Pricing\Price\BasePriceProviderInterface and extend Magento\Framework\Pricing\Price\AbstractPrice.
- Step 3: Create getValue() function and add calculation for the new price type.
10.3. How Magento Renders a Price?
Magento\Catalog\Pricing\Render\FinalPriceBox class and Magento_Catalog::product/price/final_price.phtml template (used to display price) take responsibility for rendering a price in Magento.
If the product has a Magento 2 special price, old and new prices will be shown by calling renderAmount() function in the block.
If the product doesn’t have a special price, the only final price is displayed.
11. Price Indexing
11.1. Definition and index types
Price indexing is the way Magento change data of product and catalog to optimize website performance on the frontend. When data is modified in the backend, these changes need to be updated on the frontend.
⇒ For example: if you increase a product price from $8 to $10, Magento makes reindex to update the changed product price on the frontend.
After being indexed, price values like min_price, max_price, and regular_price are stored in the catalog_product_index_price table corresponding to each website and each customer group.
The value of the final price which is stored in the catalog_product_index_price table is the lowest price among regular_price và specia_price. This solution is called in the getQuery() function of Magento\Catalog\Model\ResourceModel\Product\Indexer\Price\Query\BaseFinalPrice class.
Price index depends on indexers such as Catalog Product Rule, Catalog Rule Product, Catalog Search, and Inventory. When you reindex Catalog Price, these indexers are also indexed.
*Note: Use Magento_Catalog module to manage reindex.
In Magento, there are 2 kinds of index:
- Full reindex: rebuilds every data table of index in the system. Full index often occurs when you update a significant change like adding a new store or creating a new customer group. You can run the Full index by using the command line: bin/magento indexer:reindex
- Partial reindex: only reindex the modified data. For example, you have changed the price of a product, you just need to reindex this product price. Reindexing all products or running Full reindex is not necessary in this case.
(See more about Magento 2 Index HERE)
11.2. Debug
- Check the mode of Index Management config.
- Check whether tables in database are updated or not? (catalog_product_price, catalog_product_price_cl).
- Check Cron of the website.
- Set up crontab file and check whether indexer is matched with the declared class or not?
In case the configuration mode is Update by Schedule, the method executeFull() function is called in the Magento\Catalog\Model\Indexer\Product\Price class.
In case the configuration mode is Update on Save:
- For Bundle and configurable products, the executeRow function is called in the Magento\Catalog\Model\Indexer\Product\Price class.
- For other product types, the executeList function is called in the Magento\Catalog\Model\Indexer\Product\Price class.
Conclusion
Everything about Magento 2 Price stays in 1 place. Either developers or store owners easily understand and apply to their own development and business operation. If you have any questions or suggestions for our article, don’t hesitate to comment. We are always ready to support you!
Nice overview!
Any idea why the priceBox JS doesn’t adjust the price using tier prices when you change the qty?