Magento 2 Pagination Control
Table of Contents
Before knowing how to configure the Magento 2 Pagination, we need to see what is contained inside it.
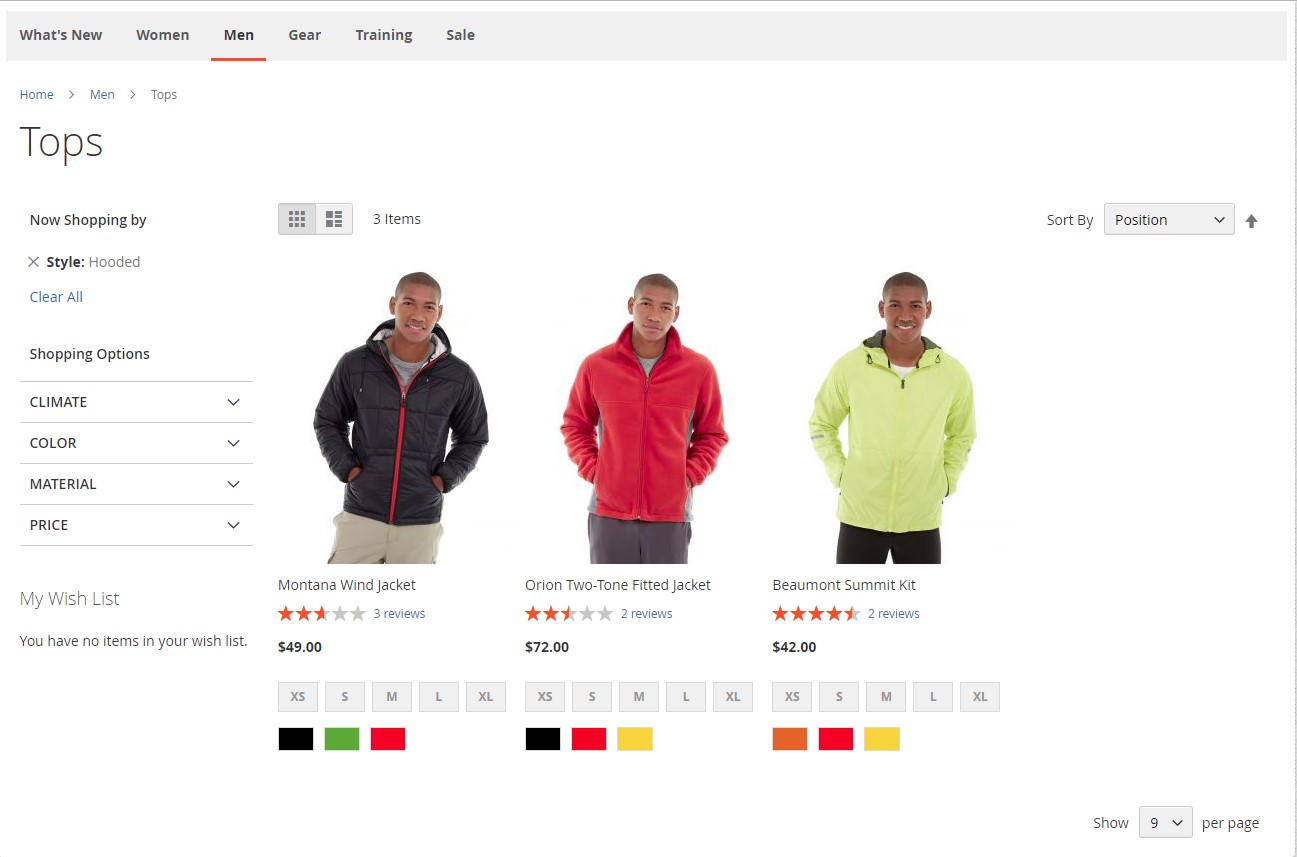
On the front-end UI of the store, whenever a user opens a product list that has the number of products displayed in more than the allowed per page in the product list configuration, the pagination links are about to appear.
Pagination settings appear at four corners on the top and bottom of the list. By choosing between the options within the pagination settings, you can change the format of the pagination links for product listings, set the number of links that appear in the control, and also can configure the Next and Previous links.
For example, in this case, there are three Pagination settings that appear. The Pagination links do not appear because there are only three products on the list and the maximum number of products per page is nine.

Magento 2 Pagination frontend
The four Pagination settings are:
- ‘View As’ – has the option to change between Listing format display and Grid format display.
- ‘Sort By’ – has the option to change the sort order of the list. The ‘Used for Sorting in Product Listing’ storefront property determines which attributes of the product can be used to sort the list.
- ‘Show Per Page’ – has options to change the maximum number of products that can be shown on one page.
- ‘Pagination Links’ – contains navigation links to other pages.
Step-by-step Configuration
In order to Configure the Magento 2 Pagination control, go to the following steps:
Step 1: Go to ‘Content’ => ‘Design’ => ‘Configuration’.
Step 2: A list of store views will appear, choose the store view you want to edit. Then in the Action column, click ‘Edit’.
Step 3: Scroll down to ‘Other setting’ => ‘Pagination’

Magento 2 Pagination Config
Here is the meaning of Pagination Controls:
- The meaning of the ‘Pagination Frame’ field is to decide the number of links that you want to appear in the pagination control. You can enter ‘10’ here, which equals 10 links to be displayed at once.
- In the ‘Pagination Frame Skip’ field, entering the number here means how many links you want to skip ahead before displaying the next set of links in the pagination control.
For example, if your store view pagination frame has ten links, enter ‘7’ into the ‘Pagination Frame Skip’ field then the last three links from the previous set will be the first three links in your next set. - The ‘Anchor Text for Previous’ field, is to choose the text that you want to appear for the Previous link. Leave blank to use the default arrow.
- The ‘Anchor Text for Next’ field, is to choose the text that you want to appear for the Next link. Leave blank to use the default arrow.
Step 4: After you configure the Magento 2 Pagination control, choose ‘Save configuration’ to finish.
Why website need Pagination?
Pagination helps you to shorten loading times and reduce server load. It is indeed faster to get 10-50 products from your database to be displayed each time than retrieving all the products at once which need more data to load. Also, the fewer elements that are presented on a page can reduce loading times.
For some kind of website, more pages mean more display ads inventory. They tend to split the articles into pieces and put them on different pages. So they can maximize the page views and get more impressive.
>>> CHECK OUT Magento eCommerce extensions to obtain all the necessary extensions with robust functionalities!
The new trend
Despite the pros of Pagination, nowadays people tend to click less and less. There is a trend for “more scrolling – less pagination” when many popular services such as Google Image Search and social networks like Facebook, Twitter, Instagram, etc. are now using the AJAX techniques to load automatically additional content as the user scrolls down the page. So for the user experience, Infinite Scroll is much preferable to Pagination.
Check out Infinite Scroll for Magento 2 Extension >>

