For Magento stores, a successful content strategy that attracts potential customers to your website and drives sales is made from an exact website analysis. When mentioning this task (website analysis), Google Analytics 4 is a tool nobody should ignore for its great support. Right in this post, BSS Commerce shares with you 5 easy steps to set up Magento 2 Google Analytics 4 for useful reports about your Magento website.
How to Configure Google Analytics 4 in Magento 2
Table of Contents
This part is a comprehensive tutorial on how to set up Magento 2 GA4.
Method 1. Set up Google Analytics 4 for Magento 2 Manually
Step 1. Create a Google Analytics property
The first thing you need to do is create a new Google Analytics 4 property. Log in to your GA dashboard with your Gmail account and click the settings cog to open up the Account Settings.

In the Property section, click Create Property. Then input your Property Name, Reporting Time Zone, and Currency, then click Next.

You can share some data about your business with Google so they can tailor your experience. However, this part is optional, so you can choose not to share.

Finally, click the Create button.
Step 2. Set up a data stream and get the measurement ID
After creating the property, you need to add a Global Site Tag to your store. Next, set up a Data Stream (which represents which data is collected). Because you are setting up Google Analytics for your online store, select Web in the Choose a Platform section.

A window will be displayed in which you will set up your data stream and get your Measurement ID. Input your Website URL and Stream name.
Then in the Enhanced Measurement section, there will be some default tracking and insights. You can click the settings cog to read more about the events captured and disable some insights you don’t need.

Click the Create button and the Web Stream Details window will be displayed. Here you will see your Measurement ID and the tagging instructions to add the Tracking ID to your Magento store.

In the Tagging Instructions tab, expand the Install manually section and copy the Global Site Tag script there.

Step 3. Set up the Global Site Tag in Magento 2
Now you have your GA4 Global Site Tag, head into your Magento Admin section to add it to your website.
Note: This doesn’t require any coding knowledge, so you don’t need a web developer for it.
First, log in to your Magento Admin and navigate to Content > Design > Configuration.

Choose the Store View you want to add the GA Global Site Tag to and click the Edit button.

Expand the HTML Head section and paste the GA Code you copied into the Scripts and Stylesheets section.

Click the Save Configuration button.
Then in the Magento Admin, navigate to System > Tools > Cache Management.

Click the Flush Magento Cache button and reload your Magento 2 store frontend.
And that’s done. Your Magento website should be tagged with the GA4 tracking code.
Step 4. Verify your Magento 2 store is tagged with GA4 code
There are several ways to check if your store is tagged. In this post, we will show you the two simplest methods.
#1. Verify by inspecting the source code
This is the quickest way to check if your store is properly tagged with Google Analytics code.
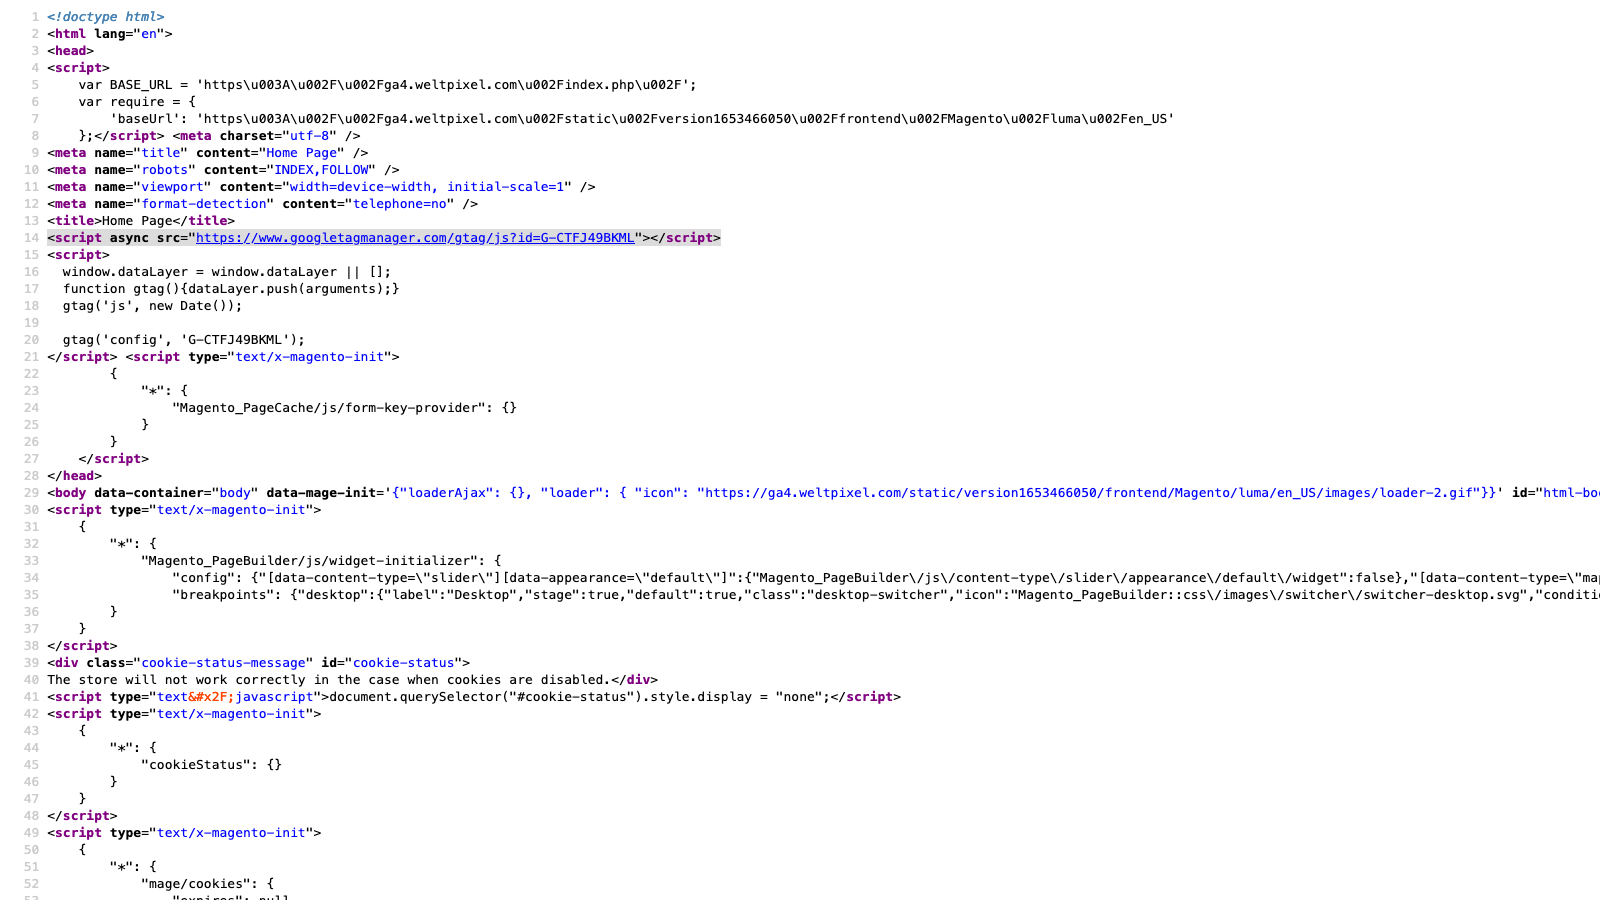
On the front end of your website, right-click and click View Page Source.

Inside the tag, you should see the Tracking ID (Global Site Tag) you inserted in the last step.

If you don’t see it, maybe because your store’s cache hasn’t been cleared successfully or you are using a CDN. You should purge your cache.
#2. Verify by using the Tag Assistant extension
Another method to confirm the GA4 Tag is present is to use the Tag Assistant browser extension.
Take Note: This extension is made by Google, so it’s 100% safe.
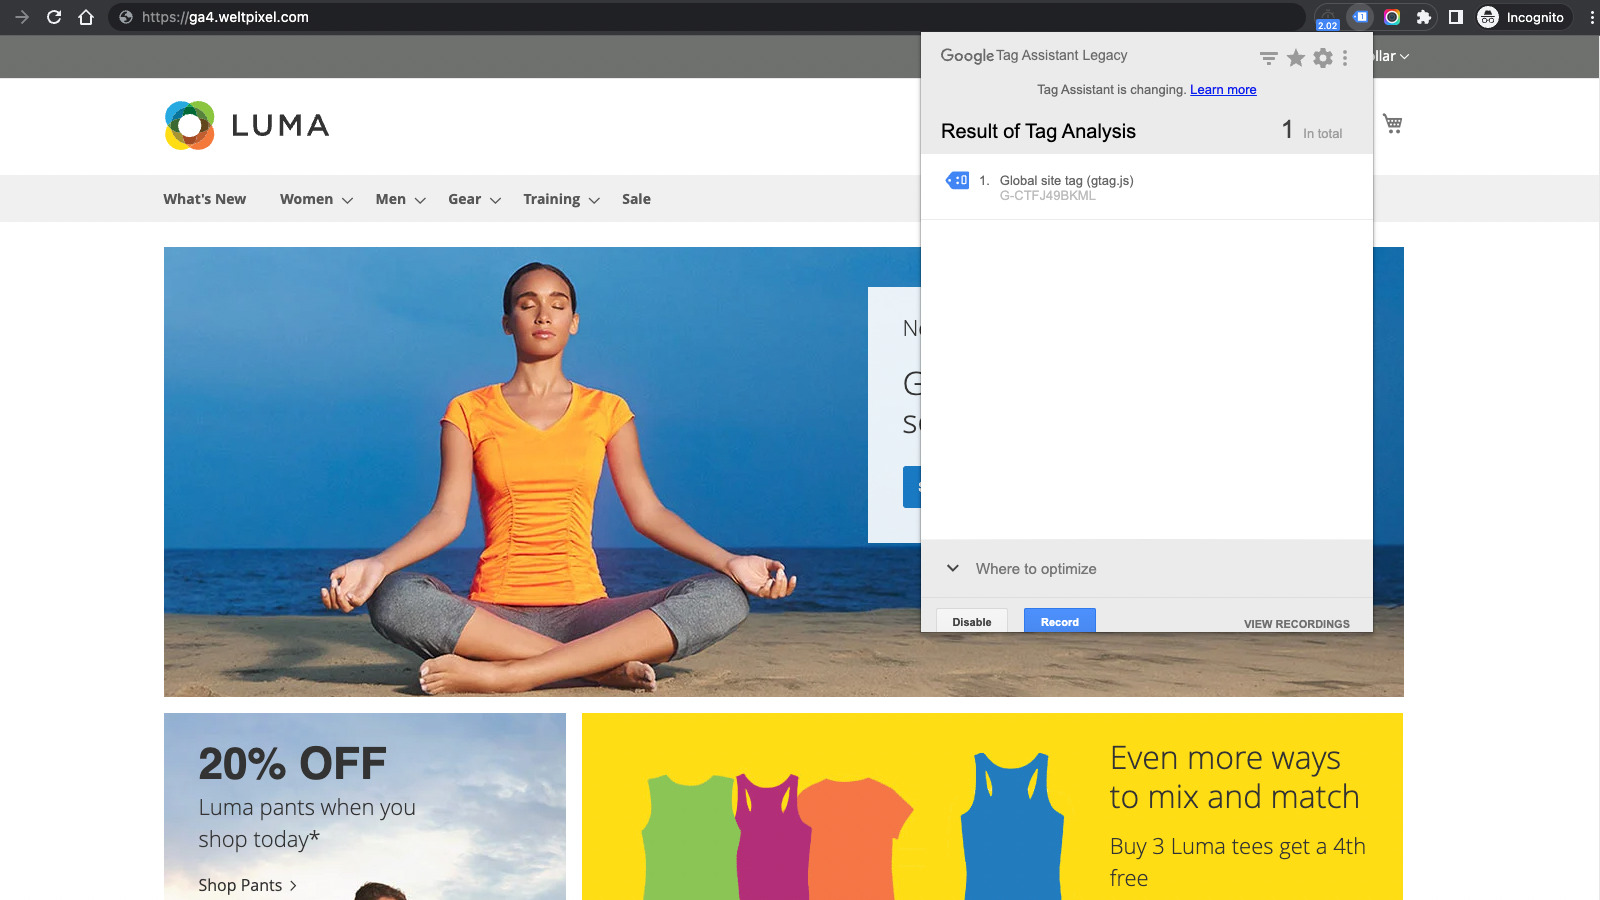
To start, if you don’t already have the extension, you must install it from the extension store. After having it installed, in your browser extension list, click the extension and click Enable.

Then reload the page, click the extension again, and you should see the Global site tag in the Result of Tag Analysis section.

The great thing about the Tag Assistant extension is that you can check a lot of neat information about your Google Tag, such as Container ID, Account ID, etc.
#3. Verify real-time data in Google Analytics 4
After confirming that your GA4 tag is present on your website, next, you should check if the real-time data makes it into your Google Analytics 4 property so you can collect customer behavior data. Log into your Google Analytics account again and select the GA property you just created in the first step.

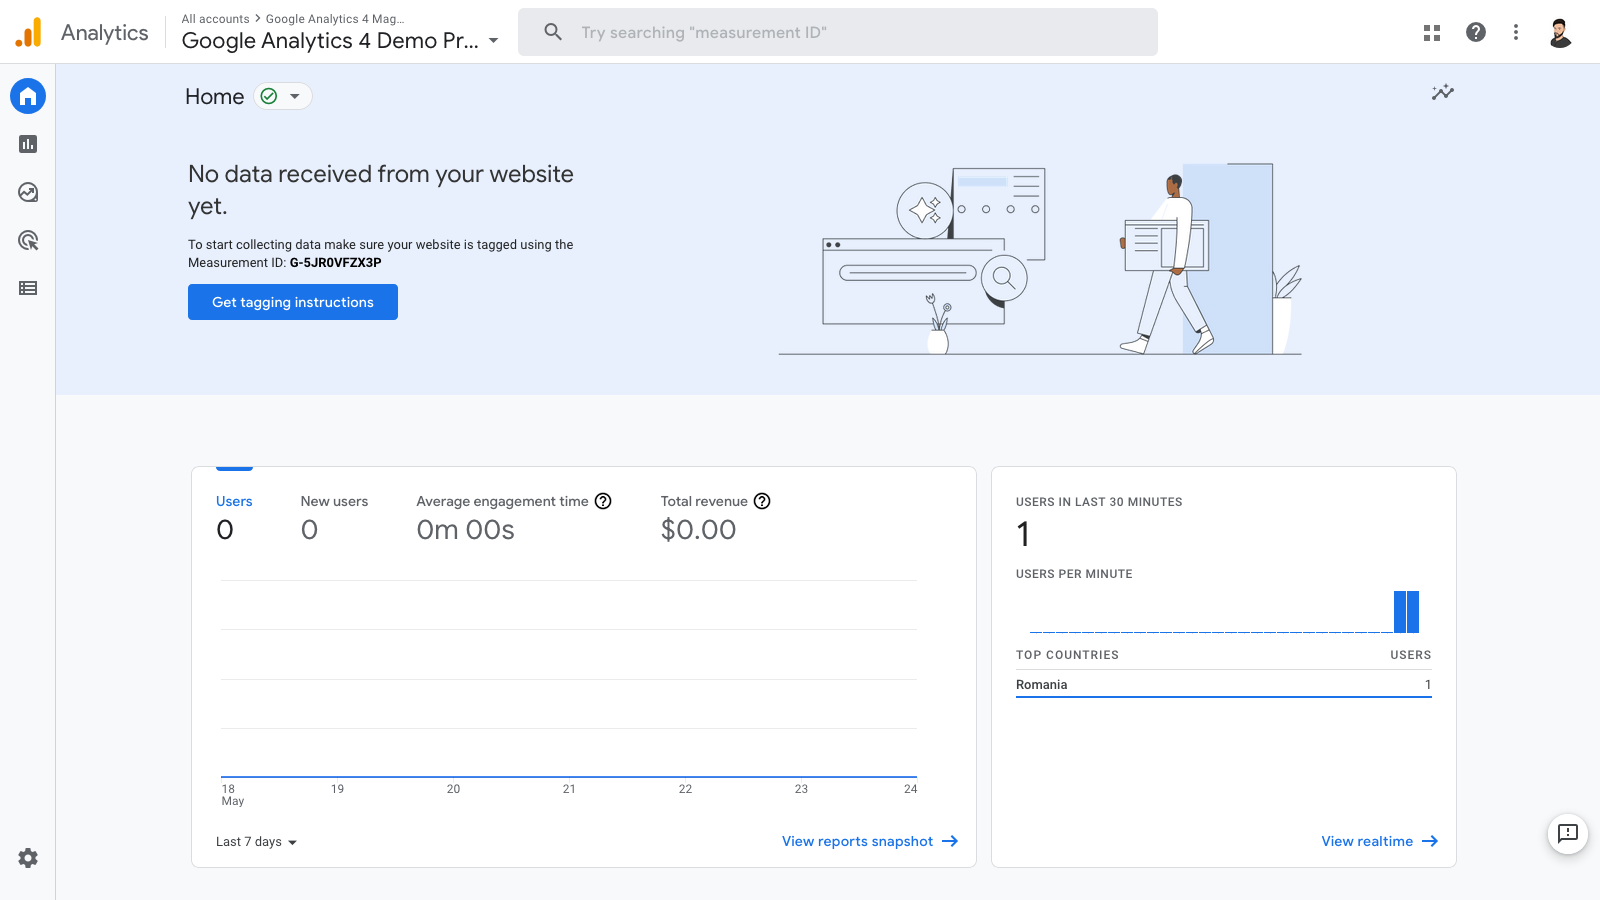
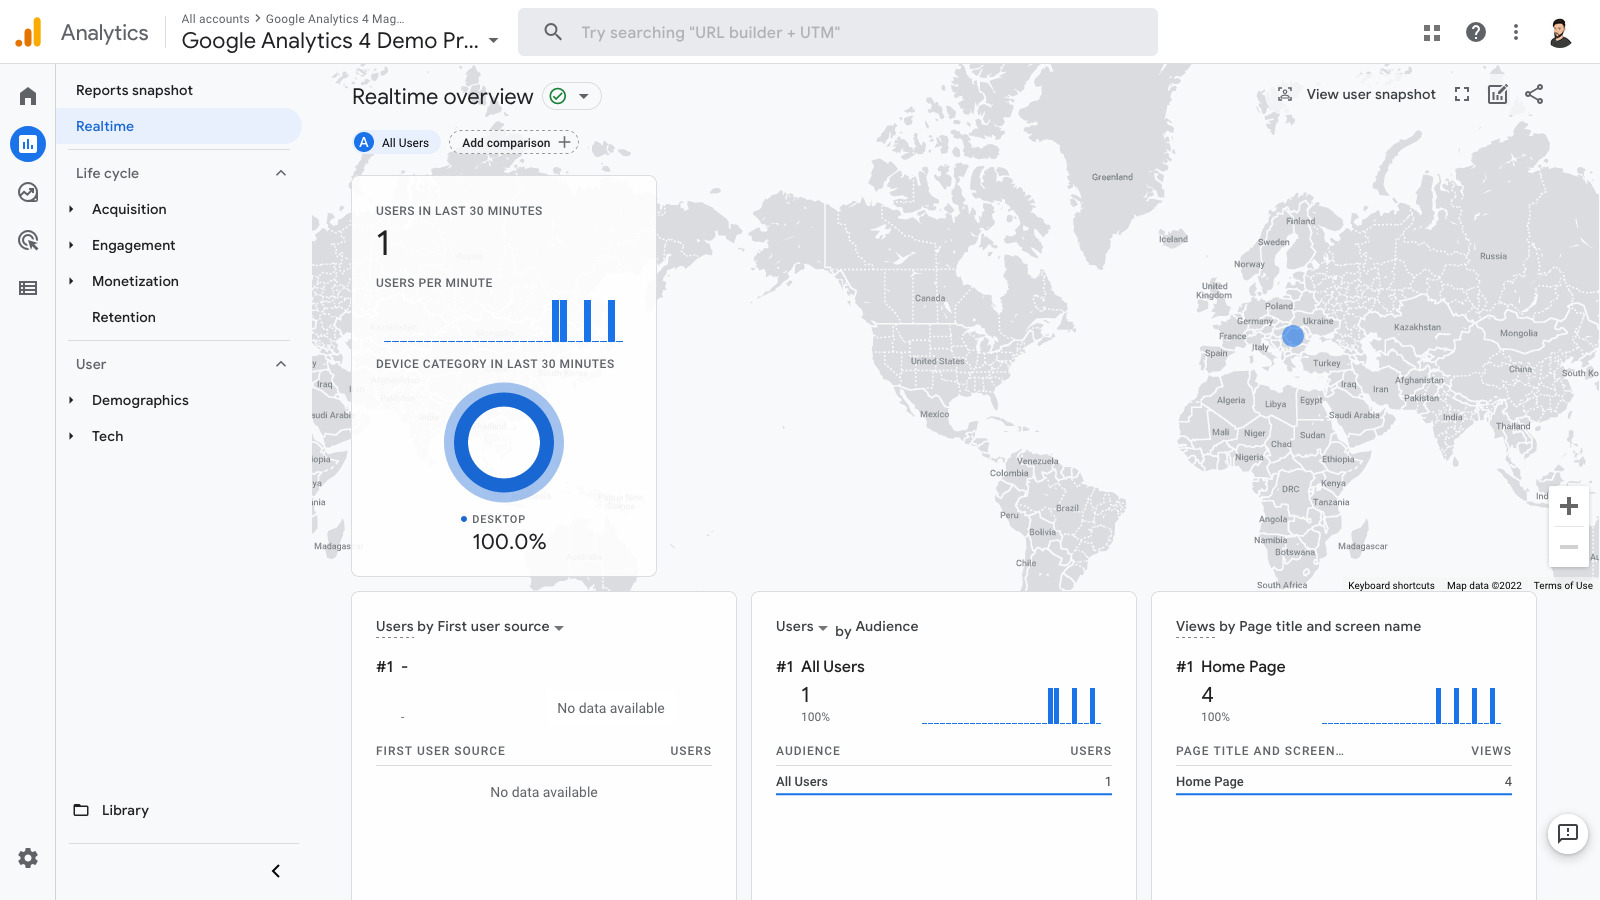
On the left-hand menu, navigate to Home. Note that you might not see much data here yet, because it can take 24-48 hours for it to start reporting data. Next, you can navigate to Realtime to see current visitors on your website in real-time, including yourself.

Method 2. Using Magento 2 Google Analytics 4 Extension
When manually setting up Google Analytics 4 for Magento 2, the intricacies, constraints, and risk of mistakes render it a less favorable choice compared to using GTM or a dedicated Magento 2 extension. Consequently, BSS Commerce advises the use of the Magento 2 Google Analytics 4 extension to enhance your efficiency.
With just one step, you can manage, log, and access essential data for your eCommerce business directly within your Google Analytics account. Stay informed about your purchases, cart additions, impressions, and overall user engagement, allowing you to strategically plan your next actions.
In this guide, BSS Commerce will provide a detailed step-by-step guide to expedite and streamline the setup process:
To begin, let’s get started by installing the Magento 2 Google Analytics 4 Extension. You can install Magento 2 extensions using either Composer or the App/Code method. If you are using the Hyva theme, it is recommended to install the original extension through Composer. Once the purchase is completed, the developer will send you an email containing the download link for this extension.
Navigate to Stores ⇒ Configuration ⇒ BSS COMMERCE ⇒ Google Analytics 4
IMPORTANT: To avoid duplicate events, ensure that the native Magento GA4 feature is disabled if your Magento version supports it: Stores ⇒ Configuration ⇒ Sales ⇒ Google API.
General Configuration

In the Enable section, select Yes to activate the module or No to deactivate it.
Measurement ID: Enter your GA4 Measurement ID. Refer to the instructions below (part 2.2) for guidance on setting up data streams and obtaining the Measurement ID.

Product Identifier: Allow store owners to select attributes for identifying products imported into GA4, either by ID or SKU.
Enable Brand: Select Yes to include the param item_brand in the item’s data; otherwise, select No. (The default setting is No.)
Brand Attribute encompasses all product attributes (both system and custom) available on the site. This configuration enables the store owner to specify which attributes will represent the product’s brand.
Enable Affiliation: Select Yes to include the param affiliation in the item’s data; otherwise, select No. (The default setting is No.)
Affiliation Attribute includes all product attributes (both system and custom) available on the site. This configuration allows the store owner to specify which attributes will represent the product’s affiliation.
Besides, you can also customize the transaction value as follows:
- Determine the price of the bundle product by selecting from three options: minimum, maximum, or average. This feature assists administrators in deciding which bundle price should be displayed on GA4.
- Exclude Shipping Costs from Transaction: Select Yes if you prefer not to include shipping fees in the transactions recorded on GA4. If you wish to include them, select No. (The default setting is No.)
- Exclude Orders with a Value of 0: Choose Yes if you do not want to display orders with a value of 0 on GA4. If you want to include these orders, select No. (The default setting is No.)
How to Get Your GA4 Measurement ID
Step 1. Create an Analytics account if you do not already possess one
- Navigate to Admin, then select the Account column, and choose the option to Create Account.
- Next, enter the account name and configure the data-sharing settings to track the information you share with Google. Finally, click on Next.
Step 2. Proceed to create a property
- Navigate to Admin and select the Property column, then proceed to create a new property.
- Enter a name for the property, followed by selecting the appropriate reporting time zone and currency.
- Click Next and choose your industry classification along with the size of your company. Finally, click on Create.
Step 3. Add a data stream
- Go to the Web section, enter your website URL, activate enhanced measurement if you wish to use eCommerce tracking, and then proceed to create the stream.
Step 4. Get your measurement ID
- Enter your “G-” ID into the Measurement ID field provided by the module. You can find your “G-” ID in the upper right corner.

* Please be aware that starting the data collection process may take as long as 30 minutes. You can verify that data is being received by checking the real-time report or debug mode.
Step 5. Keep track of events in DebugView
DebugView provides a real-time display of events and user properties collected by Analytics, enabling you to troubleshoot issues while installing tags or observing an external user’s live interactions.
To begin, you must install and activate the Google Analytics Debugger extension to turn on debug mode in your browser. Next, to activate debug mode across all user devices, you will need to modify your configuration:
1. Monitor all events
To track all events occurring on a page, include a ‘debug_mode’:true parameter in your config command, as shown below: gtag(‘config’, ‘G-12345ABCDE’, { ‘debug_mode’:true });
2. Monitor specific events
If you wish to monitor only particular events, add the ‘debug_mode’:true parameter solely to those events, for instance: gtag(‘event’, ‘xyz’, { ‘debug_mode’:true });
3. Disable debug mode
To turn off debug mode, simply omit the ‘debug_mode’ parameter; setting it to false will not deactivate debug mode. After enabling debug mode on your devices, navigate to Admin > DebugView in the left-hand menu to observe the events as they occur.

The Seconds stream, located in the middle column, displays events that have been recorded within the past 60 seconds. The Minutes stream, found in the left column, presents a collection of event archives from the last 30 minutes. Meanwhile, the right column highlights the Top Events logged during this 30-minute timeframe, along with the user properties for the device currently selected.
Track Custom Product Attributes: How to Setup
In addition to the standard dimensions offered by Google Analytics, users can add custom parameters for enhanced tracking capabilities. The Magento 2 Google Analytics 4 Extension from BSS Commerce facilitates the creation of custom item-scoped dimensions in the backend, allowing for the inclusion of product attributes such as color, size, product name, and price within the items array of eCommerce events like ‘purchase’ or ‘add_to_cart’.
To do this, you need to (1) add the custom event parameter into your website (which BSS’s module will facilitate), and then (2) establish item-scoped custom dimensions within your GA4 property.

Begin by accessing the backend and navigating to Stores > Configuration > BSS Commerce > Google Analytics 4 > Custom Dimension.
Under Enable Item-scoped, select Yes to activate this feature.
For Related Product Attribute:
To introduce a custom dimension or parameter, click the Add button. You can include a maximum of 10 custom dimensions.
In the Track Custom Attributes column, select the product attributes you wish to track in GA4.
In the Parameter Label column, assign a name to the dimension or parameter corresponding to the chosen attribute.
Take Note: This label must match the name of the item parameter dimension you intend to add to GA4.
Finally, click the Save Config button to complete the process.
After that, create the custom dimension in your GA4 property by following the guidelines provided by Google.
Take Note: The product attributes eligible for tracking are limited to the following formats: ‘text’, ‘textarea’, ‘date’, ‘date/time’, ‘dropdown’, ‘multi-select’, ‘price’, ‘boolean’, ‘swatch_visual’, ‘select’, and ‘swatch_text’. Also, when naming a Dimension, hyphens are not permitted; however, underscores and spaces may be used.
Expected Results
Take Note: It typically takes approximately 24-48 hours for custom parameters to be processed and reflected in Google Analytics. During this timeframe, the displayed value may frequently show as “not set.”
To access all the dimensions added in GA4, you can follow these methods:
(1) View the list of item-scoped dimensions by going to: Admin > Data Display > Custom Definitions.

(2) Check the custom parameters associated with ‘purchase’ or ‘add_to_cart’ events in Google Analytics 4 reports or within Tag Assistant’s Data Layer as follows:

(3) Use the Explore feature in GA4:
Go to the Explore section and select Create New Exploration. On the left side, you will find the Dimensions tab. Click the + button to view all available Dimensions. Select the Custom tab, expand the Custom section, and you will find the dimensions you have added. Your custom dimensions will now be available for use in your reports.

Enhanced Ecommerce Implementation For Magento 2
The guide above has shown you how to implement a simple GA4 tracking integration for your store, which helps you measure:
- Page views
- Scrolls
- Site search
- Outbound clicks
These are all great metrics to track. However, as an eCommerce store owner, you will require more specific and specialized information about your users and products to build business strategies.
![]()
Google Analytics 4 provides an Enhanced eCommerce category to have you track important eCommerce metrics like:
- Conversion rate
- Revenue and Per-product performance
- Product detail metrics
- Checkout steps
- Checkout step drop-off
- Product impressions
- Product clicks
- Cart actions
- Coupon code usage
- Promotional material impressions and clicks
>>> Must know: Top 7 Best Magento 2 Google Analytics 4 Extensions To Track Data
Conclusion
By completing the above steps to set up Magento 2 Google Analytics 4 without difficulty, you have a powerful Magento analytics tool to support your eCommerce business from now on. Your job is to use the reports in a clever way for proper content strategy in the long run. If you do not have enough time to manually set up GA4, we recommend using Magento GA4 extensions. These Magento modules will help you integrate Google Analytics 4 into your store without requiring technical proficiency.
FAQs – Magento 2 Google Analytics 4 Tutorial
1. How does the GA4 tag improve customer insights for my Magento 2 store?
The GA4 tag provides a more comprehensive and accurate picture of your customers. It collects event-based data, allowing you to understand user journeys across different devices and platforms. Additionally, GA4’s machine learning capabilities offer predictive metrics and insights into customer behavior, helping you make data-driven decisions.
3. How can GA4 assist in optimizing the backend functions of my Magento 2 store?
While GA4 primarily focuses on frontend user behavior, it can indirectly help optimize backend functions. By understanding user interactions and identifying bottlenecks, you can optimize product pages, checkout processes, and other frontend elements. This can indirectly impact backend performance by reducing server load and improving overall site speed.
4. Can I use my GA4 measurement ID for API interactions on my Magento 2 platform?
Yes, you can use your GA4 measurement ID for API interactions. However, it’s essential to implement proper event tracking and parameter passing to ensure accurate data collection. Consider using a dedicated API tracking solution or library to streamline the process.
5. Is there a method to evaluate GA4 on my Magento 2 eCommerce site?
To evaluate GA4’s performance, you can:
- Compare GA4 data with previous data: Analyze key metrics and identify trends.
- Test different configurations: Experiment with different event setups and parameters.
- Utilize GA4 debugging tools: Use the debugging mode to verify data collection.
- Monitor data quality: Ensure data accuracy and completeness.
- Set up custom reports: Create reports tailored to your specific needs.


