With Magento 2 Multi store extension, you can have different product catalogs, different store views, different pricing and tailor the shopping experience to your customers in each store. All admin tasks are also simplified with a single backend to manage all stores.
In this guide, BSS Commerce will walk you through the process of setting up multiple stores on Magento 2, providing you with the benefits of using multi-store for Magento 2, tips, and best practices for Magento 2 multi store setup. Now, let’s get started!
Why Should You Use Multi-Store for Magento 2?
Table of Contents
Prior to delving into the steps to create, check out the advantages that come with establishing a Magento 2 multistore, as follows:
1. One-stop SEO management
Without SEO, time and resources are wasted, as it is one of the main prerequisites for occupying high positions on SERPs and attracting consumers. Magento 2 multiple stores of different domains is suggested for implementation because it consolidates SEO activities for different stores, whereby one can carry out monitoring and modification of activities, as well as monitor the effectiveness of the stores.
2. Financial tracking
Just like customer management, keeping track of your financial metrics becomes immensely easier compared to the feat of pulling data from various sources and then compiling it into one location. When managing multiple stores, all the numbers including revenues, taxes, profits, and costs are comforted in one location.
3. Streamlined customer management
Your admin panel will consolidate all the data from various stores, enabling you to effectively monitor customer behaviors across different stores and gain valuable insights for future strategies.
4. Seamless customization for multiple stores
With just a single admin panel, you can manage and customize multiple stores altogether. Each store may have its own themes, configurations, and ways of payment which are all under one control point. A considerable amount of time and energy can be saved by using this effective system. Furthermore, customers from different areas can be served in their own languages by assigning various languages to each store.
5. Optimized operational costs
Your store’s operational expenses will significantly decrease if you centralize all operations through a single admin panel. You won’t need extra staff to manage various tasks and there will be fewer costs for Magento extensions plus third-party integrations.
How to Setup Magento 2 Multi-Store
You can create multiple stores under a single website or set up individual stores under distinct websites for setting up multiple stores under a single administration in Magento 2. Here, BSS Commerce will show you how to set up a new store with its own separate website.
Now, begin by logging into your Magento 2 admin panel and proceeding with the following steps to create multi store in Magento 2:
Step 1: Create root categories
Log in to the Magento Admin as a user authorized to create categories.
Go to Catalog > Categories then click Add Root Category.
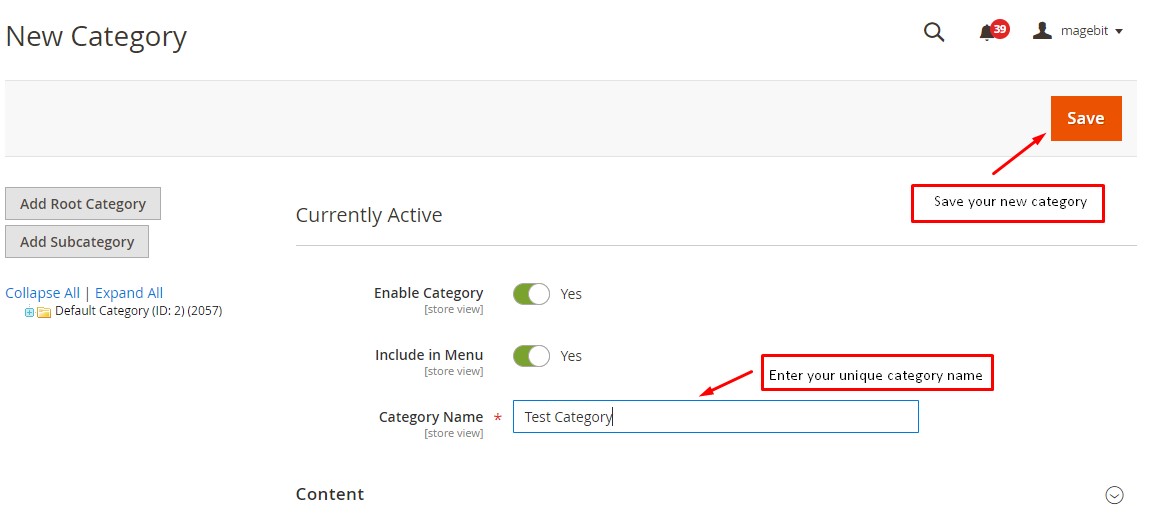
In the Category Name field, enter a unique name to identify the new category.
Set Enable Category to Yes.
Click Save.
Step 2. Build a new website
In the left menu, go to Store > Settings > All Stores. In the All Stores section, select Create Website, and adjust the settings as follows:
- Name: Provide a name for the newly created website.
- Code: Assign a distinct code for the fresh website.
- Sort Order: Specify the desired sort order for the website, with the default being ‘0’. (Optional)
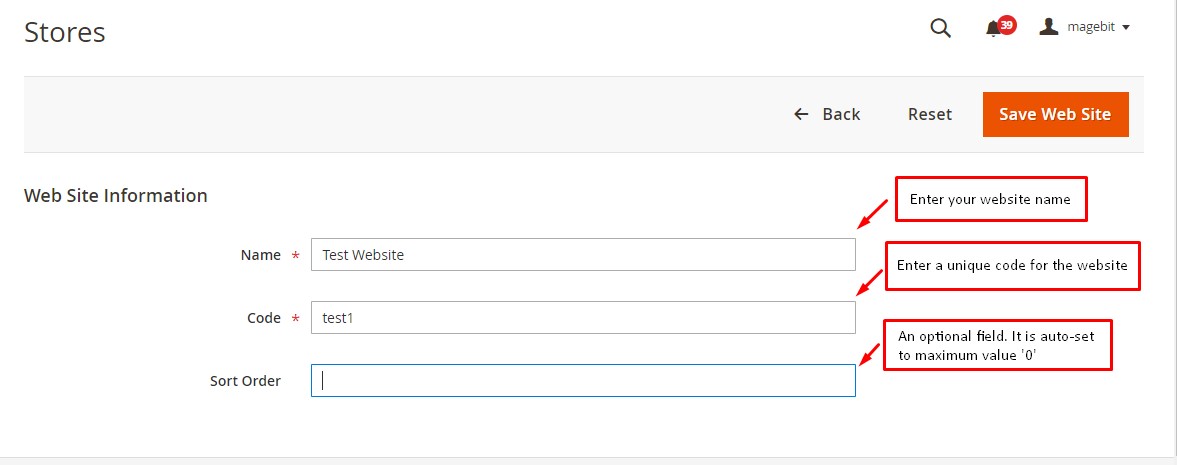
Once done, click on the Save Web Site button to store the new website.
Step 3. Build a new store
Next, to establish a new Magento 2 store, navigate to Store > Settings > All Stores. From there, click on the option to Create Store and proceed to configure the following settings:
- Web Site: Select the website that was previously created. (This store will be created within the chosen website)
- Name: Provide a suitable name for this store.
- Code: Assign a unique code for this store.
- Root Category: Choose the appropriate category for the store view.
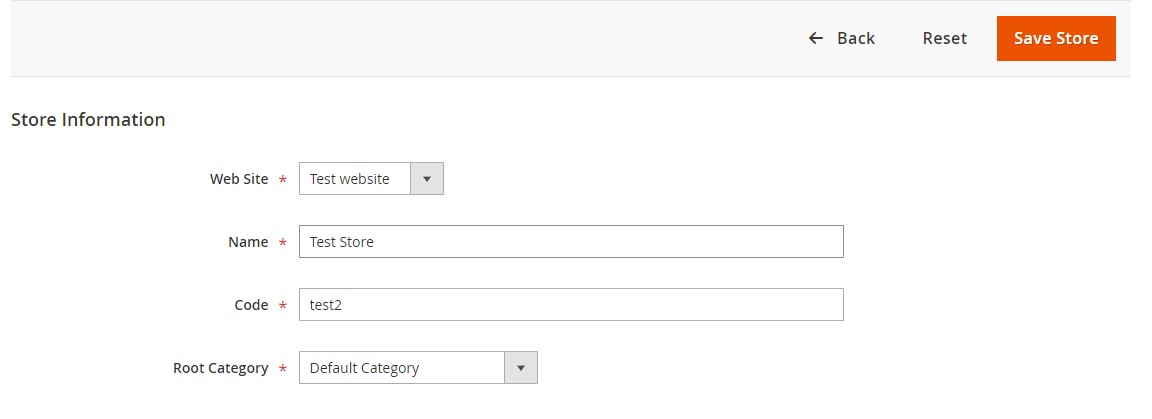
Finally, click on the Save Store button to successfully create a new store in Magento 2.
Step 4. Build a new store view
Establish a new store view within the previously established store. Navigate to Store > Settings > All Stores, and configure a store view with the specified parameters:
- Store: Choose the existing store where the new store view will be created.
- Name: Input the name for the new store view
- Code: Assign a distinct code for the store view.
- Status: Opt for ‘Enable‘ to activate the store view.
- Sort Order: Specify the order for the store view, with the default being ‘0’ (optional).
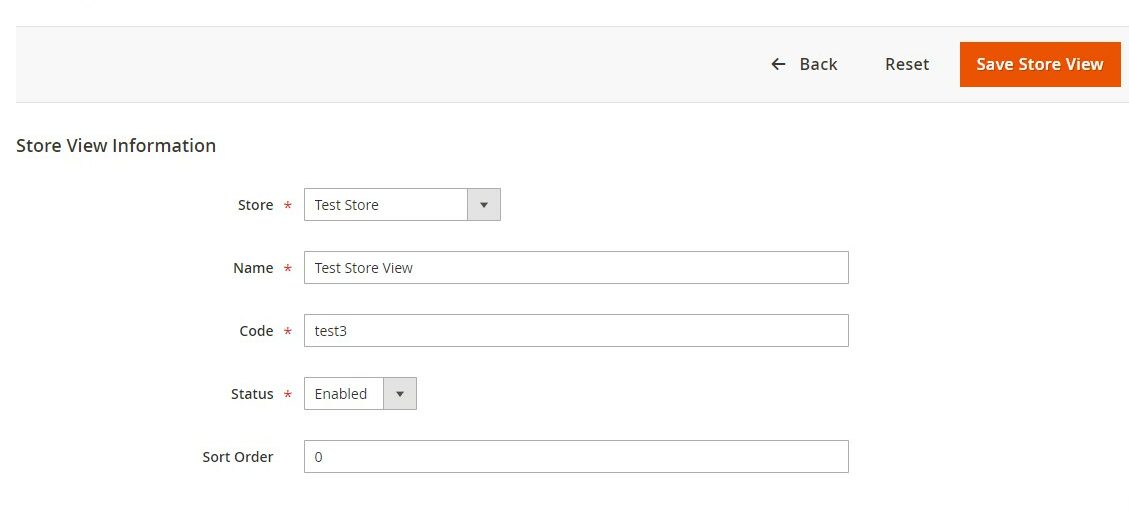
SAVE the store view by clicking on the Save Store View button.
Step 4. Create the base URL
Navigate to Stores > Settings > Configuration > General > Web. Select the website created in Step 1 and expand the Base URLs section. Configure the following settings:
- Base URL: Enter the base URL for the website.
- Base Link URL: Enter the base link URL for the website.
- Base URL for Static View Files (default value): Enter the URL for static view files.
- Base URL for User Media Files (default value): Enter the URL for media files. If needed for ‘https’ access, fill the same in the fields under Base URLs (Secure).
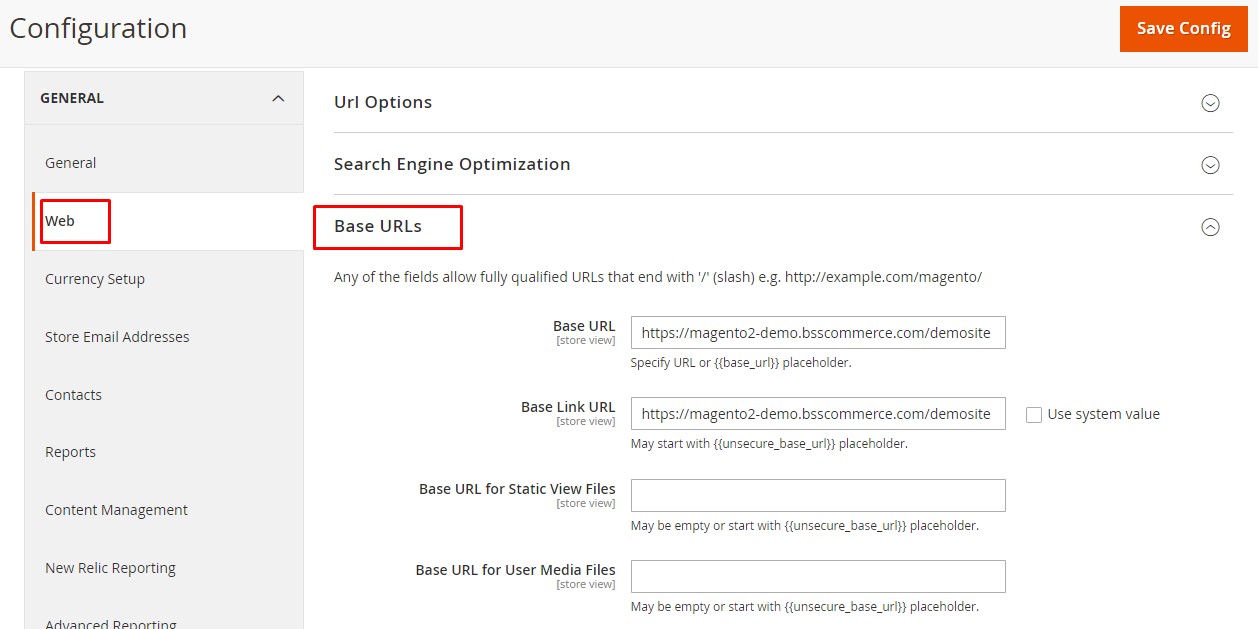
Repeat those steps in the Base URLs (Secure) section.
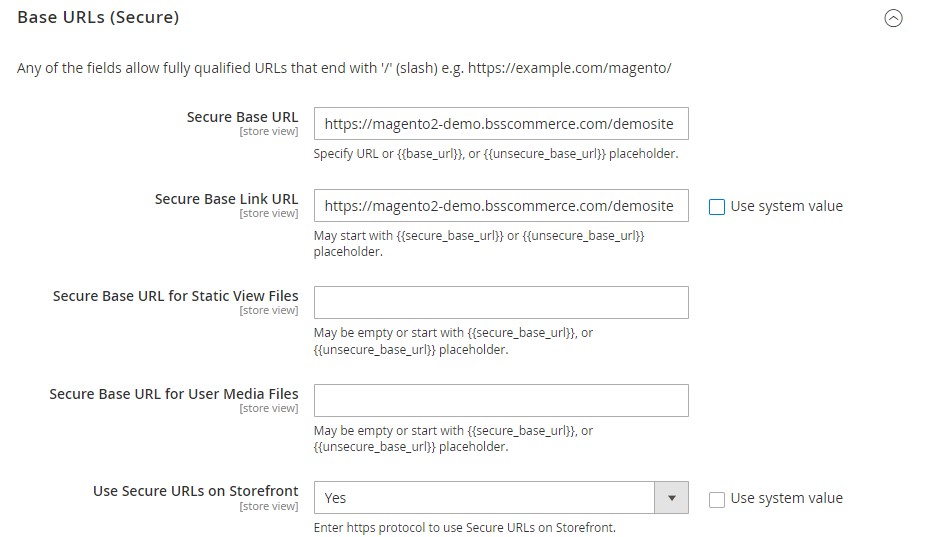
Finally, click on Save Config to save the settings.
Step 5. Add the store code to the base URL
Here are the steps to add store codes to the URL to streamline the process and avoid needing separate directories for each store.
1. Go to Stores > Settings > Configuration > General > Web.
2. Select “Default Config“ from the Store View list at the top of the page.
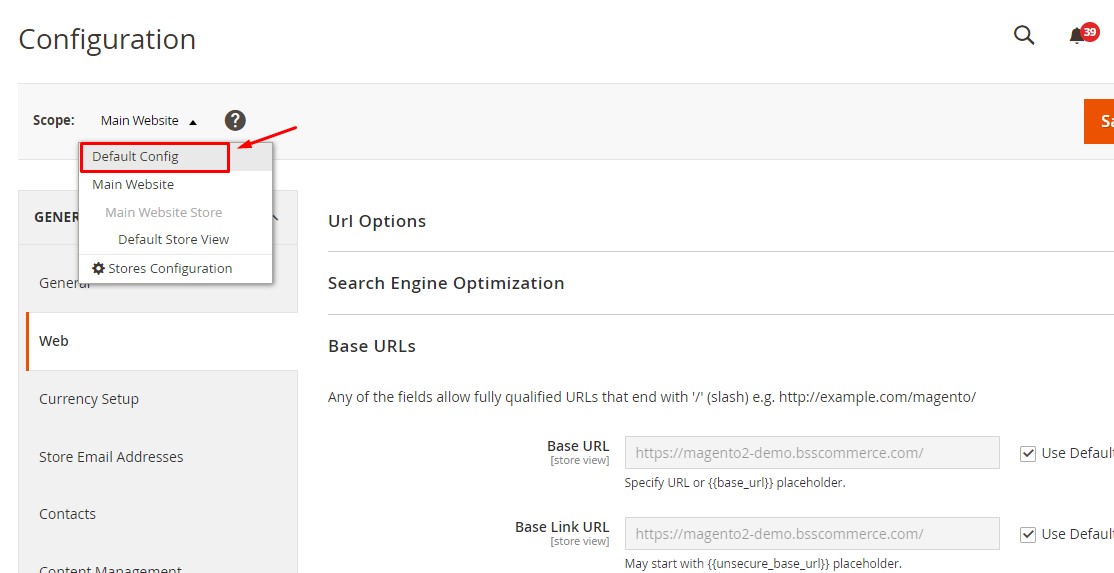
3. Expand the “URL Options“ section and uncheck the “Use system value” checkbox next to “Add Store Code to URLs“.
4. Choose “Yes“ from the “Add Store Code to URLs” list.
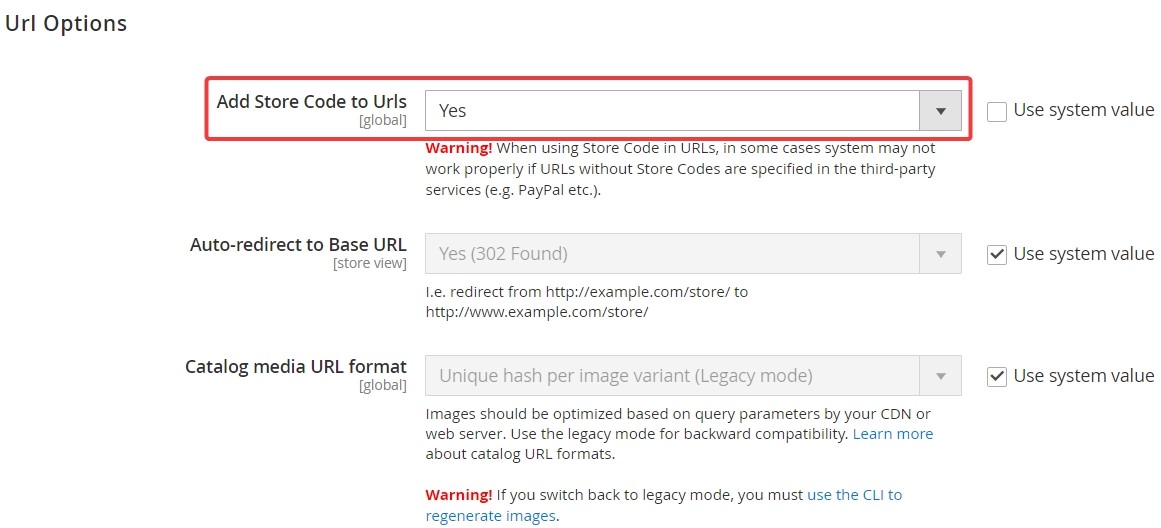
5. Click on “Save Configuration“.
6. If prompted, flush the cache by going to System > Cache Management.
Step 6. Create Apache virtual hosts
In the Magento 2 multi-store setup process, the next step is setting up Apache virtual hosts for each Commerce website.
This guide will demonstrate the procedure for configuring MAGE_RUN_TYPE and MAGE_RUN_CODE values by using the Apache server variable SetEnvIf within a virtual host configuration.
To create Apache virtual hosts, access the virtual host configuration file in a text editor with root privileges.
For instance, open /etc/httpd/conf/httpd.conf. Next, find the section that begins with <VirtualHost *:80>. Subsequently, generate the subsequent virtual hosts following any pre-existing virtual hosts.
<VirtualHost *:80>
   ServerName          mysite.mg
   DocumentRoot        /var/www/html/magento2/pub/
</VirtualHost>

<VirtualHost *:80>
   ServerName          french.mysite.mg
   DocumentRoot        /var/www/html/magento2/pub/
   SetEnv MAGE_RUN_CODE "french"
   SetEnv MAGE_RUN_TYPE "website"
</VirtualHost>

<VirtualHost *:80>
   ServerName          german.mysite.mg
   DocumentRoot        /var/www/html/magento2/pub/
   SetEnv MAGE_RUN_CODE "german"
   SetEnv MAGE_RUN_TYPE "website"
</VirtualHost>
Remember to save your modifications to httpd.conf and close the text editor. Afterward, proceed to restart Apache:
- CentOS: service httpd restart
- Ubuntu: service apache2 restart.
Step 7. Flush the Magento 2 cache
To complete the process, the final step is flushing the cache. This step is extremely straightforward. Go to Systems > Cache Management.
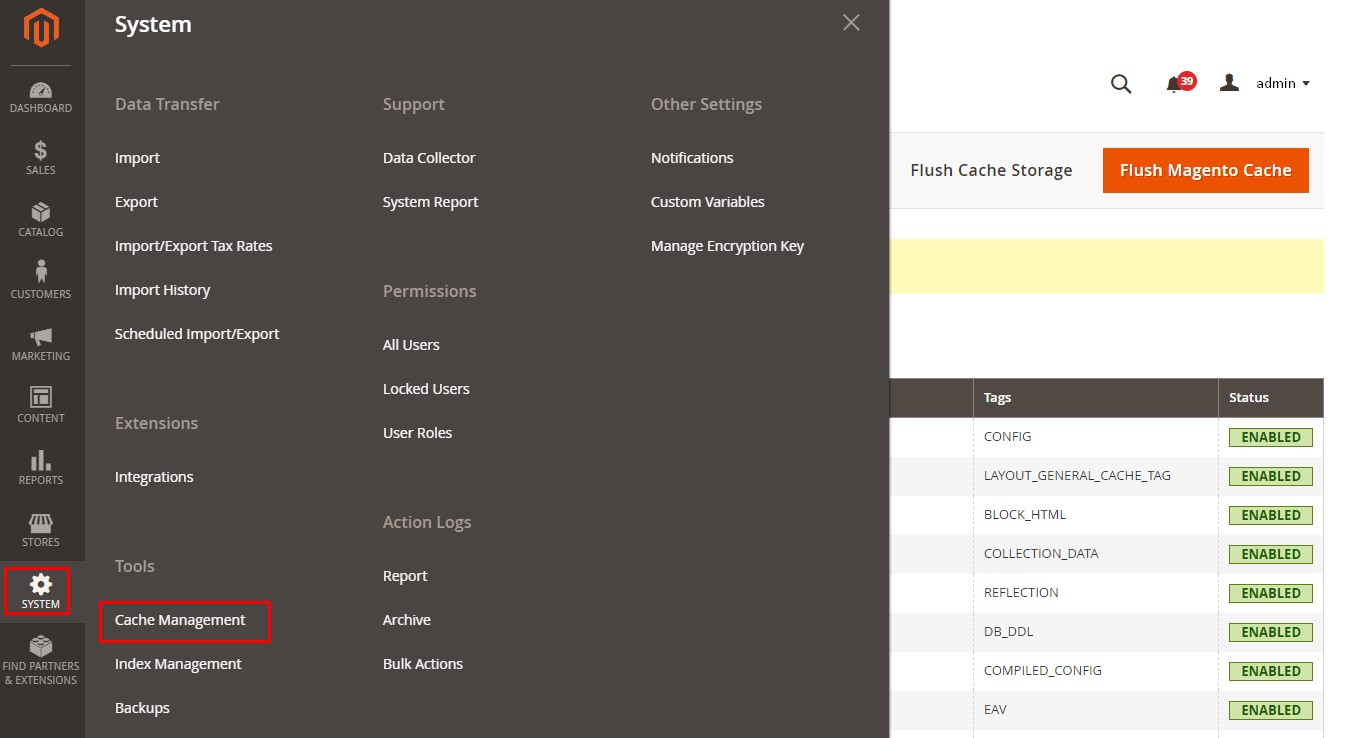
Afterward, click on the “Flush Magento Cache” button and patiently wait for the process to finish.
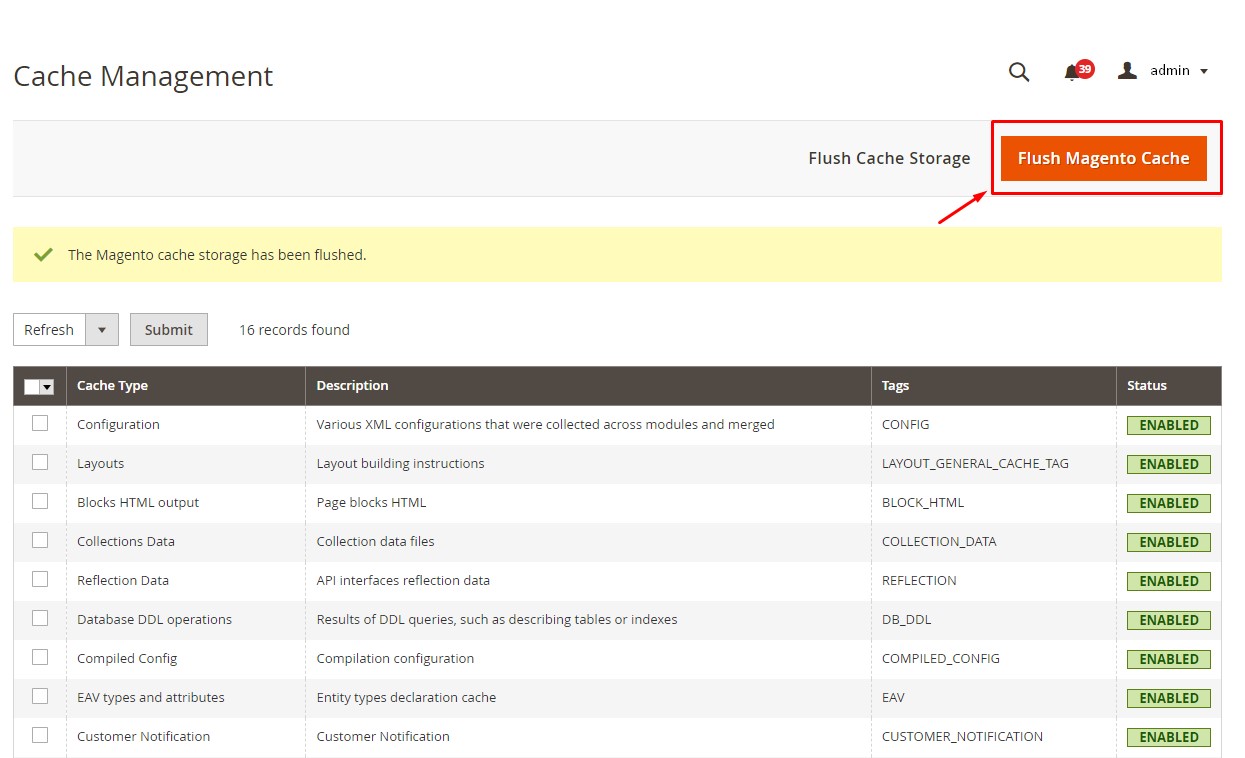
It’s done! You have successfully set up multiple websites and stores in Magento 2. Here’s the result:

>>> READ NOW: Magento developer tutorial for beginners: A Full Guide
Even though your Magento store is easy to use, there might be some problems that people who use your store might run into. To avoid these problems and make things easier for you, BSS Commerce listed common issues that you might face when setting up your store and how to fix them in the section below.
Troubleshooting When Setting Up Magento 2 Multi Store
Now, let us examine several typical problems that may arise during the Magento multi store setup process, along with the best solutions to fix them:
#1. Forbidden Error 403
Throughout the process of setting up multiple stores, it is possible to encounter a 403 error, which signifies forbidden access to the website. This error indicates that you lack the necessary authorization to enter the site. To resolve this matter, let’s understand a few things to check:
File Permissions. To ascertain a correct configuration of Magento 2, check the permissions of both your files and directories in it. You will normally find out that files require permission 664 and directories require permission 775. The permissions can be known as follows:
- find /path/to/your/magento2/ -type f -exec chmod 644 {} \;
- find /path/to/your/magento2/ -type d -exec chmod 755 {} \;.
.htaccess file. Ensure .htaccess file settings are accurate and it is placed in the main folder of Magento 2. It should be the same as the default Magento 2 file. Check for any specific rules set by the user that may have been misconfigured.
Store Configuration. It’s important that you go over the store configurations again through your Magento 2 admin panel with special attention to the store code, Base URLs, and other settings, to ensure that they are in line with the multi-store setup.
URL Rewrite Rules. To ensure the URL Web server Rewrites are enabled, please navigate to the Stores > Configuration > General > Web > Search Engine Optimization section. Double-check that the “Use Web Server Rewrites” setting is “Yes.” This step is crucial in troubleshooting the forbidden 403 error, and you can find more detailed information on this matter by referring to the provided link.
#2. Failure to Display Content on Subdomain
Please ensure that all the required subdirectories are correctly set and that they are correctly linked to these domains. Moreover, you can create a test.php file which you should then proceed to access. By following these simple steps, this issue can be resolved once and for all.
#3. Challenges with Magento Multi-Site Extension
Occasionally, extensions can lead to problems. If your store is a multi-store configuration, then there is an option to keep the extension’s functionalities running in one store while deactivating them in others. However, this should not be an issue most of the time until one mistakenly updates the Magento version.
To avoid this issue BSS provides some Magento 2 multiple store view extensions. They empower you to set up different pricing, currency and language per store view, offering customers a localized shopping experience tailored to their preferences.
#4. Resolving Cookie Issues to Extend Customer Session Duration
With Magento multi-store setup, customers may encounter the issue of session login time per store. When a customer signs in to one store, they are not automatically signed in to another store. However, this can be resolved by adjusting the online session time.
For instance, if a customer logs in to their account on your website, does not log out, closes the browser, or does not browse the site for a period of time before revisiting, they will still be logged in to their account as long as the cookie lifetime has not expired.
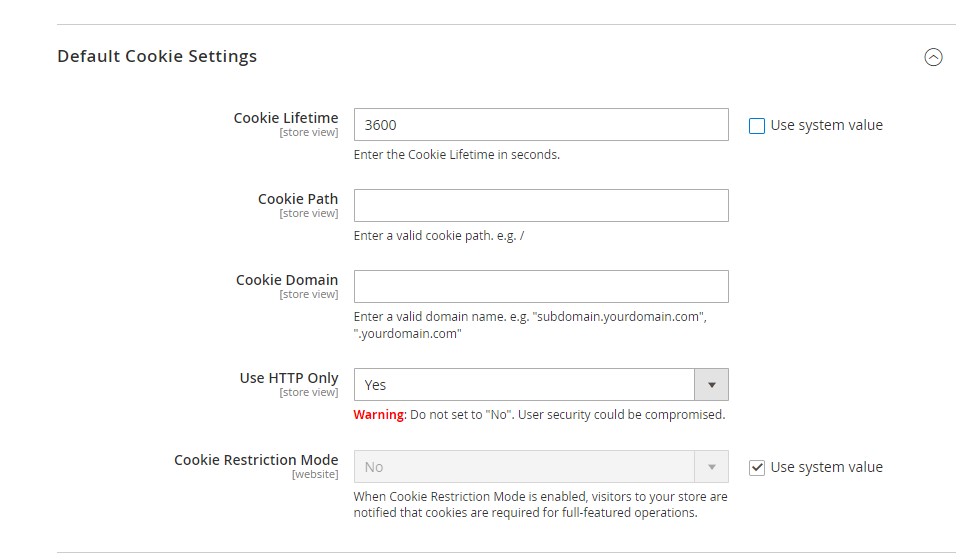
To address this, you can configure the cookie settings in Magento Admin. Simply switch to the specific store and adjust the cookie value for that particular store.
To do this, go to Stores > Configuration > General > Web > Default Cookie Settings > Cookie Lifetime.
#5. Multiple Stores Sharing the Same Code
If you plan to have many shops and aim at putting store codes into store views on each of them when coming up with numerous stores, you might find it difficult because of misconfigurations.
For example, if you have two stores with their individual domains (.be and .nl) and want both websites to use English as their default language for URL store which is /en/.One way to do it would be creating different folders in Magento’s root directory for every store code like pub/en or pub/nl respectively; these directories will work as document roots pointed out specific views only within the site structure. To make above happen just put up those ones under directory “pub” available under Magento installation on the server. The structure of these folders should resemble the following:
- /es/hair
- /es/pets
- /fr/hair
- /fr/pets
Within these folders, you should copy both the .htaccess and index.php files from the magento/pub folder.
#6. Troubles with Enabling Customers to Log in to Multiple Stores using the Same Credentials
In certain instances, your various stores may serve distinct purposes but for a common objective. During such occasions, it is imperative that your visitors are able to sign in to all your sites using the same login credentials. Imposing the requirement for individual accounts on each site will only lead to frustration and ultimately drive them away.
To prevent this problem, you can provide your customers with access to multiple stores using the same login details. Here’s how:
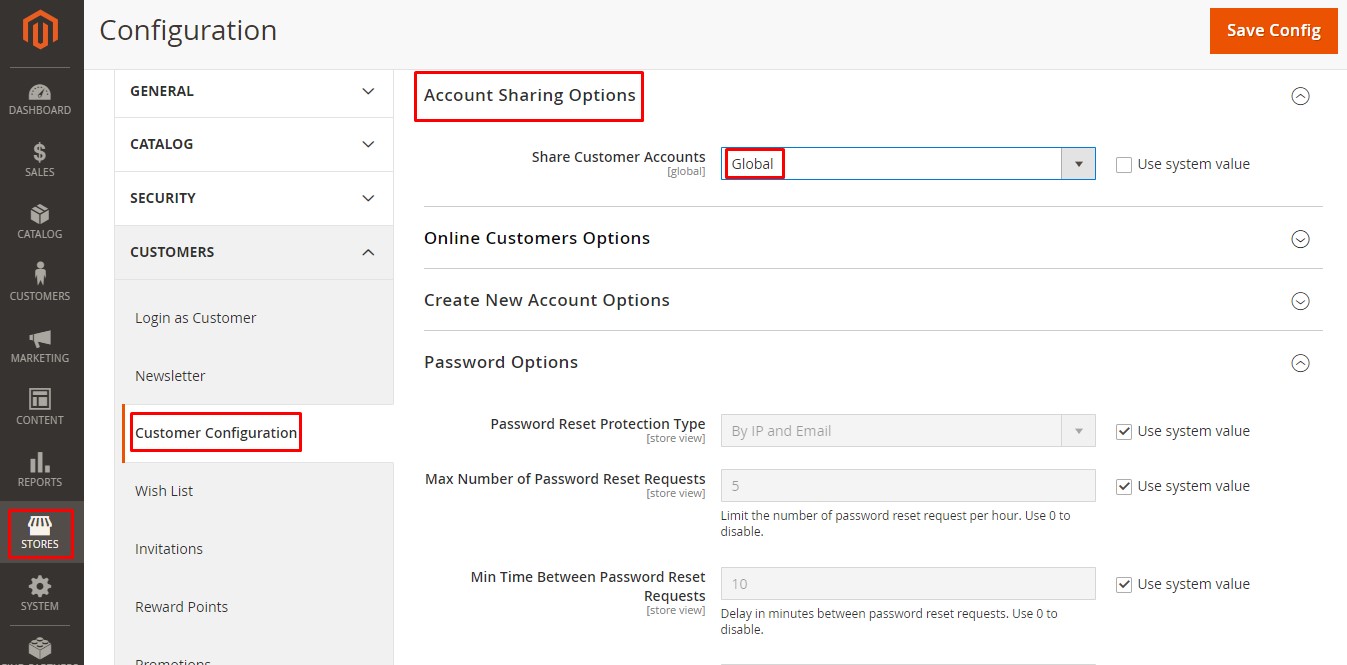
Step 1. Navigate to Stores
Step 2. Select Settings
Step 3. Click on Configuration
Step 4. Proceed to Customers
Step 5. Choose Customer Configuration
Step 6. Locate the Account Sharing Options section
In this section, modify the setting “Share Customer Accounts” to “Global“
Tips and Best Practices for Magento 2 Multi-store Setup
Setting up a Magento multi store can be effortlessly accomplished by following the steps outlined earlier. By adhering to these guidelines, you will successfully reach your goal. Nevertheless, there are some advanced tips to consider while setting up your Magento multi store:
#1. Separate Folders for Each Website
Make sure that the domain name you intend to use directs to the server. In case you possess several domains and aim to establish the store with the same codes, adhere to the steps provided below:
- Establish a subfolder with the preferred name, for instance, /jp/.
- Duplicate index.php & .htaccess from the root (!it is crucial to copy both files).
- Access index.php to erase all content within it.
- Modify both Base URLs and Base URLs (Secure) Links to, for example, example.com/jp
- Save the changes. Clear the Cache. Reindex.
- Experience your fresh website within a subdirectory.
When setting up a multi-store configuration for Magento 2, you can choose the URL structure according to your preference. An example of a shared domain with distinct slugs or paths is as follows:
- domain.com/store1
- domain.com/store2
To properly point the domain, adhere to the following instructions:
Establish a server alias pointer domain for your additional store. This pointer domain should direct to the primary domain of your Magento setup.
Edit the index.php file by inserting the following code:
<?php
$params = $_SERVER;
$params[\Magento\Store\Model\StoreManager::PARAM_RUN_CODE] = 'yourcode.yourdomain.com';
$params[\Magento\Store\Model\StoreManager::PARAM_RUN_TYPE] = 'website';
$bootstrap = \Magento\Framework\App\Bootstrap::create(BP, $params);
$app = $bootstrap->createApplication('Magento\Framework\App\Http');
$bootstrap->run($app);
?>
Save the index.php file
Make alterations to the .htaccess file located in the root directory of your Magento installation. Insert the provided code just before the line that says RewriteEngine On.
- SetEnvIf Host .*[StoreCode].* MAGE_RUN_CODE=[StoreCode]
- SetEnvIf Host .*[StoreCode].* MAGE_RUN_TYPE=website or store
After successfully configuring your pointer domain to function with Magento, you can commence building your new store.
To streamline operations and minimize complications, use a unified database for all your stores so long as they have common products and customer information which consequently leads to synchronization that cuts down on overhead and complexity.
#4. URL Configuration
Establish custom URLs for each store or store view in advanced multi-store setups. Ensure URL rewriting is set up to ensure that SEO-friendly URLs work correctly on all stores.
#5. Multi-Website Setup
For intricate multi-store structures, it will be important to make sure that many websites are created in one Magento instance. Appropriate website-specific settings have to be efficiently managed; these include databases, design themes, and configuration scopes.
Wrapping Up – Magento 2 Multi Store Setup
To conclude, the advantages of the Magento 2 multi store setup are numerous. Not only makes it easily manageable and reduces the cost but helps in optimizing the resources. With this comprehensive tutorial by BSS Commerce, you can easily set up multiple stores in Magento 2 with unlimited numbers of stores. Besides, you can run them effectively through just one admin panel.
After creating magento 2 multiple stores with different domains, you can install Magento extensions for multiple store views to set up different prices, promotions, and discounts for each store view. Explore these extensions now:
- Magento 2 different price per store view
- Magento 2 cart price rules extension per store view
- Magento catalog price rules per store view
However, remember that improper execution may lead to a flawed setup. In such instances, rectifying the issues can be quite troublesome.
On the other hand, if you are uncertain about handling the setup yourself, it is highly advisable to seek the assistance of Magento 2 development services to ensure that the task is completed proficiently on your behalf.

