
Read this article to know 6 steps to configure Magento 2 SEO like a PRO along with all helpful information and tool to shorten the SEO process!
Search engine optimization is key to one’s business success in this digital world. But, it shouldn’t be time and resource-inducing.
Luckily, if you choose Magento 2 to host and run your store, you’ve already had an edge on a solid SEO foundation.
Now, let’s learn how to tap into that ground and get your site into a great ranking shape in 2022.
The Bread-N-Butter Of This Post
Table of Contents
We’re going to learn how to turn Magento 2 into a ranking machine for your online store. The keyword here is “configure correctly.”
As you can see here, today, we will tackle the 1st block in three-pillars of Magento 2 SEO: Technology.
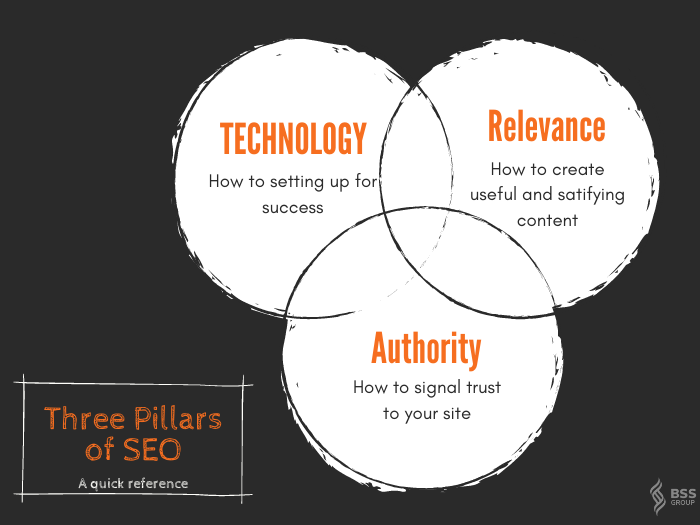
Don’t worry. We’ll also sprinkle around tips/tricks and helpful resources that help you better of the other two pillars as well.
But First, How Can I Determine My Current Magento 2 SEO?
That’s a valid question. Before jumping into changing things, you must know what your current stats are.
And we have exactly that for you!
>>> GET LISTED to receive FREE SEO audit from BSS <<<
Our SEO audit has three reports with notes and recommendations for you to switch it up and perfect your SEO.
Don’t be hesitate. The offers are flying out.
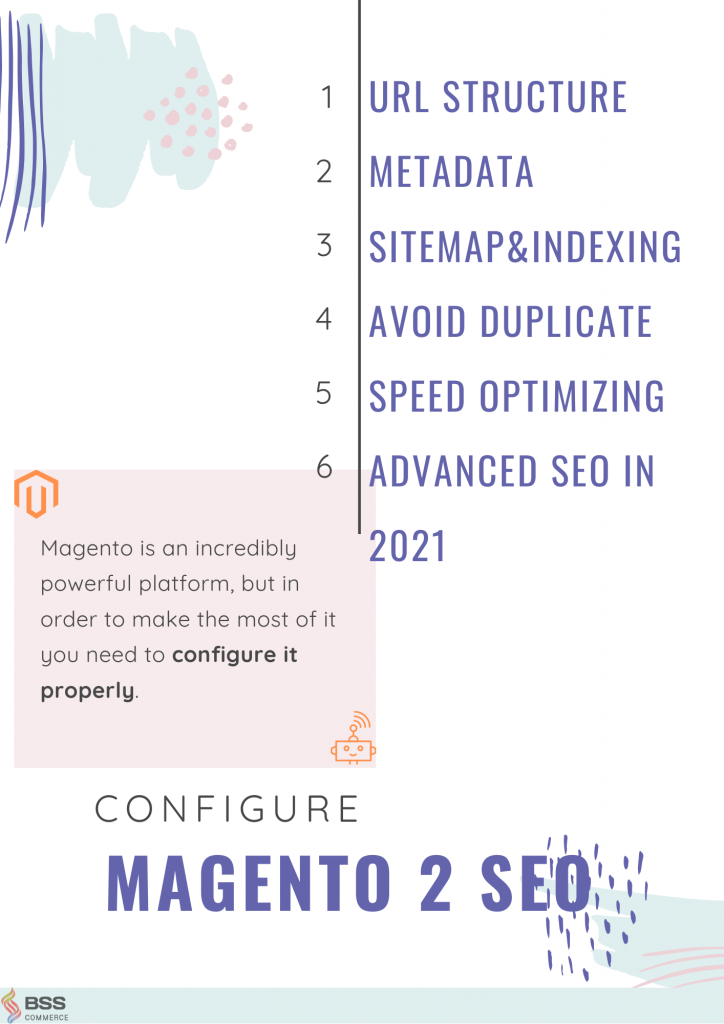
1. Set Up A SEO-friendly URL Structure
The goal here is to make all your URLs:
- Readable
- Short
- Organized
Then, put them into their appropriate categories without search engines registering them as duplicate pages (later down the post!)
Make the URL readable and formulated
First, this is how you recognize your URL readability.
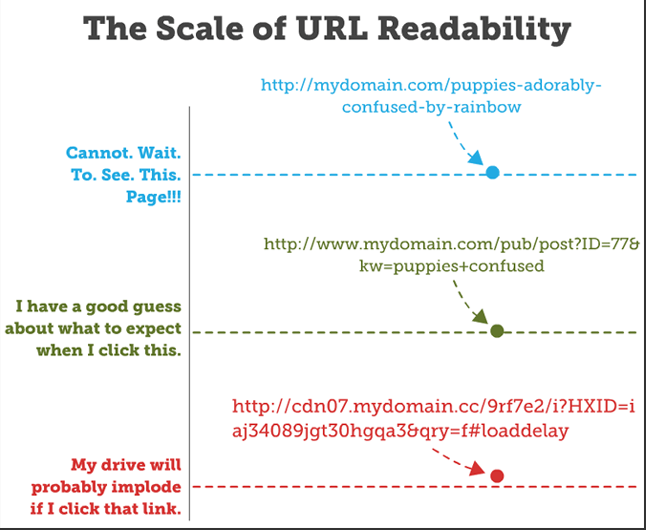
The clearer, the better, you want customers to see upfront what they gonna get if they click on the link.
Rather than the undecidable system-generated URL key, you should put down your product name as a URL Key.
Hence, the default Magento 2 URL key is set to your product name.
So what if your product name is too long? For example:

The obvious answer is to enter a URL key that differs from the product name. But that’s not optimized.
As a rule of thumb, your URL must include the main keyword for your product, which the name of it must also contain.
For this case, I still recommend you use the name of the product as the fixed URL key.
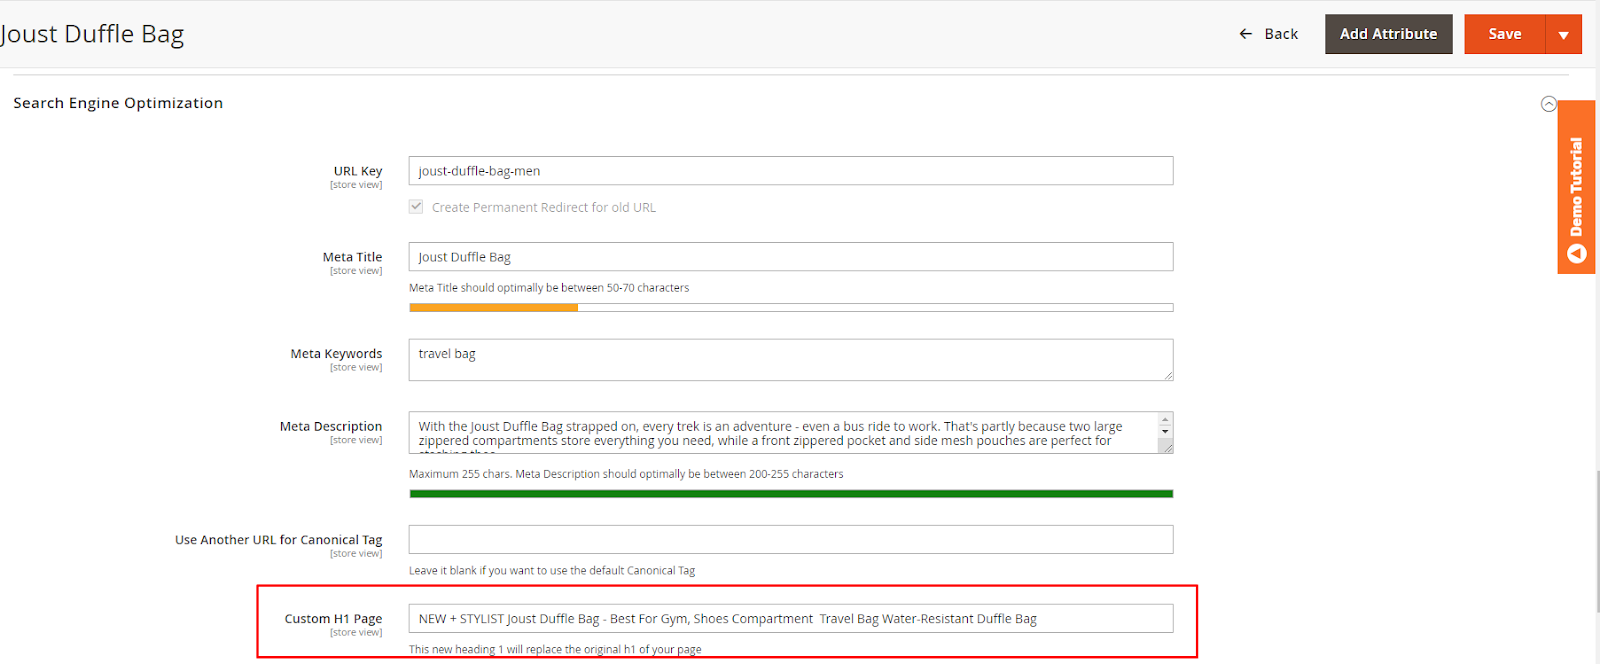
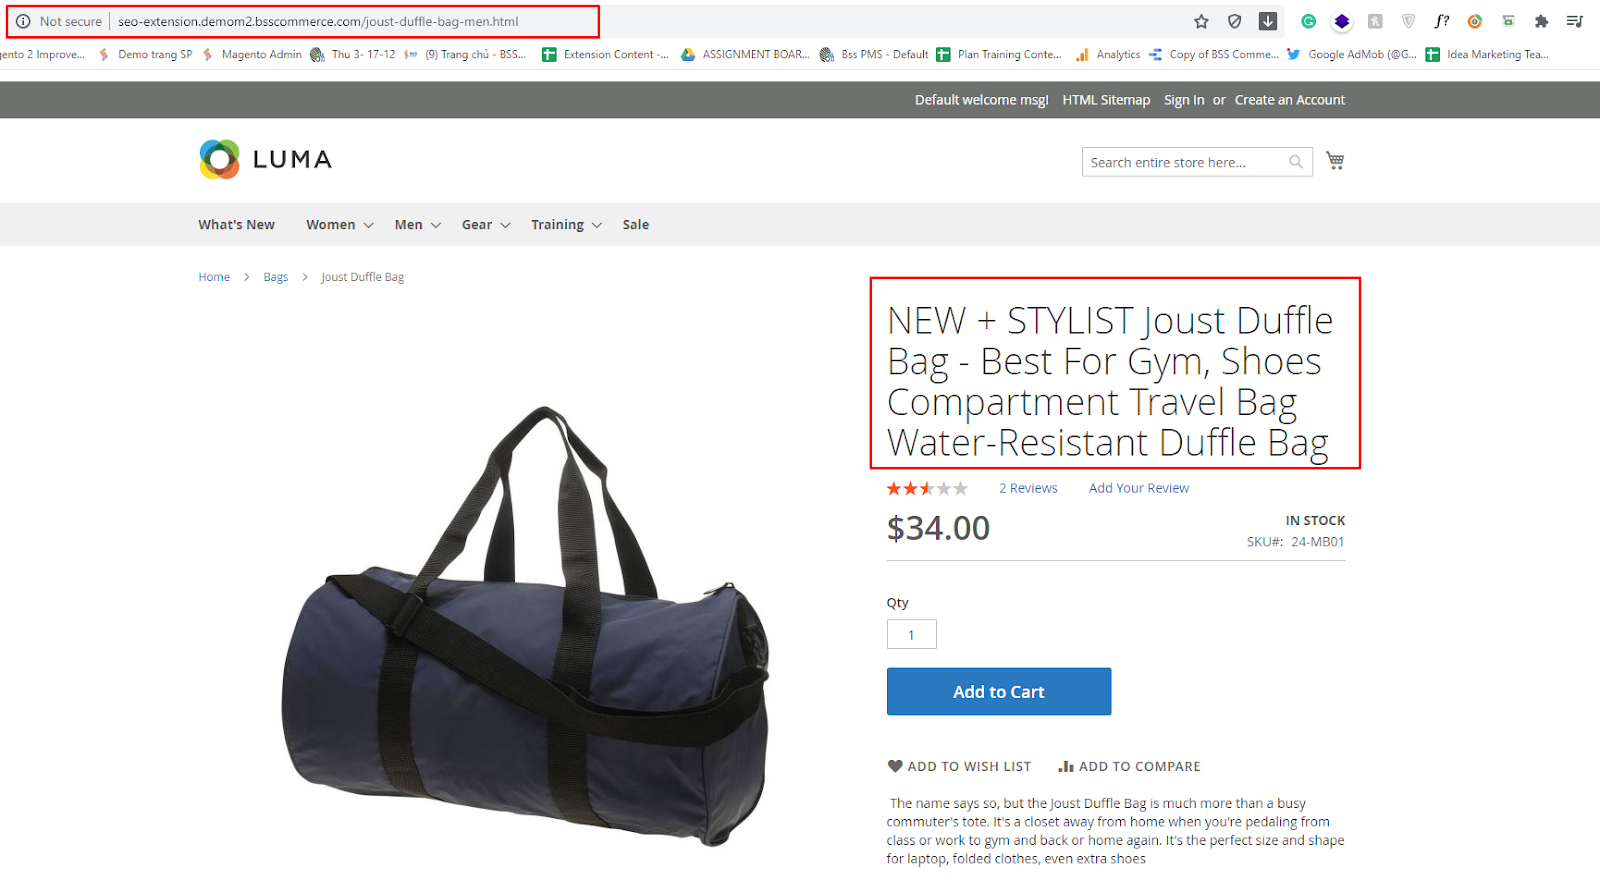
The wonderful thing here is that you can change the title to a custom H1 page with the help of a third party.
Imagine, you can use the mega-tittle-Amazone-style for your product without the unformatted Amazon link.

Voila!
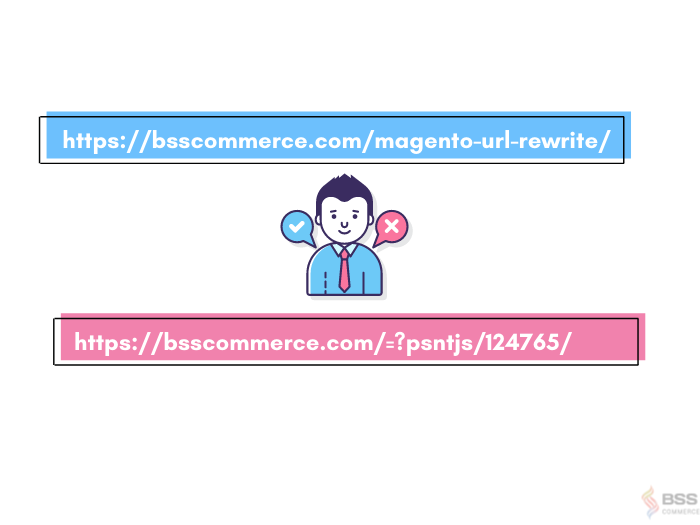
Shorten the URL
There are a few things to unpack here.
First, the full URL structure is too much for the human eye to handle. Here is the breakdown of one:
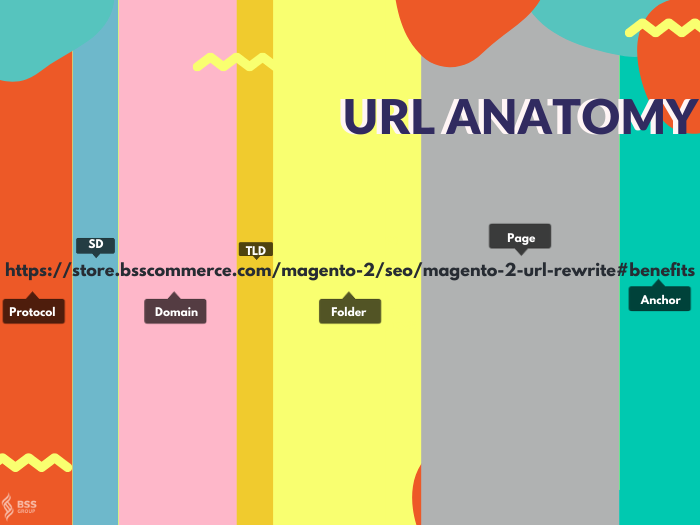
Hence, our goal here is to make this link as short as possible while maintaining all its vital information.
So here is how we do it.
Eliminate categories (folders) from the URL
The default Magento 2 SEO is more than convenient. They already use this as a system value.
You can check this at Stores > Configuration > Catalog > Catalog > Search Engine Optimization
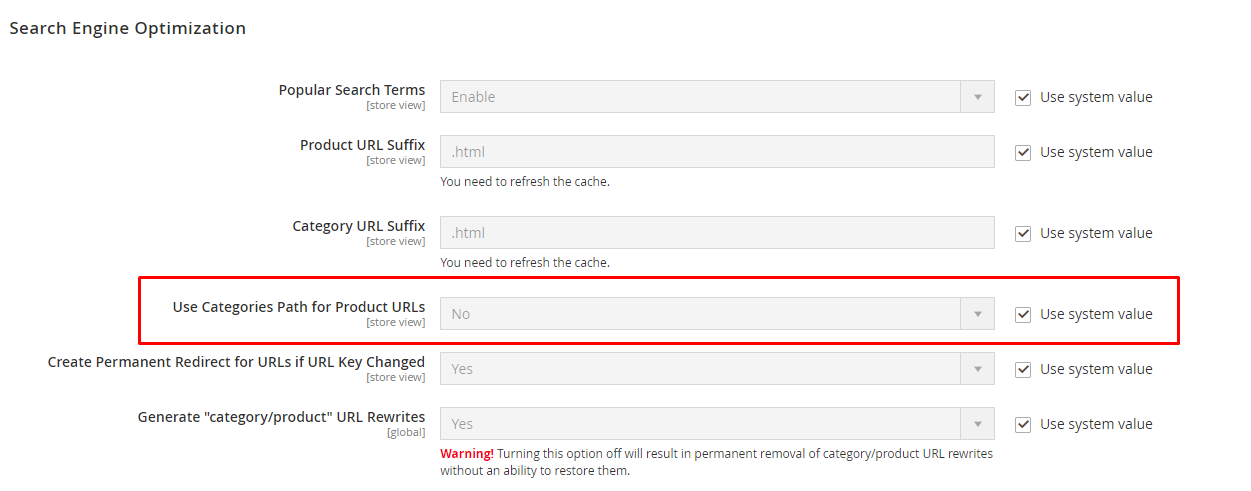
No need to touch/twitch this configuration.
No store code allowed + redirect configuration
Go to Stores > Configuration > General > Web
- Keep the No to the Add Store Code to Urls configuration.
- Turn on the URL rewrites config, and change the Auto-redirect to Base URL to Yes (301 Moved Permanently).
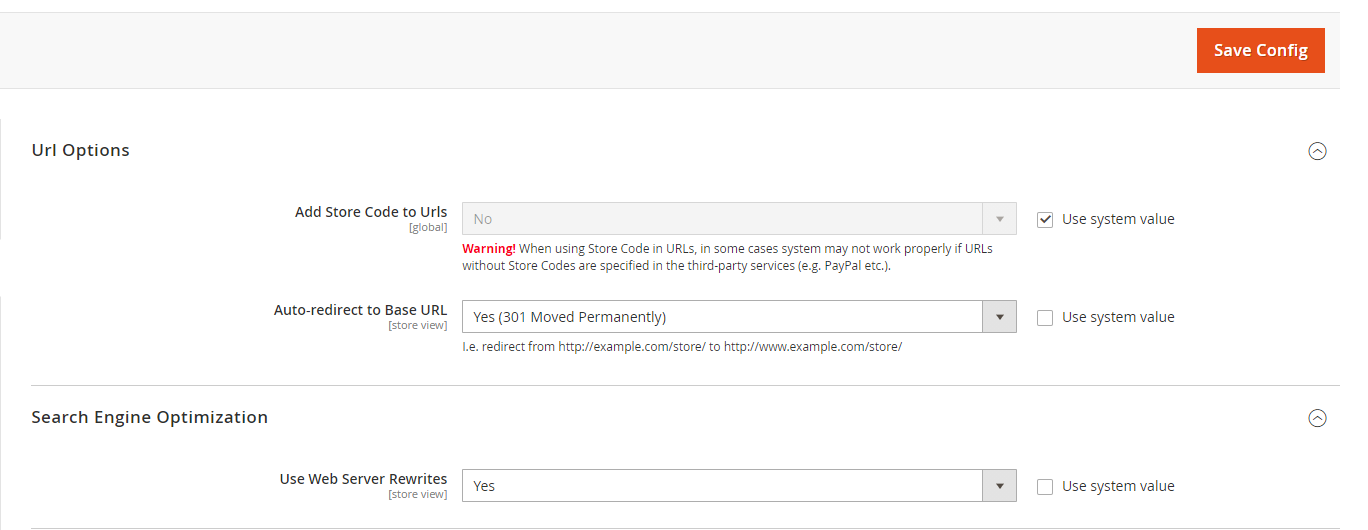
You might ask, why 301 permanently? Well, let’s start with how this function works.
As the name suggests, the field allows you to automatically redirect customers and bot crawlers when they enter your site without the subdomain.
Hence, when a customer/bot call for e.g., when https://www.yourstore.com, he/she/bot is moved to https://yourstore.com
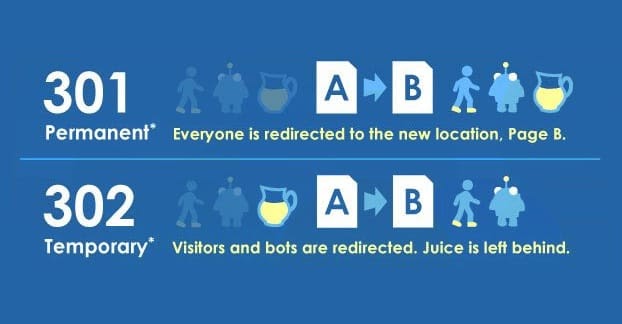
Great feature, no doubt about that! But the default for this config is 302 moved temporarily, and it’s not entirely great for your SEO.
Link equity or the link authority, a.k.a SEO power gets left behind when you use the 302 redirects.
CATCH NOW: Magento 2 SEO URLs in 5 minutes
So, picking the permanent redirect is the optimized choice here to keep your SEO juice.
Keep the same energy for redirect when admin users change the URL key. Ideally, you want to keep the URL key unchanged, but life happens.
Luckily, the default Magento 2 coming in clutch with automatically creates permanent redirect if URL key changed config that saves time and effort down the line.
Proceed with caution: delete the .html tag
Warning:
Even though this practice is recommended, you don’t need it for a smooth SEO system. This is to prevent complications when migrating to another platform. Only delete the .html tag when you fresh to Magento. Implementing this on your running store is destined to be a disaster as it causes URL migration on your site LIVE to your end-users.
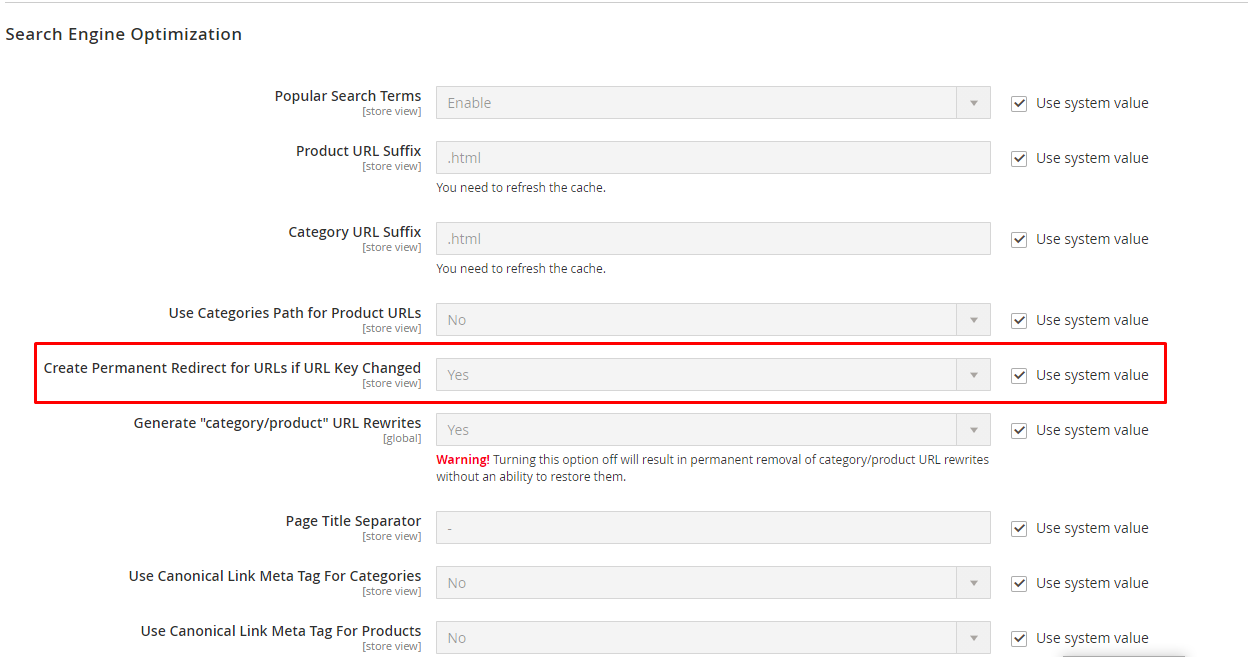
To erase the .html extension from your URL, go to Stores > Configuration > Catalog > Catalog > Search Engine Optimization.
Then, proceed to delete the values of these two fields: Product URL Suffix and Category URL Suffix.
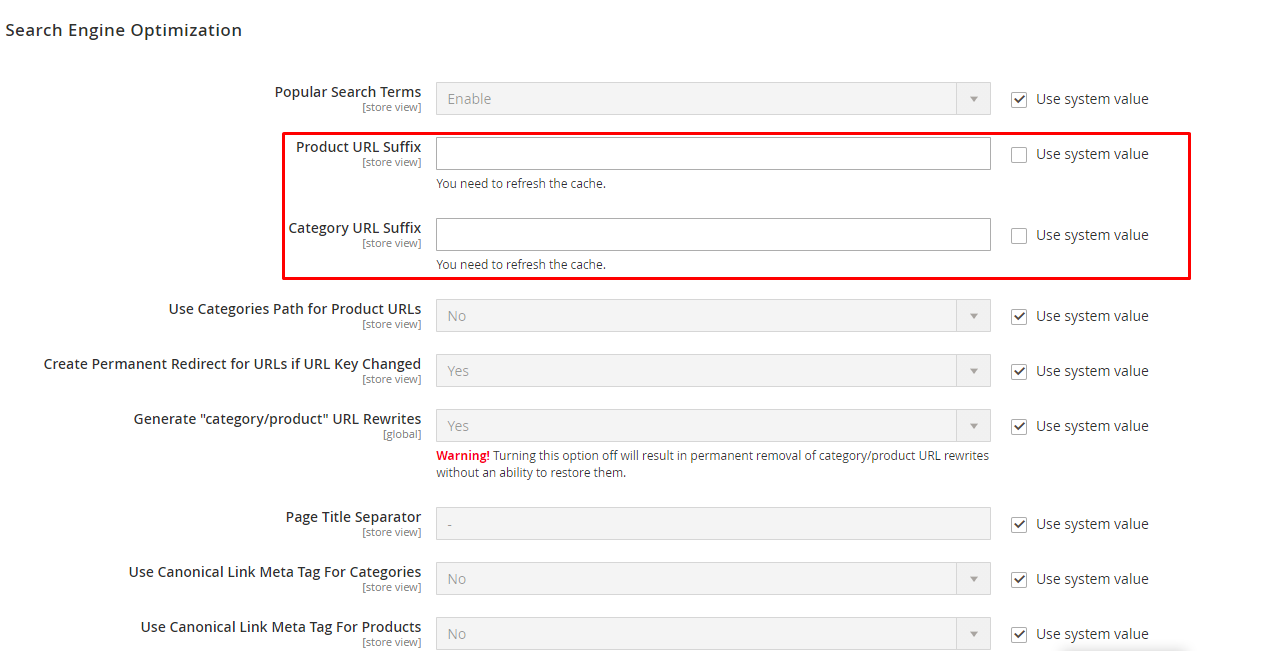
Once you hit Save Config, you need to refresh your cache to the change to be applied.
Subfolder (subcategory) or Subdomain? If strictly SEO-only, then Subfolder!
Have you ever considered what is the difference between https://yourstore.com/handmade and https://handmade.yourstore.com, SEO-wise?
According to Google, there’s none, apparently.
But, the majority of the SEO world has disagreed with this statement.
First, getting a subdomain to rank demands more effort-involved. There are servers to maintain content to build (as Google sees the subdomain as a separate entity from its counter).
Second, unless your business is multi-faceted, it’s best to use subfolders for navigation.
This is because when you place content under a subdomain, you choose to separate your authority.
For example: if you have two subdomains, each has 20 backlinks. The join-force power from them is low. However, if you replace them with subfolders, all 40 backlinks now consider authority signal for your main website.
In conclusion, subfolder for the win.
2. Generate SEO-Friendly Metadata
We’ll go into detail about this very specific part with 2 of our articles:
- Magento 2 SEO – Why Meta Tag Won’t Work (And How To Optimize It)
- 5+ SEO Meta Extensions To Skyrocket Your Business
Each article contains the principles and the tool to help you facilitate your metadata to Magento standard while being SEO-friendly.
3. Crawling, Indexing & Duplicate Content
On this part, we’ll learn how to instruct web crawlers to read and index your site percisely as you want them to.
In other words, we will make Google fa
Implement canonical URLs for homepage and CMS pages
By default, Magento doesn’t add self-referencing canonical URLs to its homepage and CMS pages. This means you’re at risk of having duplicate content.
In order to fix this, you have several options:
- You adjust the template to always include the self-referencing canonical URL for the homepage and CMS pages.
- You add a custom XML block to pages, where you manually define the self-referencing canonical URL for the homepage and CMS pages.
- You use a plugin for this, like, for example this one.
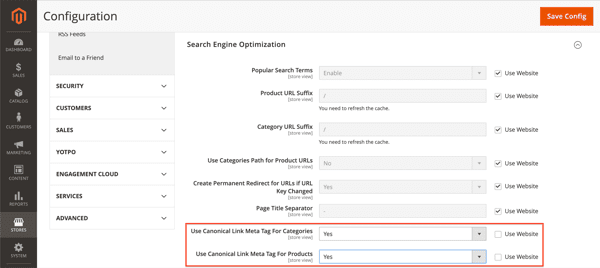
Turn on the use of canonical URLs for products and categories
Canonical URLs give search engines a strong hint as to what page they need to index. So in a case where you have one product with multiple variants, and you want to signal to search engines that they are to only index the product page, and not the variant pages, then you can do so with the canonical URL.
By default, the use of canonical URLs is turned off in Magento. With this setting turned off, a product is available through both its own URL and a URL that includes the category: https://example.com/product/ and https://example.com/category/product/. This leads to situations where these pages are competing with each other for a search engine’s attention.
To turn on the use of canonical URLs, log on to your Magento backend and navigate to:
- Stores > Configuration (Under Settings) > Catalog > Catalog > Search Engine Optimization.
- At the top of the page, select the right Store View you want to adjust the settings for. In our example, this is Default Store View.
- In the screen that this loads, you’ll find fields named Use Canonical Link Meta Tag For Categories and Use Canonical Link Meta Tag For Products. Change their values to Yes. This will result in both product and product-category pages having canonical URLs, which significantly helps to prevent duplicate content.
Use an XML sitemap
XML sitemaps are an efficient way to communicate to search engines what pages they need to crawl and index.
The best practices around XML sitemaps are as follows:
- Keep the XML Sitemap up to date with your website’s content.
- Only include indexable pages.
- Don’t list more than 50,000 URLs in a single XML Sitemap.
- Make sure the sitemap’s (uncompressed) file size doesn’t exceed 50MB.
- Reference the XML sitemap in the robots.txt file.
Magento 2 comes with XML sitemap functionality. To configure the XML sitemap, log on to your Magento backend and navigate to:
- Stores > Configuration (under Settings) > Catalog > XML Sitemap.
- At the top of the page, select the Store View you want to adjust the settings for. In our example, this is Default Store View.
Including categories, products, and CMS pages in XML sitemap
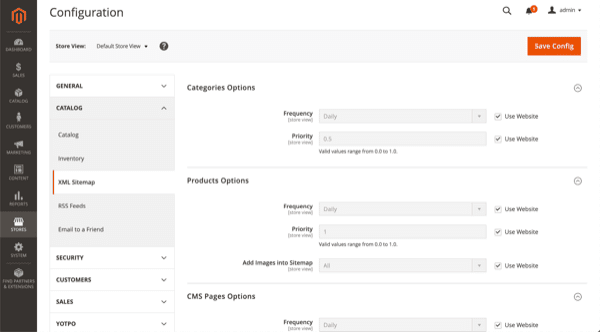
Editing the XML Sitemap settings for categories, products and CMS pages in Magento 2.
By default, the options for categories, products and CMS pages are configured correctly. Google doesn’t use the Frequency and Priority hints, so there’s no need to change anything there. By default, images are included in the XML Sitemap as well.
XML sitemap generation settings
At the top of the page, select Default Config for Store View to manage the generation settings for the XML sitemap. The page will reload, and when you scroll down a little, you’ll see that you can define if, when, and how often the XML sitemap needs to be regenerated under Generation Settings.

Editing the XML Sitemap generation settings in Magento 2.
By default, the Enabled field is set to No. Change this to Yes, because you want your XML sitemap to be regenerated automatically.
Setting Start Time to 02:00:00 will ensure the XML sitemap is regenerated at 2 AM. This is just an example; change this value to the quietest time of day for your store, as regenerating the XML sitemap can temporarily make your Magento store slower.
Keep the value of the Frequency field set to Daily to make sure the XML sitemap is regenerated every day. This too is just an example: if the content on your store only changes once a week, it makes more sense to regenerate the XML sitemap once a week.
XML sitemap: limits and robots.txt
Things get interesting down below; under Sitemap File Limits, you’ll find the fields Maximum No of URLs Per File and Maximum File Size.
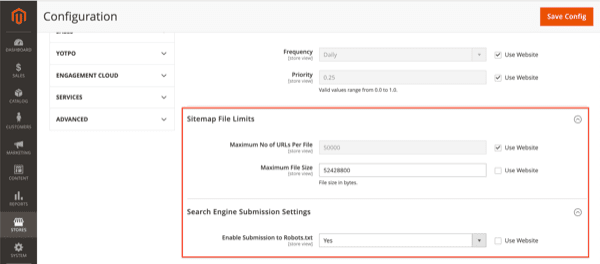
Editing the XML Sitemap file limit and robots.txt settings in Magento 2.
XML sitemap: maximum no of URLs per file
For most Magento stores, the default Maximum No of URLs Per File limit is correct as it aligns with SEO best practices.
XML sitemap: maximum file size
You can raise the maximum file size to 52428800, as this equals 50 MB.
XML sitemap: enable submission to robots.txt
Under Search Engine Submission Settings you’ll find the field Enable Submission to Robots.txt, which has a default value of No. Switch this to Yes, as you want your robots.txt file to reference your XML sitemap.
Once this is all set up, it’s time to create the XML sitemap and configure its (re)generation settings. To do this, go to Marketing > Site Map (under SEO & Search) and click the orange Add Sitemap button.
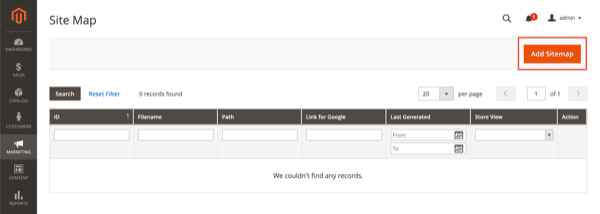
Adding the XML Sitemap to the Magento store.
In the screen that follows, you define the XML sitemap’s name and location:
- Fill in the XML Sitemap’s name in the field Filename, example: sitemap.xml.
- Then fill in the XML sitemap’s path in the Path field – for example /pub/ in our case because of the nature of the Magento installation in our test setup.
- Next, click the Save & Generate button, and you’re all done!
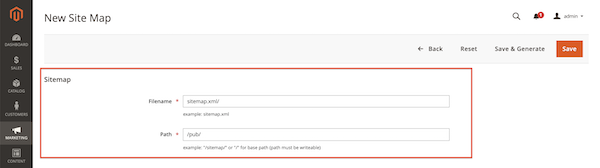
Configuring the filename and location of the XML Sitemap in Magento 2.
Robots.txt
The robots.txt file tells crawlers the rules of engagement when it comes to accessing URLs on your site. For eCommerce stores – and so this goes for Magento stores too – it’s essential to leverage the robots.txt file to send search engine crawlers in the right direction, and keep them from touching the wrong URLs in an effort to
- Keep them from reaching potential crawler traps.
- Prevent duplicate content.
- Preserve precious crawl budget.
While search engines claim to be good at recognizing crawler traps, they first need to go down one in order to find out only later that it is in fact a crawler trap.
Your Magento 2 store has a variety of URL patterns that you don’t want search engines to touch.
Here are the pages we recommend barring off from search engines:
- Internal search result pages: /catalogsearch/ and /search/. While we recommend adding the robots noindex directive (either the meta tag or HTTP header) to these pages as a second line of defense, the first line of defense is the robots.txt file.
- Login pages /customer/account/login/ – login pages.
- URLs containing SID and PHPSESSID parameters.
- Filtering criteria such as price, color, material and size.
This boils down to the following robots.txt:
User-agent: *
Disallow: /catalogsearch/
Disallow: /search/
Disallow: /customer/account/login/
Disallow: /*?SID=
Disallow: /*?PHPSESSID=
Disallow: /*?price=
Disallow: /*&price=
Disallow: /*?color=
Disallow: /*&color=
Disallow: /*?material=
Disallow: /*&material=
Disallow: /*?size=
Disallow: /*&size=
We recommend including both ways a criterion is included in URLs. For example, with price that’s both /*?price= and /*&price=.
Editing your robots.txt file in Magento 2
In order to edit your robots.txt file in Magento 2, navigate to:
- Content > Configuration (Under Design).
- There, edit the settings for Main Website instead of the Default Store View, because the latter won’t allow you to change the robots.txt file.
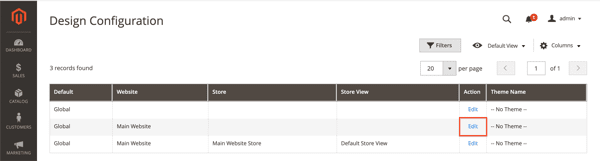
Navigating to the robots.txt settings in Magento 2.
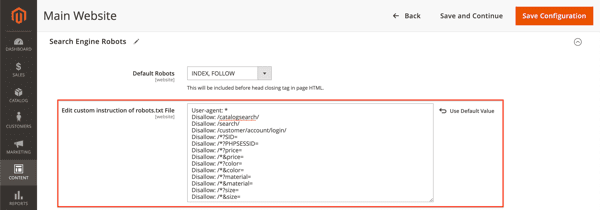
On the screen that follows, scroll down to Search Engine Robots. There you can define your robots.txt content:
4. Site Speed
Magento requires quite some server resources to run smoothly, so having a solid, Magento-optimized hosting platform is essential to the success of your Magento store.
But you won’t get far with “muscle” alone; you need to configure both your hosting and your Magento platform correctly in order for it to take.
Requirements for your hosting platform
For best performance, your hosting platform needs to be:
- Optimized for Magento
- Ready to support Redis and Varnish
- Running on Nginx
- CDN compatible
Enabling caching features
To enable the built-in caching features in Magento:
- Navigate to System > Cache Management
- Mark all checkboxes, select Enable from the drop-down box, and hit Submit:
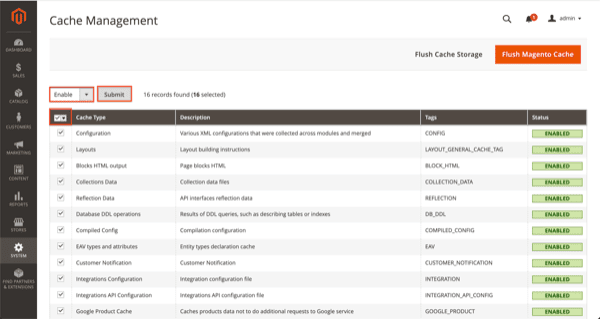
Enable caching in Magento 2.
Enabling full page cache in Magento 2
To enable full page caching:
- Navigate to Stores > Configuration (under Settings) > Advanced > System.
- Under “Full Page Cache”, you’ll find the Caching Application field. By default, it’s set to Built-in Cache. Change that to Varnish Cache (Recommended).
- Next, an additional settings screen named Varnish Configuration appears. There, you fill in whatever your hosting provider has provided you.
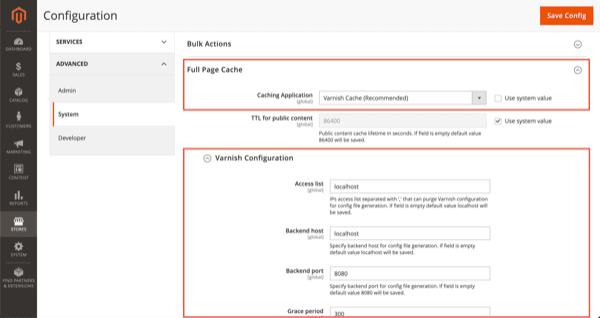
Enable Full Page Caching in Magento 2.
Configure JavaScript settings in Magento 2
Configure your store’s JavaScript settings by going to Stores > Configuration (under Settings) > Advanced > Developer.
There, expand JavaScript Settings and change the value of Merge JavaScript Files, Enable JavaScript Bundling, Minify JavaScript Files to Yes:
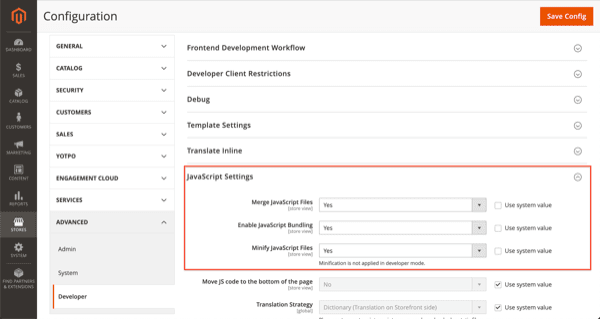
Configure JavaScript settings in Magento 2.
While this helps speed up loading of pages for simple, out of the box, Magento implementation it doesn’t do much for more complex implementations.
As soon as you introduce your own JavaScript and third party plugins, simply merging and bundling JavaScript files adds little to no value. Therefore, Magento is working on a module called Baler which enables you to configure advanced JavaScript bundling.
For instance, you can create separate bundles for JavaScript that’s required on all pages, category pages, product pages, landing pages and so on. This way, you only load what’s really needed, rather than loading everything just in case it’s needed. Thanks for your input on this Marnix Lont and Karen Foesenek!
5. Advanced Magento 2 SEO 2022
I have written an in depth review + recap for SEO 2021 and what trends/movements you need to keep an eye on for the year 2022.
CHECK IT HERE: SEO 2021 Recap And What’s Next For SEO 2022 [BEST TRENDS]
Wrap Up
Together, we’ve learned through the whole process of leveraging and advancing SEO merits of your Magento 2 Store. You got (almost) every rights to set up a great SEO foundation with the default setting. But, BSS can make it even better, faster, and easier. Ranking on the 1st SERP is honestly not the wildest dream.
If you have any other questions, feel more than happy to CONTACT US. We’re on 24/7 support!
BSS Commerce is one of the leading Magento extension providers and web development services in the world. With experienced and certified Magento developers, we commit to bringing high-quality products and services to optimize your business effectively. Furthermore, we offer FREE Installation – FREE 1-year Support and FREE Lifetime Update for every Magento extension.
CONTACT NOW to let us know your problems. We are willing to support you every time.