This article will help you see a comprehensive view of Facebook Pixel to websites built on the Magento platform.
I. What’s Facebook Pixel ?
Facebook pixel is code that you place on your website. It helps you measure the effectiveness of your advertising by understanding the actions people take on your website. With Facebook pixel you could:
- Reach the right people: find new customers and optimize your ads for people likely to buy after they’ve visited your website.
- Show the right products: show people relevant ads on facebook with products they viewed on your website.
- Measure the results of your ads: understand the sales and revenue that resulted from your ads.
II. How to Setup Facebook Pixel on Magento 2 ?
1. Get the code
To get the pixel code, you firstly login to your account at https://business.facebook.com/ (create an account if you have not already) then go to “Bussiness Manager -> Pixel -> Create Pixel”.
![]()
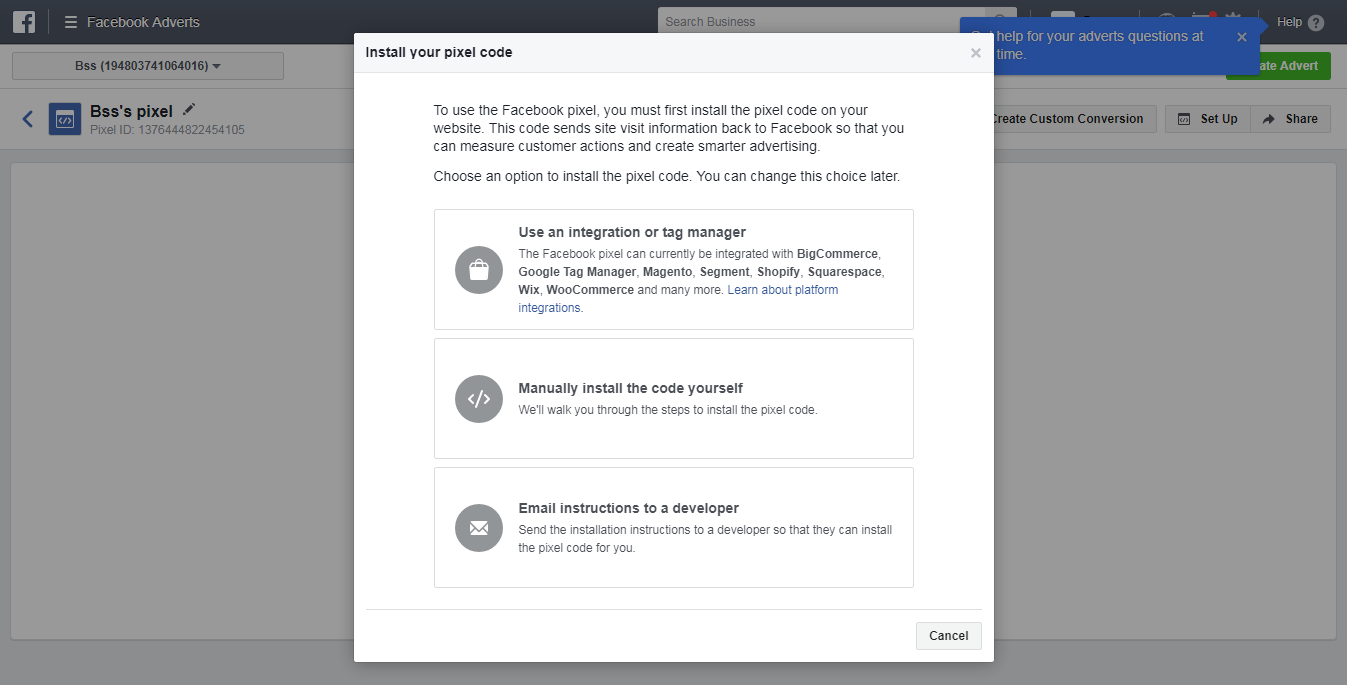
Create a name for the pixel (you can change the name of the pixel later from the Pixel Facebook tab).

Select one of the above options to install the pixel code. In here we will guide you manually install the code yourself (option 2).
This is the Pixel Facebook of your advertising account.
![]()
2. Install the code
What does the pixel code include?
– Base Code: this is the entire Pixel code you created above.
– Standard Event Code: a small code located in the base code, above the closing tag. Each child page on your website will have different standard event codes.
![]()
Facebook offers 9 types of standard event codes as below image.
![]()
Install the code
You can attach the entire website or on each child page that you want to track.
- For Magento 1, you can attach the entire website in the admin. Go to System → Configuration → Design → HMTL Head → Miscellaneous Scripts and add the pixel code.
![]()
- For Magento 2, you can attach the entire website in the admin. Go to Content → Configuration → Scope of theme → HTML, Head and add the pixel code.
![]()
Then, to see if the code works or not, you can use the add-on that Facebook offers: Facebook Pixel Helper (Installed at: https://chrome.google.com/webstore/detail/facebook-pixel-helper/fdgfkebogiimcoedlicjlajpkdmockpc? hl = vi).
![]()
III. How to Set up Conversion Tracking on Magento 2 ?
Conversions here are interpreted as the last action you want the user to take in your campaign goals. A conversion is the final act of the user you desire after the person has clicked on the ad.
In Facebook Adverts, select “Convert conversion” -> choose “Create custom conversion”.
![]()
The “Rule” section is where you will set up user destinations that you think are conversions.
URL contains: Keyword choice into the landing page address that you see after a user visits that page is 1 conversion.
For example: Just a client looking for a page with a url containing base. Then you can add the keyword “bss” to the “URL Contains” section. Then Facebook will understand and count the number of times the user after clicking on the ad is directed to the page containing the keyword “bss” is the number of conversions in the ad report.
![]()
When setting keywords in an URL contains, you should note that if your site contains many sub-page links with similar keywords, you need to remember and clearly distinguish which conversion settings are being set for the action.
In the example above, either http://example.com/bss-1 or http://example.com/bss-2 all counts.
URL equals: Select the exact link of the page you want to track.
For the example above, I will copy the URL path http://www.example.com/bss into the URL equals to track the conversions you want.
![]()
Event: This is the section of the standard event code.
III. How to Create a Custom Audience File for Magento 2 ?
In Facebook Adverts, select “Audience” -> Create Audience -> Custom Audience.
![]()
Here you see the board shows up with different items, but with this section you select “Website traffic”.
Pixel Facebook will save the data of all visitors to your website Regardless of where the source comes from (SEO, Adwords, Direct, Web banner, Facebook ads…).
Similar to the “Custom conversion” section, you can select either “URL contains” or “URL equals” as the exact child page address on your website that you want to save the data who ever visited.
![]()
IV. Advertising To The Custom Audience File From The Website.
Once you’ve created the right object customization file, at some point this file is large enough that you can run an ad that only displays on an object file you saved.
Beside Faceboook Pixel, if interested in any marketing or SEO aspect, you should visit these helpful blog posts:
- 27+ Magento 2 SEO Tips – Search Engine Optimization A to Z Checklist
- Magento 2 SEO Settings – The All-in-One Definitive Guide [2019]
