
Magento 2 insert data into table can be straightforward if you know the right ways to do it!
In processing Magento 2 development, creating a table and inserting data when you would like to make a custom module is essential. This article will guide you through the steps to create a table and insert data into the table in Magento 2.
I. Create A Simple Module To Create The Table
Magento 2’s structural element is the module. In Magento 2, modules provide the foundation of a whole new system. The creation of a module is the first stage in creating a custom eCommerce store.
Module Version — The Module version indicates the current version of the database schema and data. Consider the case when you want to change the schema of a table in your module. But how can we be certain that this modification will occur in every instance where the code is used? Direct SQL queries will not be able to change the database at this time. Every module in Magento 2 allows you to install and upgrade scripts. The scripts provide instructions that can be used to change the database structure or data.
First of all, we create a simple module named Bss_Schema; you need:
Step 1: Create file module.xml in app/code/Bss/Schema/etc/module.xml
Declare the module made already.
<?xml version="1.0" ?>
<config xmlns:xsi="http://www.w3.org/2001/XMLSchema-instance" xsi:noNamespaceSchemaLocation="urn:magento:framework:Module/etc/module.xsd">
	<module name="Bss_Schema" setup_version="1.0.1"/>
</config>
Step 2: Create file registration.php in app/code/Bss/Schema/registration.php
Register the module with the Magento system.
<?php
\Magento\Framework\Component\ComponentRegistrar::register(
    \Magento\Framework\Component\ComponentRegistrar::MODULE,
    'Bss_Schema',
    __DIR__
);
Step 3: Create file InstallSchema.php in app/code/Bss/Schema/Setup/InstallSchema.php
Create table data_example and add a column to the table.
<?php
namespace Bss\Schema\Setup;
use Magento\Framework\Setup\SchemaSetupInterface;
use Magento\Framework\Setup\ModuleContextInterface;
use Magento\Framework\DB\Ddl\Table;
class InstallSchema implements \Magento\Framework\Setup\InstallSchemaInterface{
    public function install(SchemaSetupInterface $setup,ModuleContextInterface $context){
        $setup->startSetup();
        $conn = $setup->getConnection();
        $tableName = $setup->getTable('data_example');
        if($conn->isTableExists($tableName) != true){
            $table = $conn->newTable($tableName)
                            ->addColumn(
                                'id',
                                Table::TYPE_INTEGER,
                                null,
                     ['identity'=>true,'unsigned'=>true,'nullable'=>false,'primary'=>true]
                                )
                            ->addColumn(
                                'title',
                                Table::TYPE_TEXT,
                                255,
                                ['nullable'=>false,'default'=>'']
                                )
                            ->addColumn(
                                'content',
                                Table::TYPE_TEXT,
                                '2M',
                                ['nullbale'=>false,'default'=>'']
                                )
                            ->setOption('charset','utf8');
            $conn->createTable($table);
        }
        $setup->endSetup();
    }
}
 ?>
In which:
- $setup-> startSetup (): start setup
- $setup-> endSetup (): end setup
- $conn: create a connection to the database
- $tableName: create table name
- addColumn (): there are four parameters; name is column name, type is data type (int, smallint, text, varchar, float …), size is data length, options are array values (primary key, empty or not …)
Example for options: [‘identity’=>true,’unsigned’=>true,’nullable’=>false,’primary’=>true].
- identity => true: key
- unsigned => true: the key is not negative
- nulladble => false: not null
- primary => true: primary key
- default => ”: default data
Activate the module to create a table in the database, you should use the follow command:
php bin/magento module:enable Bss_Schema
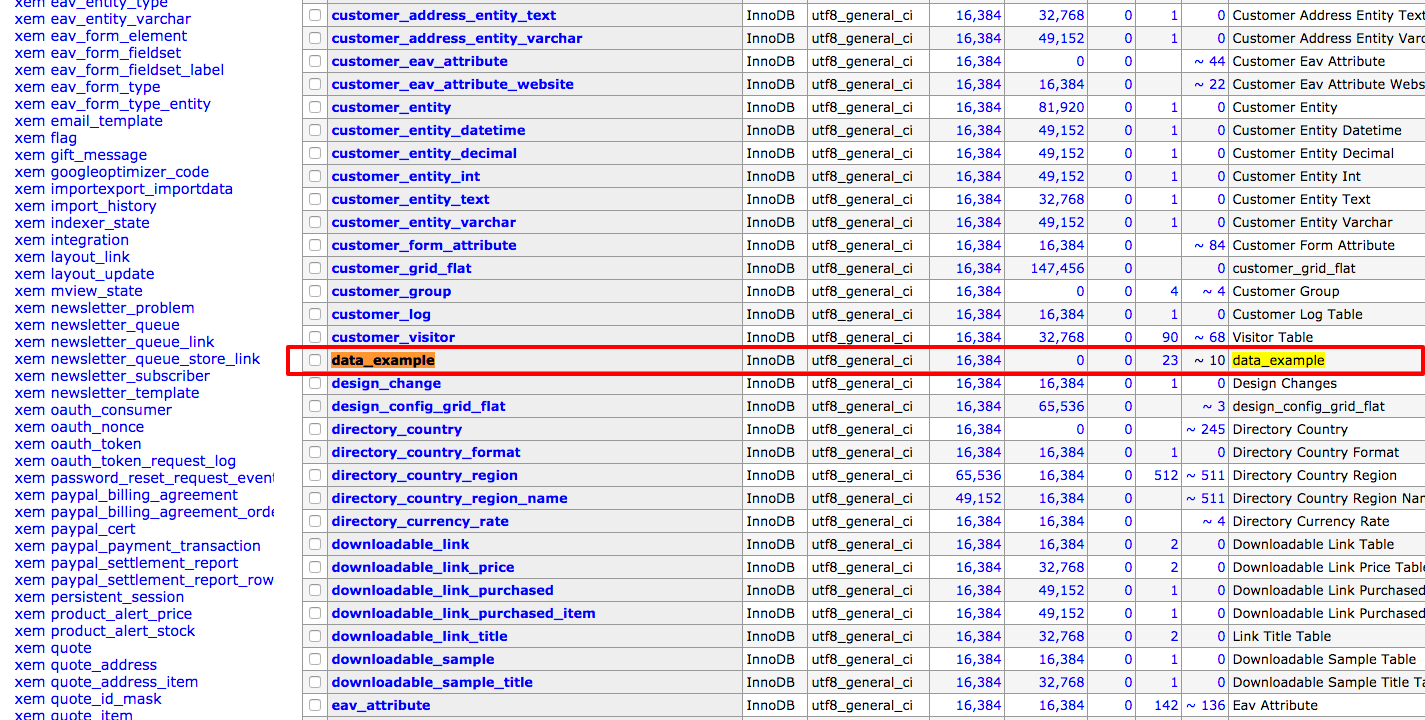
php bin/magento setup:upgradeChecking the database, you would see the data_example table created successfully.
But InstallSchema could only be used once time as running with the module installation. If you want to change and modify the mandatory you should use UpgradeSchema. We’ll show you how to add columns by using UpgradeSchema table:
Create file UpgradeSchema.php in app/code/Bss/Schema/Setup/UpgradeSchema.php
<?php
namespace Bss\Schema\Setup;
use Magento\Framework\Setup\SchemaSetupInterface;
use Magento\Framework\Setup\ModuleContextInterface;
use Magento\Framework\DB\Ddl\Table;
class UpgradeSchema implements \Magento\Framework\Setup\UpgradeSchemaInterface{

	public function upgrade(SchemaSetupInterface $setup,ModuleContextInterface $context){
        $setup->startSetup();
        if (version_compare($context->getVersion(), '1.0.1', '<')) {
            $this->addStatus($setup);
        }
        $setup->endSetup();
	}

    /**
     * @param SchemaSetupInterface $setup
     * @return void
     */
    private function addStatus(SchemaSetupInterface $setup)
    {
        $setup->getConnection()->addColumn(
            $setup->getTable('data_example'),
            'status',
            [
                'type' => \Magento\Framework\DB\Ddl\Table::TYPE_SMALLINT,
                'nullable' => true,
                'default' => 1,
                'comment' => 'Status'
            ]
        );
    }
}
?>
In which:
- version_compare($context->getVersion(), ‘1.0.1’, ‘<‘) is modified version of module
- addStatus () is function adding status column to table data_xample
Modify the module version in the module.xml file in Bss / Schema / etc / module.xml to run the UpgradeSchema.
<?xml version="1.0" ?>
<config xmlns:xsi="http://www.w3.org/2001/XMLSchema-instance" xsi:noNamespaceSchemaLocation="urn:magento:framework:Module/etc/module.xsd">
	<module name="Bss_Schema" setup_version="1.0.1"/>
</config>
To add new column status to the table we run the following command:
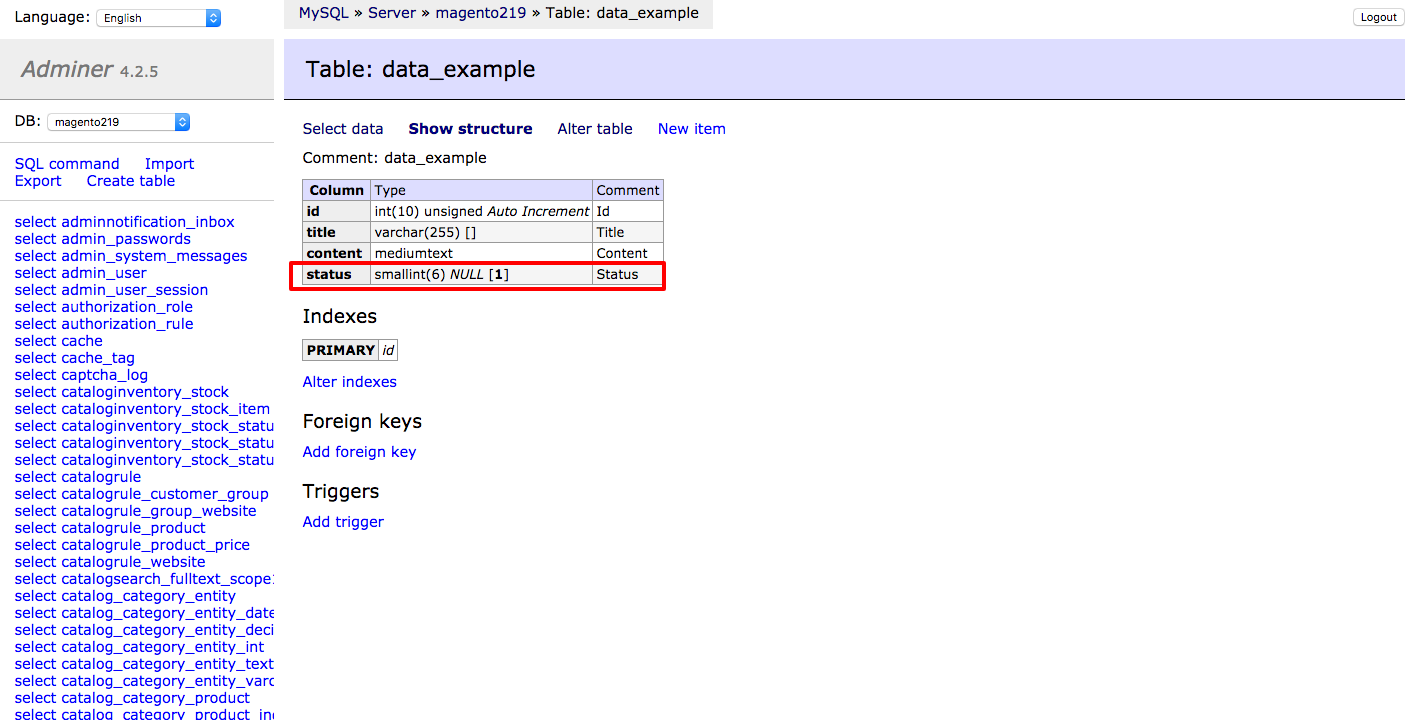
php bin/magento setup:upgradeFinally, check the database and see the status column added to the data_example table.
II. Add The First Record In The Table
Step 1: Set up Model, create DataExample.php file in Bss/Schema/Model/DataExample.php.
<?php
namespace Bss\Schema\Model;
class DataExample extends \Magento\Framework\Model\AbstractModel{
	public function _construct(){
		$this->_init("Bss\Schema\Model\ResourceModel\DataExample");
	}
}
 ?>
Step 2: Set up the ResourceModel, create the DataExample.php file in the Bss/Schema/Model/ResourceModel/DataExample.php.
<?php
namespace Bss\Schema\Model\ResourceModel;
class DataExample extends \Magento\Framework\Model\ResourceModel\Db\AbstractDb{
 public function _construct(){
 $this->_init("data_example","id");
 }
}
 ?>
Step 3: Set up Collection, create Collection.php file in Bss/Schema/Model/ResourceModel/Collection.php.
<?php
namespace Bss\Schema\Model\ResourceModel\DataExample;
class Collection extends \Magento\Framework\Model\ResourceModel\Db\Collection\AbstractCollection{
	public function _construct(){
		$this->_init("Bss\Schema\Model\DataExample","Bss\Schema\Model\ResourceModel\DataExample");
	}
}
 ?>
Step 4: Set up Controller, create Index.php file in Bss/Schema/Controller/Index/Index.php.
<?php
namespace Bss\Schema\Controller\Index;
use Bss\Schema\Model\DataExampleFactory;
use Magento\Framework\Controller\ResultFactory;
use Magento\Framework\App\Action\Context;
class Index extends \Magento\Framework\App\Action\Action{
    protected $_dataExample;
    protected $resultRedirect;
    public function __construct(\Magento\Framework\App\Action\Context $context,
        \Bss\Schema\Model\DataExampleFactory  $dataExample,
    \Magento\Framework\Controller\ResultFactory $result){
        parent::__construct($context);
        $this->_dataExample = $dataExample;
        $this->resultRedirect = $result;
    }
	public function execute(){
        $resultRedirect = $this->resultRedirect->create(ResultFactory::TYPE_REDIRECT);
        $resultRedirect->setUrl($this->_redirect->getRefererUrl());
		$model = $this->_dataExample->create();
		$model->addData([
			"title" => 'Title 01',
			"content" => 'Content 01',
			"status" => true,
			"sort_order" => 1
			]);
        $saveData = $model->save();
        if($saveData){
            $this->messageManager->addSuccess( __('Insert Record Successfully !') );
        }
		return $resultRedirect;
	}
}
 ?>
In which:
- $model: the model initialization variables.
- addData (): containing the key, column, and column values of the data passed.
Step 5: Configure route for the controller, create routes.xml in Bss/Schema file /etc/frontend/routes.xml.
<?xml version="1.0"?>
<config xmlns:xsi="http://www.w3.org/2001/XMLSchema-instance" xsi:noNamespaceSchemaLocation="urn:magento:framework:App/etc/routes.xsd">
	<router id="standard">
		<route id="schema" frontName="schema">
			<module name="Bss_Schema" />
		</route>
	</router>
</config>
Run the schema controller to add the data to the table. Open link http://localhost/magento219/schema/.
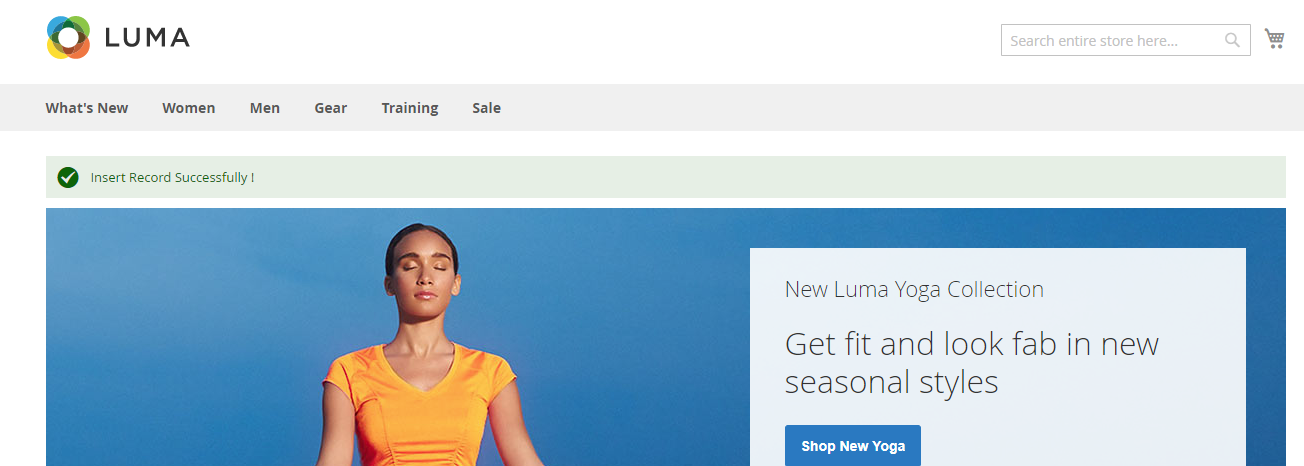
Finally, checking in the database, you will see the data added to the data_example table like the below picture

Conclusion
Hope this article helps you find your solution!
BSS Commerce is one of the leading Magento 2 extension providers and Magento 2 development services in the world. With experienced and certified Magento developers, we commit to bringing high-quality products and services to optimize your business effectively. Furthermore, we offer FREE Installation – FREE 1-year Support and FREE Lifetime Update for every Magento extension.
CONTACT NOW to let us know your problems. We are willing to support you every time.
Nice Article! Thank you for writing this. I am getting an error when I try to do setup:di:compile. Please help!
Dear Paolo,
In that case, the class in construct might not be properly declared or missing. Please check the “\” at the beginning of the class in construct, as in this screenshot.
Hope this answer is helpful.
Regards.
I am getting next error: 1 exception(s):
Exception #0 (ReflectionException): Class data_example does not exist
Dear Srdjan,
We’re looking into your errors. Please stay in touch, we will help you out as soon as possible.
Regard.
What is “use
? I have no DataExampleFactory.
I create the table “data_example” but I can’t add the record in the table. I am getting error when try add record: Exception #0 (ReflectionException): Class data_example does not exist. I posted all error text in the previous post . My code is identical as example code from this page. Please help.
Hi,
here is my code it may be helpful:
I run Magento project on virtualbox with:
http://192.168.1.3/magento2.local/schema/
AND GET ERROR:
1 exception(s):
Exception #0 (ReflectionException): Class data_example does not exist
I tryied out setup:di:compile, no error found
Thanks
Thanks so much for your recommendation. We have reviewed the code and made some modification. Please try again and notify us if there is something wrong.
Regards.
Thanks for your answer, but I could not find any modification in code above.
However I have tried out it and got the same error like before.
I have no any DataExampleFactory file or directory into “Bss\Schema\Model\” directory. Is there a solution?
Thanks,
Regards.
Solution for “How to create and insert data into the table in Magento 2”,
in my case (Magento 2.2.6, Linux Ubuntu 18.04 host, Linux Ubuntu 17.10 server guest on virtualbox 5.2.20, MySQL 5.7.22).
Seem like there was still something wrong with the code, we have fixed it alright. And, your recommendation is truly helpful. Thanks so much
Solution for “How to create and insert data into the table in Magento 2”,
in my case (Magento 2.2.6, Linux Ubuntu 18.04 host, Linux Ubuntu 17.10 server guest on virtualbox 5.2.20, MySQL 5.7.22).
Best regards.
edit this file code only…..
We have fixed the error. Thanks for your recommendation <3