
With countless online stores vying for the same customers, standing out from the crowd can be a challenge. This is where search engine optimization (SEO) comes in. However, utilizing these SEO features in Magento 2 store needs a proper understanding of Magento 2 SEO guide and how it can be applied in your Magento 2 store.
This guide will provide you with a comprehensive understanding of SEO in Magento 2. From setting up basic SEO settings to leveraging tips and best practices for SEO. Now, let’s get started!
A Quick Overview Of Search Engine Optimization Magento 2
Table of Contents
SEO is primarily carried out to enhance a website’s position in organic search results. For Magento stores, SEO involves optimizing and improving their visibility on SERPs. The criteria for ranking on the top SERPs are constantly changing, and Magento 2 provides a wide range of SEO features and techniques that contribute to improving this.
Key SEO Features in Magento 2:
- URL Management: Product and category URLs contain keywords and are search engine friendly in Magento 2 while it also permits clean redirects to be set.
- Sitemaps: Magento 2 generates an XML sitemap by default making it easier for search engines to locate and index all pages within your store.
- Meta Tags: These tags provide search engines with a summary of your page’s content. Magento 2 lets you edit product, category, and page titles and descriptions.
Magento 2 SEO Guide: Setting Magento 2 SEO Default
#1. Optimize Metadata in Magento 2
Magento comes with built-in SEO features that let you customize meta titles, descriptions, and keywords for individual pages and this in turn increases your likelihood of ranking well in search results.
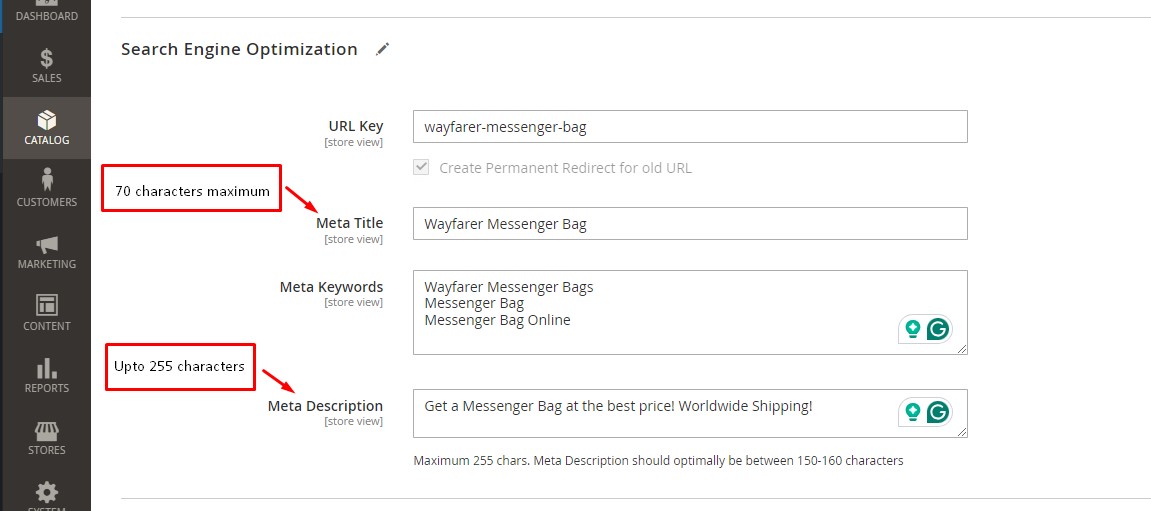
Meta Title – an SEO feature appears as the title of your product page in the search result. Try to include the high-value keywords you want to aim for the page in this field to get better recognition from web crawlers. Choose wisely as you are limited to under 70 characters.
Meta Keyword – Unlike the meta title, you have no maximum limitation for meta keywords. And they do not appear in the SERPs. Fill in all the keywords of the page for the crawlers to know what your product is about. However, don’t go over-filling and come up with the related ones only.
Meta description – The maximum allowed chars in default Magento 2 is 255. And you may see an instruction text to optimize between 150-160 chars. Wise optimization can raise more clicks through the search. Not just keywords include some phrases to attract more customers such as support policy or promotion.
Optimize meta titles & meta descriptions for product pages
Step 1. Go to Catalog > Products.
Step 2. Select the product you want to edit and access its meta information.
Step 3. Expand the Search Engine Optimization section.
Step 4. Click on the Save button to save your modifications
In case you have a large-scale site with thousands of items to manage, the below settings of the Magento SEO tutorial may be a great help. It sets a template for metadata of products at a global level.
Go to Stores ⇒ Configuration ⇒ Catalog ⇒ Catalog ⇒ Product Fields Auto-Generation.
Here, you can make a sample for meta titles, descriptions, and keywords for all products in your Magento 2 store.
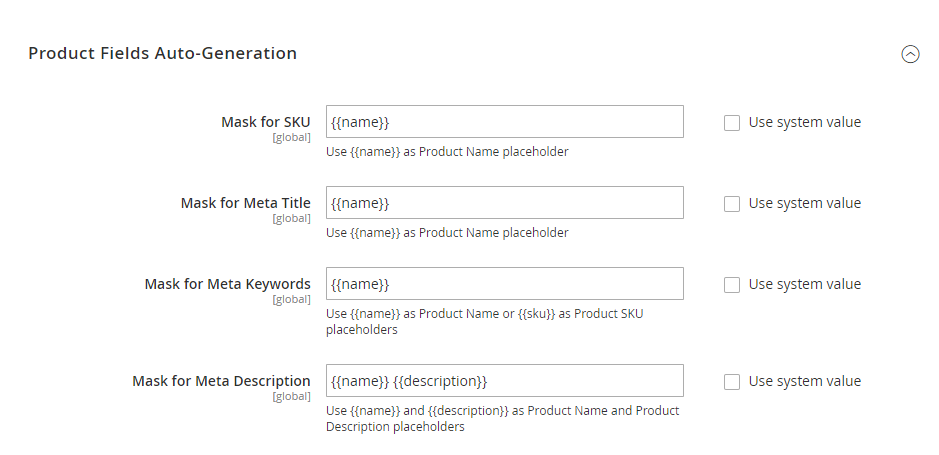
By default, Magento 2 takes placeholders such as {{name}}, {{description}}, or {{sku}} for the meta information. When you are using this Product Fields Auto-Generation feature, the SEO suggestion for the character limit of metadata above is still applied. Thus, be careful if you have a too-long product description as the meta.
*Note: Limitations of Mass settings for product metadata in default Magento SEO optimization:
- You can only use 3 placeholders as mentioned above to create a meta-template of products. Other placeholders such as {{color}}, {{country_of_manufacture}}, , {{gender}}, {{material}}, {{short_description}}, and {{size}} haven’t yet supported.
- It works only at the level of Global scope. Therefore, there are no templates for websites, stores store views, or even categories to apply.
- Mass settings do not support automatically changing meta tags for existing products, but the template is only applied to newly created products.
- It does not apply to products that are imported, migrated, or programmatically created.
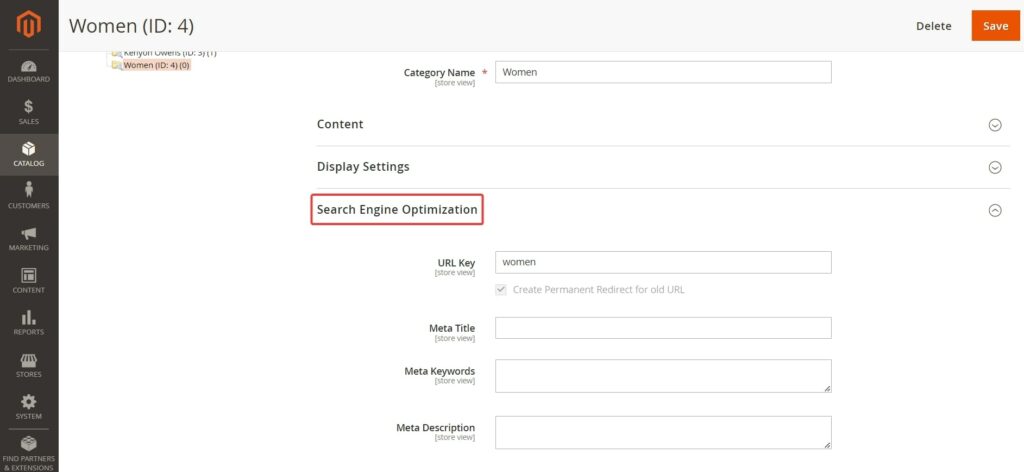
Optimize meta titles & meta descriptions for categories
Step 1. Navigate to Catalog > Categories.
Step 2. Choose the category you wish to update and access its meta information.
Step 3. Expand the Search Engine Optimization section.
Step 4. Once you have made the desired changes, click on the Save Button to save your modifications.
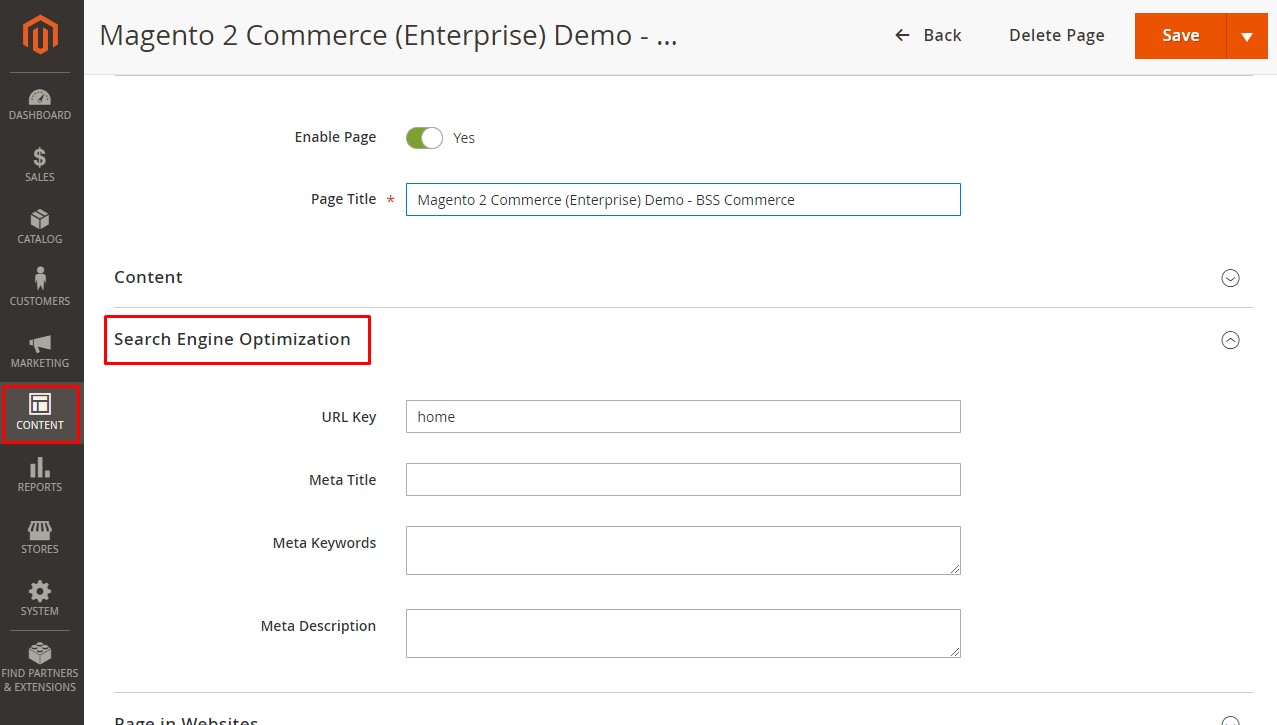
Optimize meta titles & meta descriptions for homepage and CMS Pages
Step 1. Go to Content > Pages.
Step 2. Go to the Home Page or any CMS pages and click the Edit mode.
Step 3. Customize the Page Title field to create a personalized meta title.
Step 4. Expand the Search Engine Optimization section and fill in the URL key, meta title, meta keyword, and meta description.
Step 5. Save the changes to apply the customized metadata.
*Tips: You can use the Ultimate SEO Magento Extension Suite to auto-add meta descriptions, meta titles, and meta keywords for products and categories, overcoming the limitation of the default SEO guide. Furthermore, you can take advantage of Magento 2 AI Content Generator to auto-generate SEO-friendly metadata for your product pages, category pages and CMS pages!
#2. Site Indexing in Magento 2 SEO Guide
Set Up XML Sitemap
The sitemap file assists search engines in deciding which among web pages should be crawled more frequently. Thus, by setting a sitemap structure, the search engines optimize the process of going through the needed pages and extracting information from them. For example, if you maintain a new site, and the sitemap consists of a small number of links, then robotic systems may need help in identifying new pages on the website.
To activate the Magento 2 XML Sitemap, proceed as follows:
Create a Site Map
To create the sitemap:
Step 1. Navigate to Marketing > SEO & Search > Site Map.
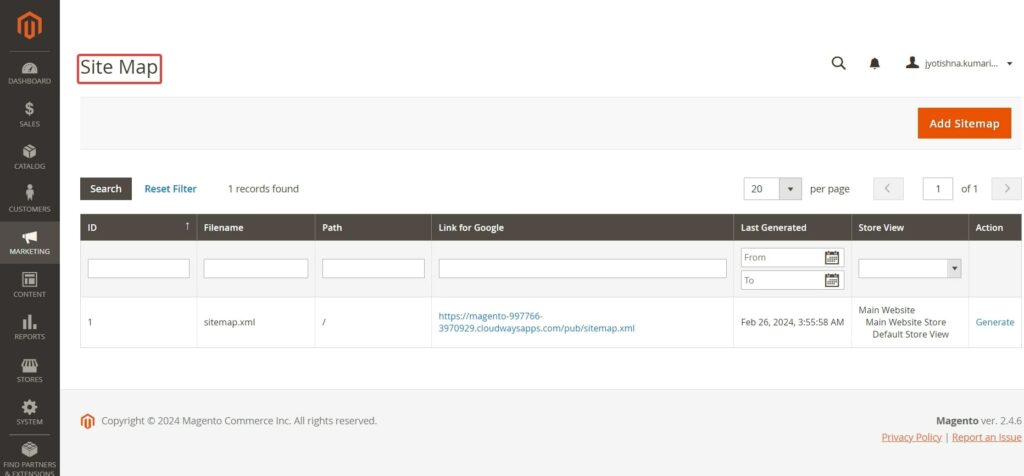
Step 2. Click on “Add Sitemap“ and complete all the required details.
Step 3. Click “Save and Generate.”
XML Sitemap Settings
Step 1. To access the XML Sitemap configuration in Magento 2, go to the store admin panel and navigate to Stores > Settings > Configuration > Catalog > XML Sitemap.
Step 2. Customize the settings for “Categories Options“, “Products Options“, and “CMS Pages Options“ from the drop-down menus.
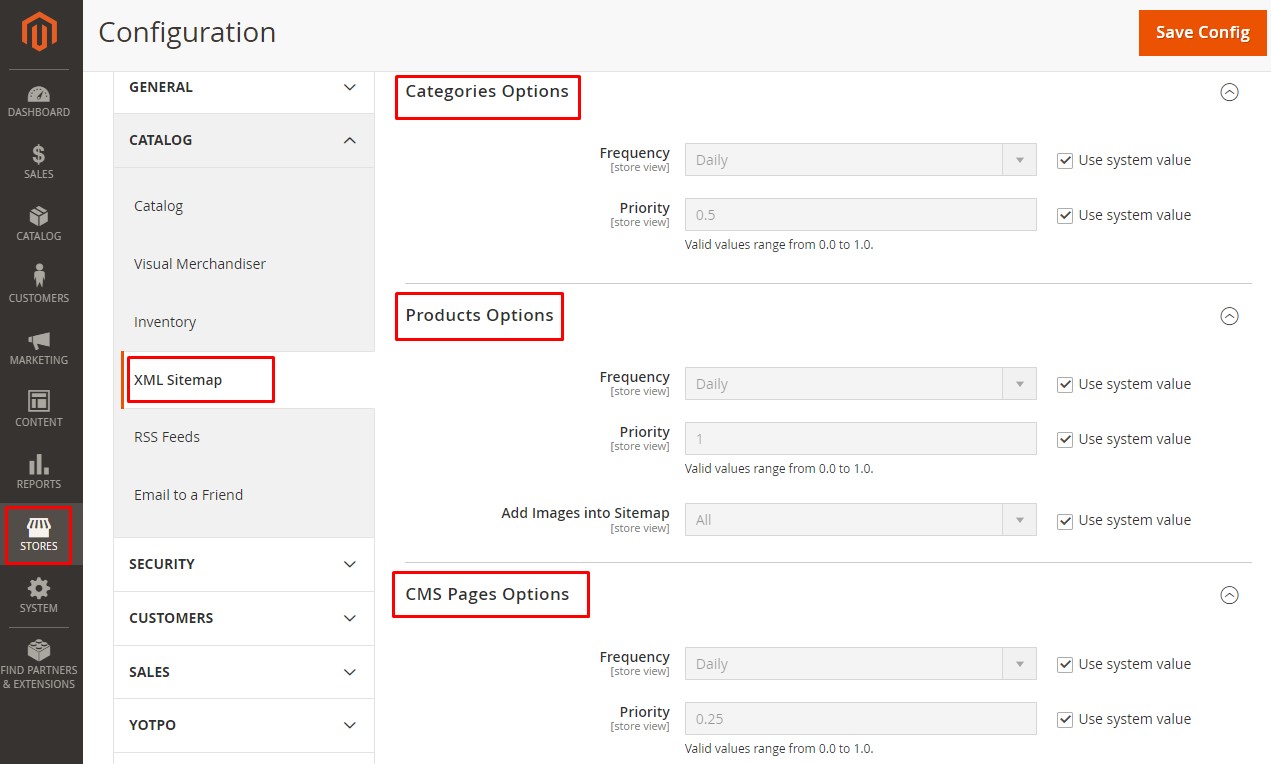
Frequency: select an option to define how often the sitemap is updated. (Always, Hourly, Daily, Weekly, Monthly, Yearly and Never).
Priority: enter a value between 0.0 and 1.0 to determine the priority of categories/ products/ CMS page updates in the sitemap about other content.
Add Images into Sitemap field of the Product Options: let admins add product images into the XML sitemap:
- No: Do not add images to the sitemap
- Base Only: Only add a base image of products into the sitemap
- All: Add all images of products into the sitemap
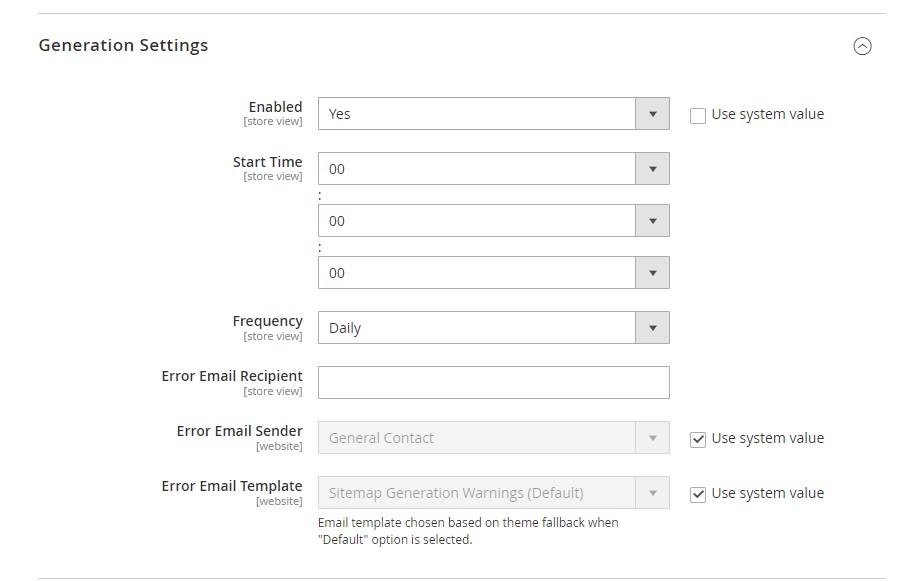
Step 3. Enable sitemap generation by setting “Generation Settings“ to YES with your preferred configurations.
-
- At Enabled: set Yes to make the XML sitemap be generated automatically.
- Start Time: set the time up to the hour, minute, and second to update the XML sitemap.
- Frequency: select Daily, Weekly, or Monthly.
- In Error Email Recipient: enter an email to receive a notification email of an error happening during an update.
- Error Email Sender: select a sender in the store contact as the sender of the error email.
- Error Email Template: select an error email template.
Step 4. Adjust the settings for “Sitemap File Limits“ as necessary.
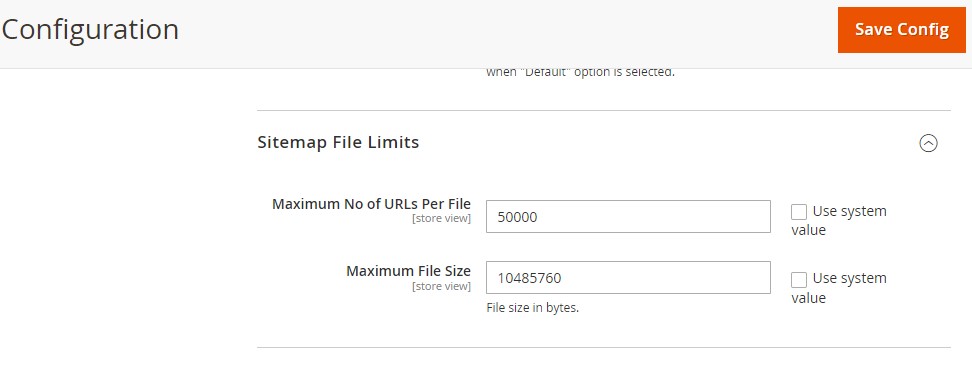
Following the Sitemap protocol for a standard XML sitemap in terms of SEO, a sitemap should not be larger than 10MB and contain over 50 thousand links. In the default value of the XML sitemap, you can notice that these rules are also applied.
In both the Maximum No of URLs per file and Maximum File Size, admins can set the value they want. However, the Sitemap protocol should be followed for the best indexing of the search engine crawlers.
You may wonder what will happen if my XML file crosses the limit. In that case, another XML file will be created, and continue listing the rest of the links in your store. Thus, there may be multiple XML files in case your store contains a massive number of web pages.
Step 6. In the “Search Engine Submission Settings” section, enable the Robot.txt field and set it to “Yes”.
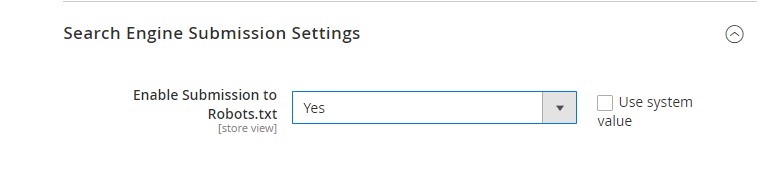
In Enable Submission to Robots.txt: select Yes if you use a robots.txt file to give instructions to search engines crawling your site. However, there are some things to remember: You cannot
- add specific pages to the XML sitemap
- remove links from the sitemap
- and have choices to select which product types to add to the sitemap
Step 7. Click “Save Config” to implement the changes
HTML Sitemap
Default Magento SEO Guide does not support HTML Sitemap at all. If you want to include it on your website, please explore Magento 2 Dynamic HTML Sitemap!
Search Engine Robots Configuration
Meta Robots
The meta robot acts as an HTML tag that tells the search engines if it should crawl through this certain webpage and follow any links on that page. You can control the default robots tag for all pages in your Magento 2 store. Here is how to customize the default robot tag:
Step 1. Access your admin panel and navigate to Content > Design > Configuration.
Step 2. Select the Edit option for the Global Store and expand the Search Engine Robots section.
Step 3. Adjust the Default Robots setting to “INDEX, FOLLOW” to permit search engines to crawl your Magento 2 store and follow all links.
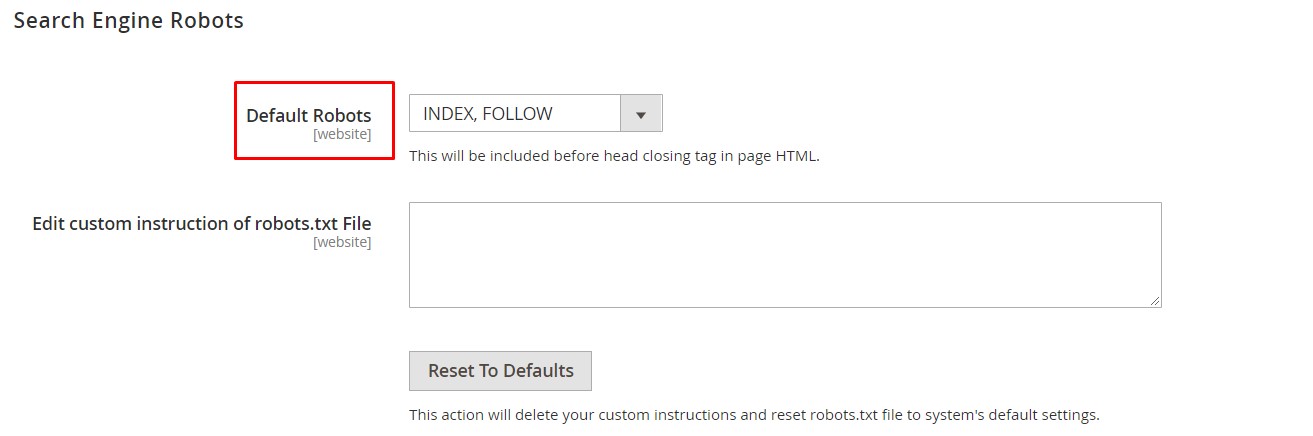
In Default Robots, admins can select among:
- INDEX, FOLLOW: Instructs web crawlers to index the site and check back later for changes.
- NOINDEX, FOLLOW: Instructs web crawlers to avoid indexing the site but to check back later or changes.
- INDEX, NOFOLLOW: Instructs web crawlers to index the site once, but not check back later for changes.
- NOINDEX, NOFOLLOW: Instructs web crawlers to avoid indexing the site and not check back later for changes.
*Note: Default functions in SEO eCommerce Magento do not include setting up Robots for each specific page.
If you want to set a specific instruction, changes can be easily made at Edit Custom instruction of the robots.txt file.
>>> Take a look: Latest Update 23+ Best Free Magento 2 SEO Extensions For ECommerce
Step 4. Click the “Save Config” button located on the top-right corner.
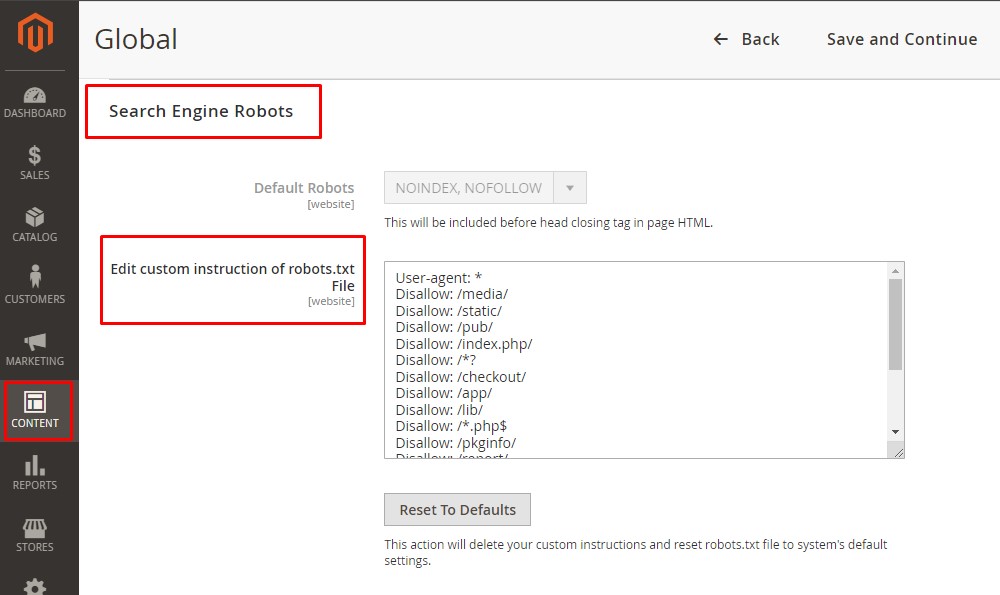
Robots.txt File
The robots.txt file consists of a set of guidelines that instruct search engine crawlers (bots) on which pages to crawl for indexing and which pages to avoid. This is an invaluable asset in keeping crawlers away from some web pages you may not want visible through search engine results. To demonstrate, for Magento 2 you could decide to exclude the /vendor/ directory.
To access the Search Engine Robots section, navigate through Content > Design > Configure > Edit (on Global store). In this section, you can add custom instructions for the robots.txt file.
#3. Manage CSS & JavaScript
Steps to Handle JavaScript in Magento 2
During the process of indexing, the incorrect handling of JavaScript content can have a negative impact on the performance of SEO. It is crucial for search engine crawlers to accurately access and interpret JavaScript content in order to effectively index your web pages.
The speed at which a website loads has a significant influence on its rankings in the SERP. Since Magento utilizes technologies such as Node.js, Knockout.js, and other JavaScript frameworks for all of its page content, it is important to ensure that it is indexed correctly.
Here’s how to mitigate the SEO impact of JavaScript rendering issues:
Step 1. Conduct an audit and optimize the JavaScript code to reduce rendering time and improve overall performance.
Step 2. Perform a comprehensive SEO audit of your Magento 2 website to identify any JavaScript rendering issues that may be affecting SEO.
Step 3. Explore dynamic rendering techniques that allow for the serving of pre-rendered content specifically to search engine crawlers.
Step 4. Use a Magento plugin like Magento 2 Defer Javascript extension to assess the rendering capabilities of Googlebot.
Step 5. Minify, bundle, and compress JavaScript files to reduce file sizes and optimize load times.
Merge and Minify JavaScript and CSS files
It is important to manage JavaScript and CSS resources efficiently for better loading speeds of the site. This can be achieved by combining and compressing these documents helping in the reduction of request numbers towards a server as well as enhancing browser loading times. If you want to use this attribute in your Magento 2 site then go ahead and switch on the Developer mode under settings:
Step 1. Navigate to Stores > Configuration.
Step 2. From the side menu, go to Advanced > Developer.
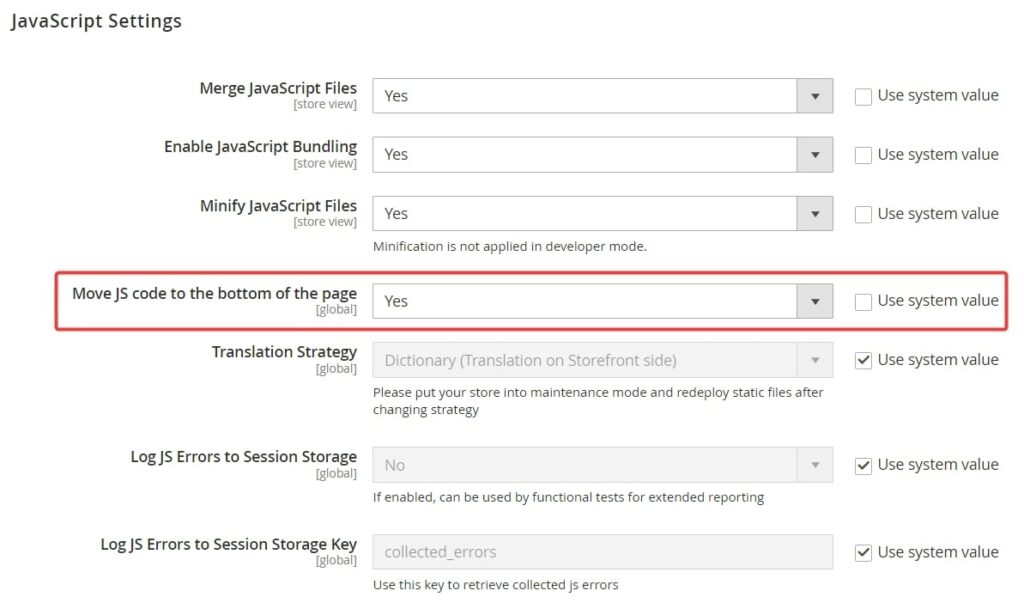
Step 3. Under JavaScript Settings, make sure to enable Merge JavaScript Files, Enable JavaScript Bundling, and Minify JavaScript Files.
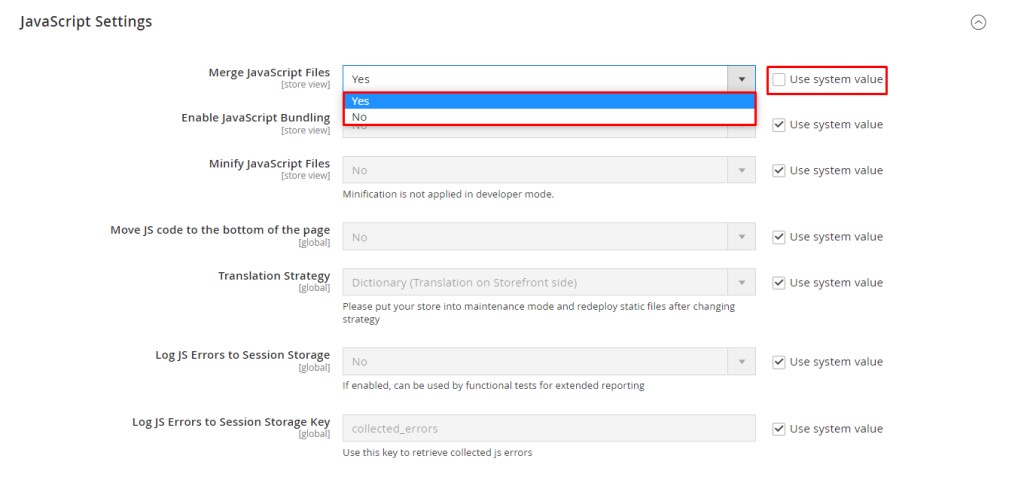
Pro Tip: By choosing the “Move JS Code to the bottom of the page” section, you can improve the loading rate of your website and solve the render blocking problem. This is quite useful for Magento eCommerce sites, which face SEO challenges on the pages that rely on JavaScript to present such things as lists of products, navigation, and filters.
Step 4. For CSS Settings, enable Merge CSS Files and Minify CSS Files to further enhance site performance.
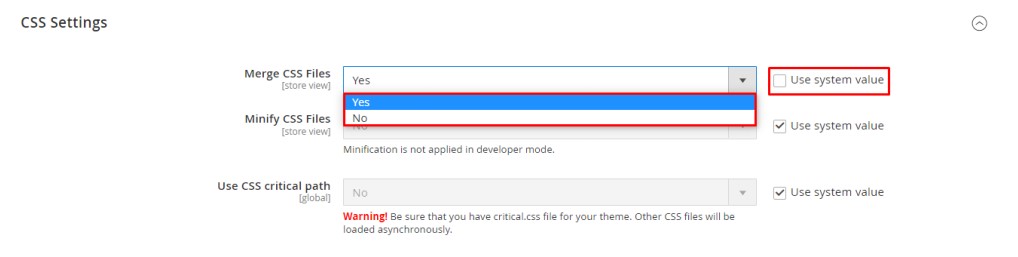
Step 5. Select “Yes“ to merge the JavaScript and CSS files
Step 6. After making these changes, remember to click on the “Save Config” button at the top-right corner to apply the settings.
#4. Implement Canonical URLs
Applying a canonical tag on category and product pages could be an easy way of dealing with such problems within Magento SEO because duplicate content is such a serious issue for internet marketers who operate eCommerce sites. To enable canonical URLs, follow these steps:
Step 1. Go to Stores > Configuration.
Step 2. Expand Catalog > Catalog > Search Engine Optimization from the side menu.
Step 3. Select the appropriate Store View at the top of the page (e.g., Default Store View).
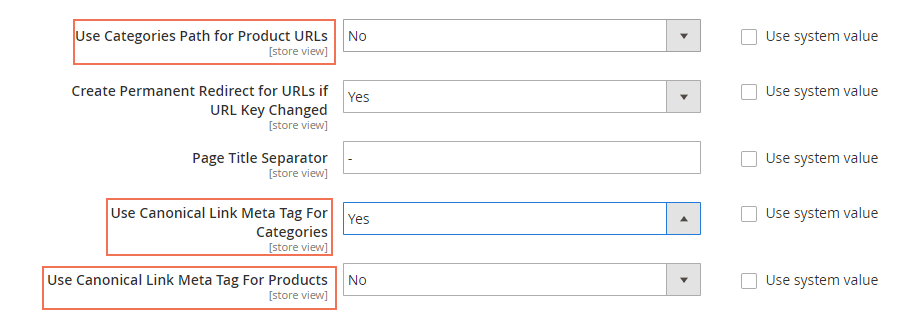
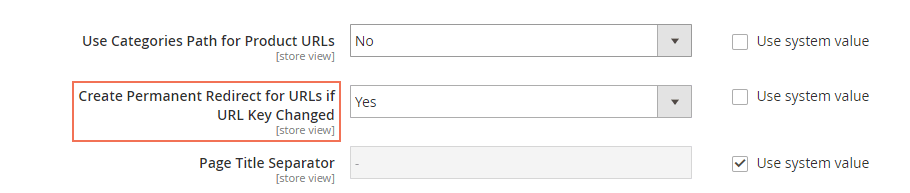
Step 4. Setting Use Categories Path for Product URLs fields
In Use Categories Path for Product URLs, this Magento SEO setting option decides whether category paths are included in product URLs. For example, a Chaz Hodie is under both the Eco-Friendly and Hoodies category.
If you choose Yes in this option, there may be SEO-friendly URLs pointing to the same product they are:
- http://yourstore.com/eco-friendly/chaz-hoodie.html
- Or http://yourstore.com/hoodies/chaz-hoodie.html
Hence, the suggested option for this is No. Then, there is only one URL http://yourstore.com/chaz-hoodie.html when a customer accesses the item from any category.
Step 5. In the displayed settings, find “Use Canonical Link Meta Tag For Categories” and “Use Canonical Link Meta Tag For Products.” Set their values to Yes.
Step 6. Click “Save Config.”
Thanks to enabling canonical URLs, you ensure that both product and product category pages have canonical references, effectively reducing the risk of duplicate content issues.
#5. URLs Optimization in Magento 2 SEO guide
User-friendly URLs
Magento 2 creates URLs automatically using properties like page titles and category names. Nevertheless, frequently, they do not satisfy the standards for being SEO-optimized. Because, mostly they’re:
- Too long.
- Do not always include the target keyword.
- Contain unnecessary numbers.
If you want to make sure that your URLs are optimized for search engines and user-friendly in Magento 2, you should modify the default URLs. This modification can only be done through Magento 2 SEO settings by changing URLs of various entities in this platform. Here are some additional tips for creating SEO-friendly URLs:
- Add your target keyword, which accurately describes your product.
- Separate words in the URL using hyphens (e.g., joust-duffle-bag).
- Avoid including numbers, special characters, and stop words like “a,” “the,” “but,” “for,” etc.
- Maintain a consistent URL format throughout your entire website.
- Keep the URLs concise and easy to read.
URL suffix
The suffix is a part of the URL after the URL key. It is the .html or .htm part. In search engine optimization, the suffix should be excluded from the URL for the following reasons. Firstly, this information offers no value to users or search engines. Moreover, it needlessly increases the length of your URL.
To do it in Magento 2 SEO guide, access Stores => Configuration => Catalog => Catalog => Search Engine Optimization.

In Product URL Suffix and Category URL Suffix, you can set any suffix or remove them. When removing the .html from the URL, your old links, including the suffix, turns to a 404 error page. Thus, you may need some consulting from SEO experts on how to fix this.
URL rewrite and redirect
An SEO-friendly URL is one of the most important factors used to rank a website by search engines. According to Google, “A site’s URL structure should be as simple as possible. Consider organizing your content so that URLs are constructed logically and in a manner that is most intelligible to humans”.
URL Rewrite is a familiar technique widely used by a lot of websites. It lets you rewrite the complicated URLs generated by systems into a new one which is better for your ranking as well as customer experience.
New URL keys now can be shorter, cleaner, and make more sense than the old ones.
The default settings in Magento SEO tutorial already have the product and category URL named based on the product and category names. However, the admins can also change this setting for better SEO at the backend by optimizing friendly URL.
Remove ‘index.php’ file
In terms of default Magento 2 SEO features, URLs contain the file name index.php (www.abc.com/index.php/men), which is useless to both users and crawlers. To remove this, follow this instruction
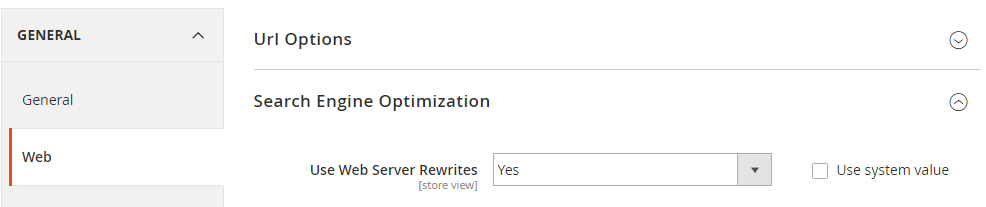
Go to Stores ⇒ Configuration ⇒ General ⇒ Web ⇒ Search Engine Optimization. Set Use Web Server Rewrites to Yes and the index.php will be auto-removed (www.abc.com/men).
Moreover, URL key rewriting can be used for keyword-rich and search-friendly links. As changing the URL makes your previous URLs lead to a 404 error page, redirecting optimization is also required at the same time. Below is how to rewrite URLs and set up redirects for SEO.
Automatic redirects settings
Under Stores ⇒ Configuration ⇒ Catalog ⇒ Search Engine Optimization, you can find an option named Create Permanent Redirect for URLs if URL Key Changed. Here, select Yes to enable auto redirect when the URL is replaced.
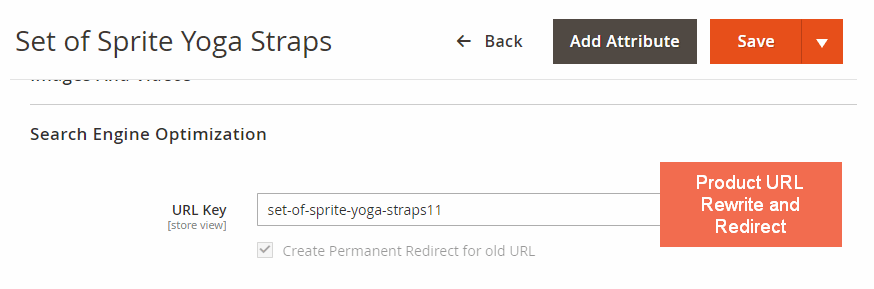
Product URL redirect
In order to change the URL key for a specific product, access Product ⇒ Catalog then select the items you want to configure. In Search Engine Optimization section, update the URL Key as needed, using all lowercase characters and hyphens instead of spaces.
Make sure that the Create Permanent Redirect for old URL checkbox is selected. Tap Save and clear the cache to complete this process.
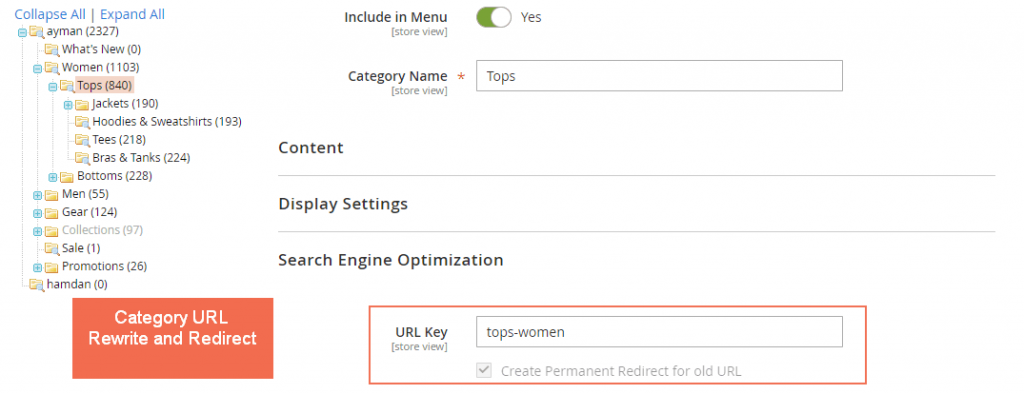
Category URL redirect
The same goes for category URL rewrite optimization. Under Product ⇒ Categories, find the category in the tree. In the Search Engine Optimization section, write the new URL Key, using all lowercase characters and hyphens instead of spaces.
Make sure that the Create Permanent Redirect for the old URL checkbox is selected. Tap Save and clear the cache.
*Note: This permanent redirect is not applied to CMS pages. If you want to change the URL key of a CMS page, you have to create 301 redirects at Marketing ⇒ SEO & Search ⇒ URL Rewrites.
Also, in case a product is deleted or disabled, a 301 redirect to the homepage is necessary. Otherwise, the product URL will redirect to a 404 page.
Create a URL rewrite
You go to Marketing ⇒ SEO & Search ⇒ URL Rewrites, and you can see a grid table of default URL Rewrites.
You click Add URL Rewrite button.
In Create URL Rewrite, you choose Product from the dropdown list.
You click a product and click Skip Category Selection button under the category tree to go to URL Rewrite Information.
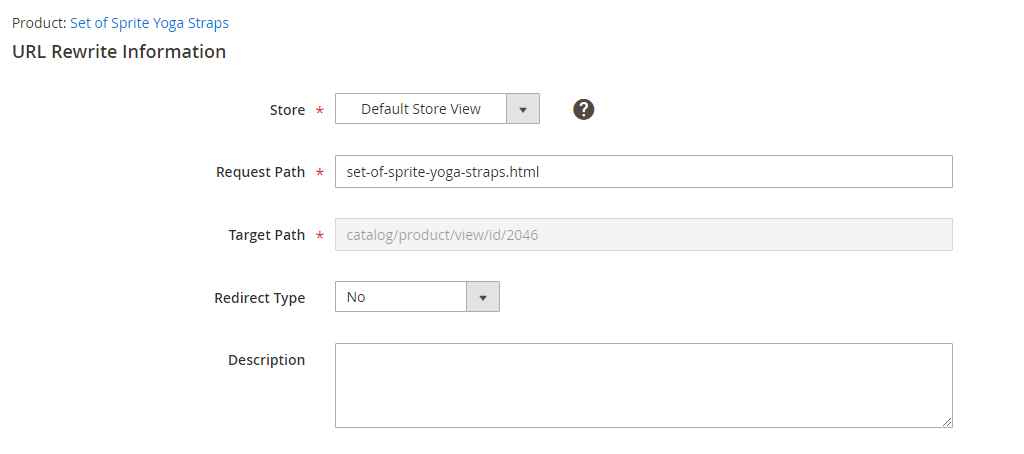
In Store: you choose a Magento level that URL Rewrite is applied. If you have multiple store views, let’s select Store. Otherwise, the URL rewrite is created for the store view level.
In Request Path: you enter the new path for the product. Please add a suffix with the new path if it has.
*Note: The Request Path must be unique for the specified store. If there is already a redirect that uses the same Request Path, there is an error when saving the redirect. The previous redirect must be deleted before you can create a new one.
In Redirect Type: You can choose No, Permanent (301), and Temporary (302).
- Permanent (301) means that the product URL is rewritten permanently and search engines can retain page rank information for permanent rewrites.
- Temporary (302) means that the product URL is rewritten for a limited time and search engines don’t retain page rank information for temporary rewrites.
In Description: you can give some description of this URL Rewrite.
Then, you Save the configuration for this SEO setting and see the URL Rewrite in the grid table.
Other Magento 2 SEO Tips
#1. Image Optimization
Alt text plays an important role in helping search engines understand the content of images and give them a weight of rankings in SERPs. The reason is that search engines cannot know what your images tell about without alt text. Hence, adding Alt text for images on your website is a necessary SEO tip if you want to get higher rankings.
In SEO for Magento, you can manually insert Alt text for every image on your site, from product images to the store logo.
- Alt text for the store logo
Please go to Content ⇒ Design ⇒ Configuration and find a store view you want to edit.
![]()
In Header, enter Alt text in the Logo Image ALT section.
- Alt text for product images or other images on the content pages
For product images, just navigate to each product edit page, then select Image and Video and click each image to enter the alt text.
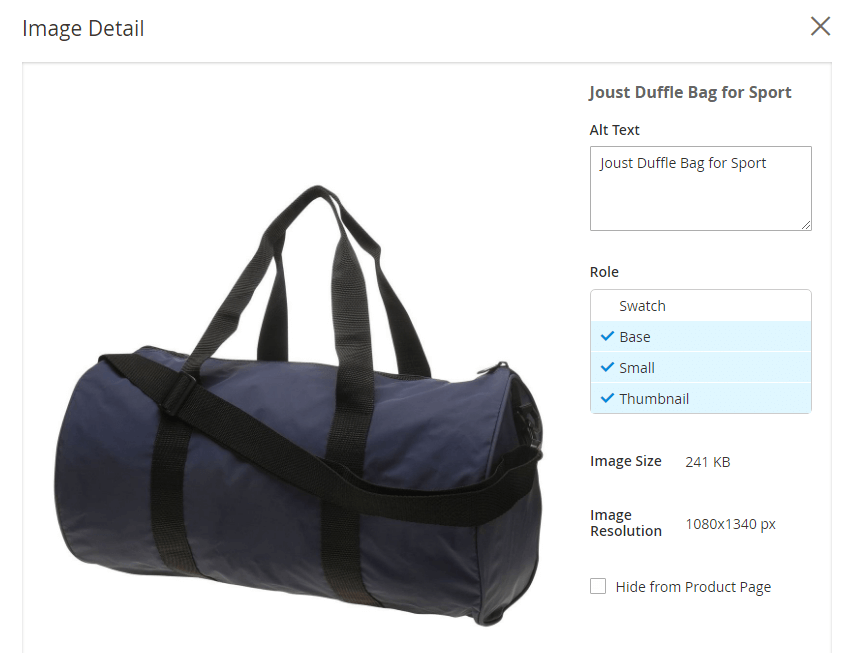
For other images on the content pages, you can add the alt text when inserting images conveniently.
#2. Implement Schema Markup for Rich Snippets
Schema markup, which is also referred to as structured data, is code to give search engines further details concerning the SERPs they can display. Such data can be average ratings, products’ availability, prices, Breadcrumbs, and images of products.
Enabling schemes can help make your web page capable of appearing in Google Rich Snippets. Despite popular discussions about rich snippets not influencing the SEO rankings per se, one may see increased CTRs. The eligibility for rich snippets can also be checked using the Google Rich Results Test tool and possible problems with the structured data.
In Magento 2, structural data markup of the simplest type is introduced on pages with products by default. However, if you want to obtain more complicated and rich results, the additional schemas can hardly be obtained from basic FOMM, and extra third-party extensions or custom development may be required.
#3. Secure Your Site with HTTPS
Most search engines prefer sites that use HTTPs as the protocol through which the site operates over sites that use HTTP. Like in the previous sections in SEO for Magento 2, it’s important to use the HTTPS, as it is marked by the padlock in the address bar to guarantee users that their data is safe.
Configuring HTTPS in Magento 2:
Step 1. Go to Stores > Configuration.
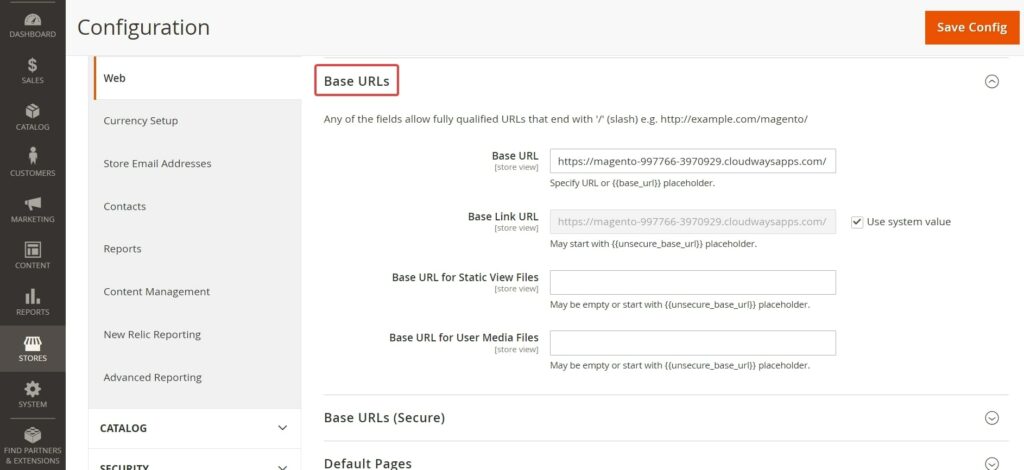
Step 2. In the side menu, navigate to General > Web
Step 3. Check that the Base URLs (Secure) section has the Base URL and Base Link URL set to HTTPS.
Step 4. Enable “Use Secure URLs on Storefront” and “Use Secure URLs in Admin.”
Step 5. Save the configuration changes and clear the cache if needed.
Implement 301 redirects to automatically redirect HTTP URLs to their HTTPS versions. This ensures that traffic is directed to the correct content indexed by search engines, even if users do not enter the exact URL.
Pro Tip: Magento typically uses 302 redirects by default. Use 302 redirects for temporary migrations and 301 redirects for permanent redirects.
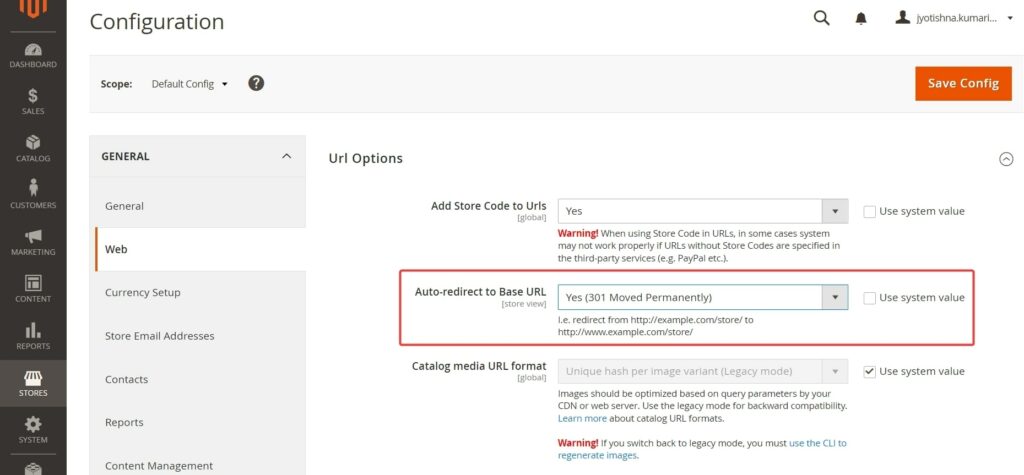
To configure redirects:
Step 1. Go to Stores > Configuration.
Step 2. In the “General” dropdown, choose “Web.”
Step 3. Select the “Url Options” dropdown.
Step 4. Change “Auto-redirect to Base URL” to “Yes (301 Moved Permanently).”
#4. Connect Magento 2 with GA4
As you have seen, when you adjust all the necessary Magento 2 SEO settings, website traffic starts to rise. With the help of GA4, you can realize which strategy works and which one requires changes. It will enable you to determine the traffic sources, user engagements, and any barriers to the users’ interactions.
If you want to link your Magento 2 store with GA4, it is recommended to use Magento 2 Google Analytics 4 extension by BSS Commerce. This extension can also help you track the website performance by collecting event data of websites and applications. The great thing is that you don’t need to be a web developer or programming guru or get help from Google Tag Manager to link Magento 2 stores to GA4.
Step 1: Sign up for Google Universal Analytics
You need to access the Google website and create an account for Google Universal Analytics.
Step 2: Configure on Magento backend
Please navigate to Store ⇒ Configuration ⇒ Sales ⇒ Google API.
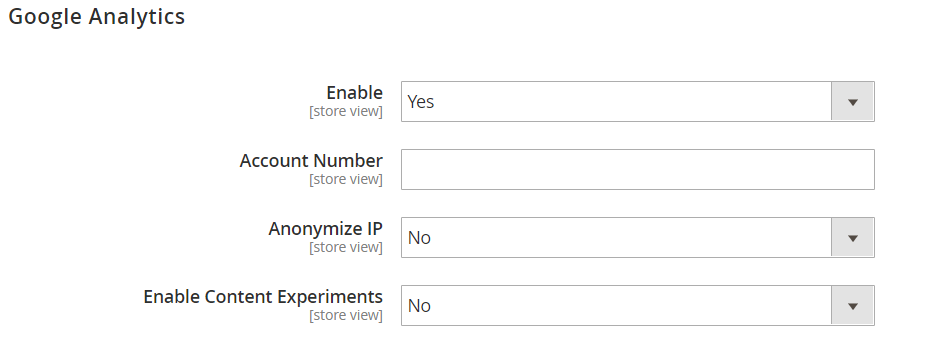
- Choose Yes in Enable.
- In Account Number: enter your own account number which you can get right after signing up the account. (Tracking ID).
- In Enable Content Experiments: Set Yes to do A/B testing and other performance tests on your content.
#5. Google Adwords
To advertise products on Google Search Result Pages (SERPs) or on other pages in the Google Network Display, we need to use Google Adwords service to set up advertisement campaigns. Keep following these configurations in Magento SEO guide:
Step 1: Create Google AdWords campaigns
Please navigate to Google AdWords and create an account.
To add a new campaign, read this instruction.
To track conversions brought via Google AdWords, you need to set up conversion tracking of your campaigns:
Click Tools ⇒ Tools and Analysis tab and select Conversions. You are redirected to All Conversions page, then click on the Conversion tab and continue to click on the +Conversion button.
Choose Website as the conversion source.
Enter a name for the conversion action you want to track.
Click Done
Click Value. Then if applicable, assign a value to the conversion. For example:
+ If you make $5 on each sale, choose “Each time it happens”, and assign a value of $5.
+ If the value of each sale varies, leave the value blank.
Continue to tab Conversion window, and finish necessary settings.
Finally, click the Save and Continue button.
Step 2: Get your conversion tag
Go to Install your tag section and determine how many conversions to count on Page load.
Add the Google Site Stats notification to the conversion page. The notification will appear in the lower corner with a link to Google’s security standards and cookie usage.
To manage your AdWord tags, you can select one of the following options:
Choose Save instructions and tag to add the script to your store by yourself.
Choose Email instructions and tag to get other people to add the script to your store.
Then, click Done.
Step 3: Set up on Magento store
Navigate to Store ⇒ Configuration and choose store view to set up if you want.
In Sales, select Google API and go to Google AdWords section:
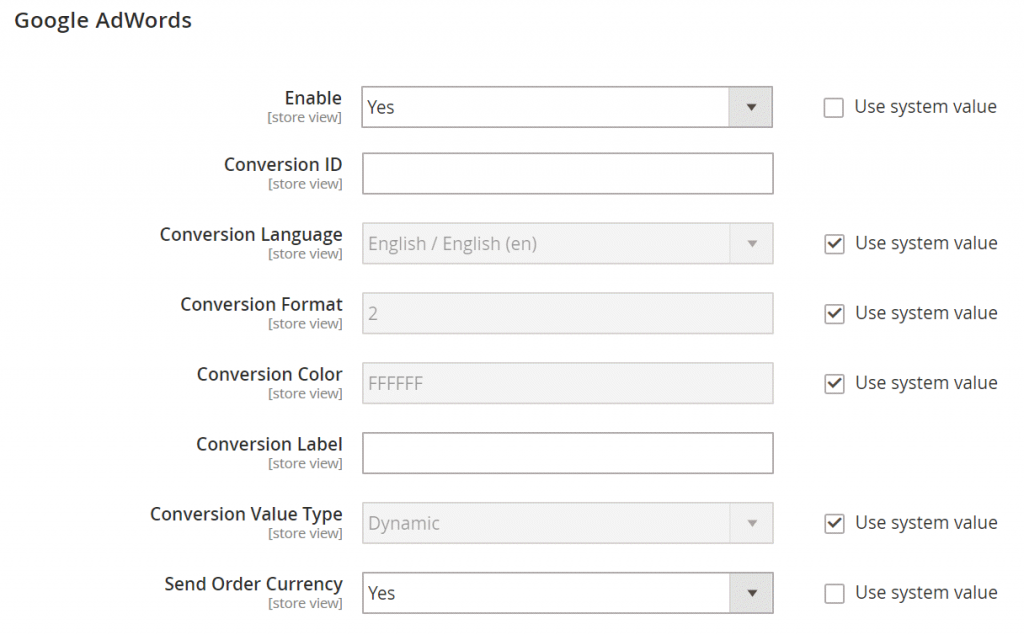
Set Yes for Enable field
Enter Conversion ID that you get from Google AdWords script.
For Google Site Stats notification, you need to make the following settings:
In Conversion Language: select a language that is identified in your Google AdWords script.
In Conversion Format: enter a number that specifies Google Sites Stat notification on the conversion page.
- show a one-line notification along with a link of reference to read about Google Tracking.
- show a two-line notification along with a link of reference to read about Google Tracking.
- no customer notification.
In Conversion Color: enter a color code for the Google Site Stats notification label.
For Conversion Label: Enter the encrypted text.
and in Conversion Value Type:
If you choose Dynamic, a conversion has occurred based on the dynamic Order Amount value.
But if it is Constant, a conversion has occurred based on a specific value entered.
Finally, click the Save Config button.
Step 4: Track status config verification
You can track the status in your Google AdWord dashboard:
- Unverified
- No recent conversions
- Recording conversions
#6. Install Magento 2 SEO Extension Suite
As mentioned above, Magento 2 SEO Guide cannot cover all features and it would be better if you install the Ultimate SEO Magento extension to equip enough necessary functions.
SEO extension developed by BSS Commerce is an all-in-one SEO solution for every website. This Magento SEO extension includes all important features to make a website SEO-friendly such as:
- Advanced HTML and XML sitemap
- Canonical tags and Hreflang tags to avoid duplicate content
- Meta tag and ALT tag template
- Rich snippets to make websites highlighted on SERPs
- Advanced breadcrumbs
- 301 redirects and external links
- Smart SEO analysis, SEO report, and SEO audit
Mistakes to Avoid for Effective Magento SEO
In addition to the numerous benefits of Magento 2, there are some common SEO mistakes when optimizing online stores:
#1. Addressing Duplicate Content Problems
Many Magento websites need help to utilize the same content due to misconceptions regarding product descriptions about different variations of products, categories, and filtered navigation.
- Tips and Solution: Through the canonical tags, you can distinguish between the original content and its duplicates.
#2. Maintaining Default Meta Tags
When metadata is managed well, it has potential to improve search placement since it helps to meet the users’ expectations. If practices of metadata are not updated, Magento SEO best practices can suffer and traffic and conversion rates will decrease.
- Tips and Solution: Use concise and effective meta-tags on each page to clearly define the content of your website.
#3. Ensuring Indexing of Both HTTP and HTTPS Versions
Indexing both the HTTP and HTTPS versions of your website can lead to duplicate content issues. Search engines may view these two versions as distinct websites, despite their similarities.
- Tips and Solution: To avoid these issues, selecting either HTTP or HTTPS for indexing your website is crucial. By doing so, search engines will be able to easily identify the correct URL for indexing and ranking purposes.
#4. Implementing the Default Title for Magento Homepage
Most Magento store owners make a simple mistake in Magento 2 SEO by sticking with the basic homepage title that comes with the Magento store. This default title is usually nondescript unless it is something like ‘home page’ or ‘magento commerce’.
- Tips and Solution: Create a captivating title that highlights the offerings of your store and resonates with the keywords prospective customers commonly employ while searching for products similar to yours.
#5. Avoiding Blocking of Site Search Results in robots.txt
Failing to exclude site search results in the robots.txt file is a common Magento 2 SEO mistake. These search results are typically irrelevant and may cause duplicate content problems, ultimately harming the search rankings of a website.
- Tips and Solution: Please modify the following text: Set up the robots.txt file to provide instructions to search engines to refrain from crawling and indexing these pages. Add the line with the “Disallow:” section that prevents URLs containing the search query parameter from being accessed.
#6. Backlink Techniques
High-quality and relevant backlinks in the site help to increase website credibility to reach user intent to identify and highlight a particular niche market product and service. This leads to an efficient and effective construction of linkages hence producing search results that are ranked high.
- Tips and Solution: Use high-quality backlinks to enhance the credibility and rankings of your website.
#7. Allowing Indexing of Internal Search Pages
It is not advisable for search engines to include internal search results pages in their indexes. The search bar of this site creates a URL every time someone types something in while some users prefer conducting unique searches there; hence, leading them towards using internal methods instead. This practice has led to high levels of information being generated in Magento catalog searches, making it quite difficult for Googlebot to explore them all at ago.
- Tips and Solution: Do not place indexing tags on internal search result pages or restrict access to them by search engines through the use of the robots.txt file.
Wrapping Up – Magento 2 SEO Guide
Magento 2 SEO includes a wide range of strategies and techniques that are essential for optimizing your Magento 2 store. With numerous options available, you can use various features to enhance your store’s SEO, as settings and configurations are relatively basic and static. Achieving optimal SEO results requires significant time and manual effort. It is important to understand that the outcomes may take weeks or even months to materialize, especially when employing fundamental techniques to improve rankings.
For Magento stores, SEO plays a crucial role in the success of their website. This is a platform with a high technical level and may get a bit complicated but if you are a store owner do not be afraid because we have many Magento plugins both paid and free that can be used on Magento platforms which will help you achieve the best ever rankings which your customers will really love. If you need help or have something to say shoot me an email!

