Smoothen B2B Experience with Shared Catalog Magento 2
Shared Catalog is a must-have feature for Magento 2 B2B websites. Knowing how to utilize it to enhance the B2B shopping experience will bring about enormous advantages for your B2B online store.
This blog post will provide all necessary information about Shared Catalog in Magento 2 in 3 main points: What – Why – How.
Now, let’s begin!
What Is Magento 2 B2B Shared Catalog?
IN CASE you’re looking for a quotation function, take a look at Magento 2 B2B Quote of Commerce edition.
Shared Catalog Magento 2 is an indispensable feature in B2B websites. It enables store admins to customize prices for different companies, and B2B buyers. This means that it creates custom catalogs in addition to the original master catalog.
This feature can be referred to as Price per customer, as each B2B buyer will view different prices for each product.
If the store admin enables the shared catalog feature, only the admin can continue to view the standard master product catalog. The Default (General) public shared catalog will be visible from the storefront. Moreover, store admins can configure custom catalogs to be visible to particular company accounts.
It is empty in the default shared catalog. It doesn’t include any product beforehand. Therefore, store admins need to assign products to be displayed on the storefront. Then, you can manage the catalogs effectively with the Shared Catalog grid.
Why Do B2B Websites Need Magento 2 B2B Shared Catalog Feature?

ENHANCE your customer experience with Magento 2 Company Account feature, also on Commerce edition!
The shared catalog feature enables B2B sellers to set different prices for each customer in mass quickly. For that reason, you don’t have to spend a lot of time personalizing every single product’s price. It is much more enhanced than the original way.
You can also provide better pricing for many customer groups, not only the Magento default customer groups but also the defined customer group for custom catalogs. With the shared catalog feature, the customer shopping experience will be smoothened. You set different pricing for each customer without them figuring out the difference.
How to Create A Shared Catalog Magento 2?
If you are running multiple websites, you have to make sure to configure the price scope before creating a shared catalog.
Quickly, you only have to open the Admin sidebar and go to Stores > Settings > Configuration > Catalog > Price. Then, please set the Catalog Price Scope to Global or Website and click Save Config.
Now, you can create a shared catalog in Magento 2 following either of these 2 methods below.
Method 1: Create A New Shared Catalog

- Open the Admin sidebar and choose Catalog > Shared Catalog.
- Look at the upper-right corner, select Add a Shared Catalog.
- Assign a Name of the shared catalog.
- Set Type to Custom.
- Set Customer Tax Class to an appropriate category.
- Click Save, and the new shared catalog will be saved in the grid.
Method 2: Copy An Existing Shared Catalog
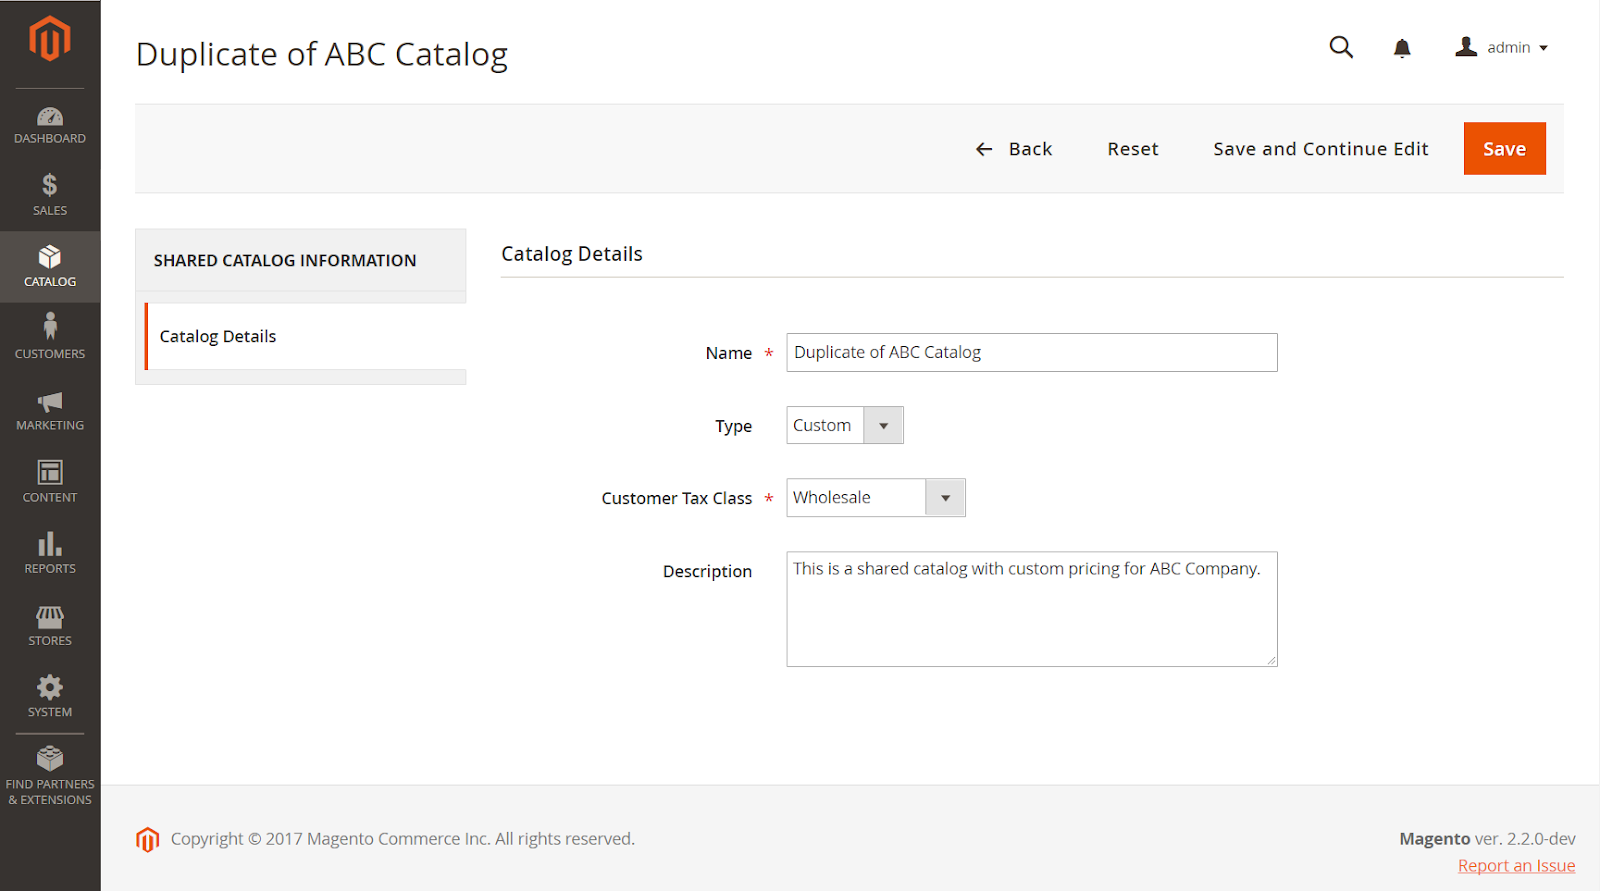
If duplicating an existing shared catalog, the original pricing model and structure, except company associations will be maintained.
- Open the Admin sidebar and choose Catalog > Shared Catalog.
- In the Shared Catalogs grid, select General Settings at the Action column of the shared catalog that you want to duplicate.
- Choose the Duplicate option and adjust the information if necessary.
- Click Save, and the Duplicate of the original shared catalog will be saved in the grid.
Set Pricing and Structure & Assign Companies
The newly created shared catalog is empty. You should configure it with a suitable product selection. Let’s continue with setting pricing, structure, and assigning companies.
Set Pricing & Structure
Firstly, you need to open the shared catalog that you want to configure. Then, please click Set Pricing and Structure at the Action column of the chosen shared catalog and select Configure to continue.
Step 1: Choose the products

- Set the scope of configuration in the Store chooser.
Note: The Store chooser will only appear at the first configuration.
- In the category tree on the left, choose one of the following based on your demands: Select all, click on specific checkboxes of particular categories of products, deselect the checkbox if excluding products.
- Click the category name on the tree to view category products in the grid.
- Use filters and other grid controls to find the targeted products quickly.
- To deselect individual products, click the toggle in the first column, setting it to the Off mode.
- Click Next to continue.
Step 2: Set custom prices
You can set custom prices for each product or use the Action control to set a fixed amount or percentage for multiple records.
- Apply a custom price:

- Set Website to the site that you want to apply custom prices.
- Select products by using the category tree, or by setting Mass Actions control to Select All, or selecting individual checkboxes.
- Set Actions to Set Discount or Adjust Fixed Price.
- Fill in the discount amount and choose Apply.
- Choose Generate Catalog and Save to complete.
- Apply a tier price:
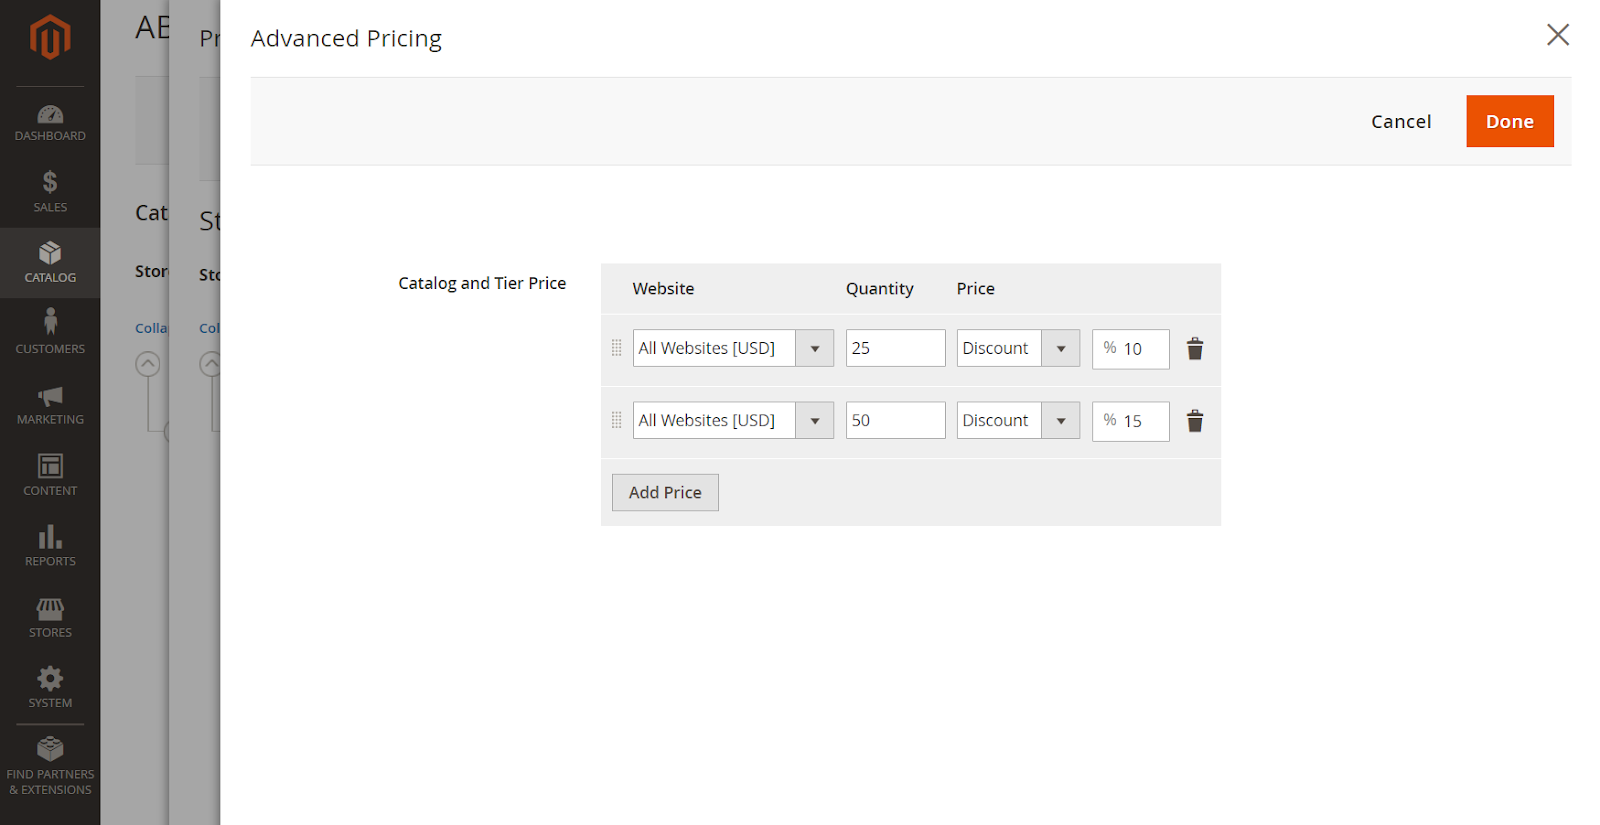
- At the Tier Price column of the targeted product, click Configure.
- Click Add Price.
- Set Website to the site that you want to apply a tier price.
- Fill in the must-be-purchased amount to receive a discount.
- Set Price to Fixed or Discount.
- Enter the discount amount.
- Click Add Price and repeat the whole process to add another tier price.
- Click Done to complete.
Assign Companies
You have 2 methods to assign companies to a shared catalog:
- Assign companies from shared catalogs
- Assign companies by editing the company account
Method 1: From Shared Catalogs
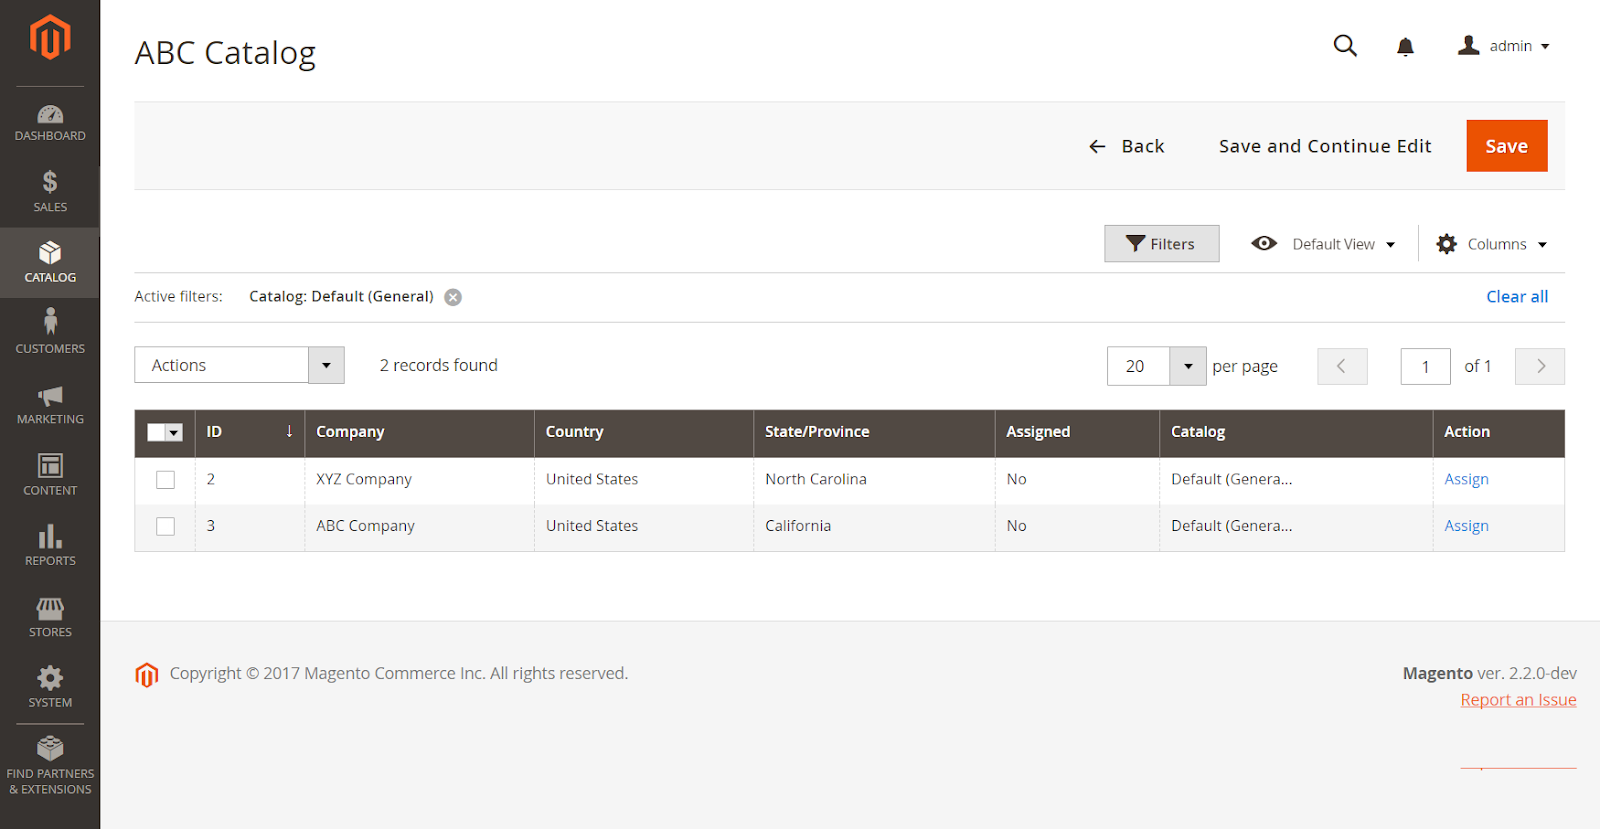
- Open the Shared Catalogs grid by going to Catalog > Shared Catalogs.
- Choose Assign Companies at the Action column of the targeted shared catalog.
- When a list of available companies appears, click Assign at the Action column of the targeted company.
- Repeat the process if you want to assign multiple companies for the shared catalog.
- Click Save to complete.
Method 2: Edit Company Account
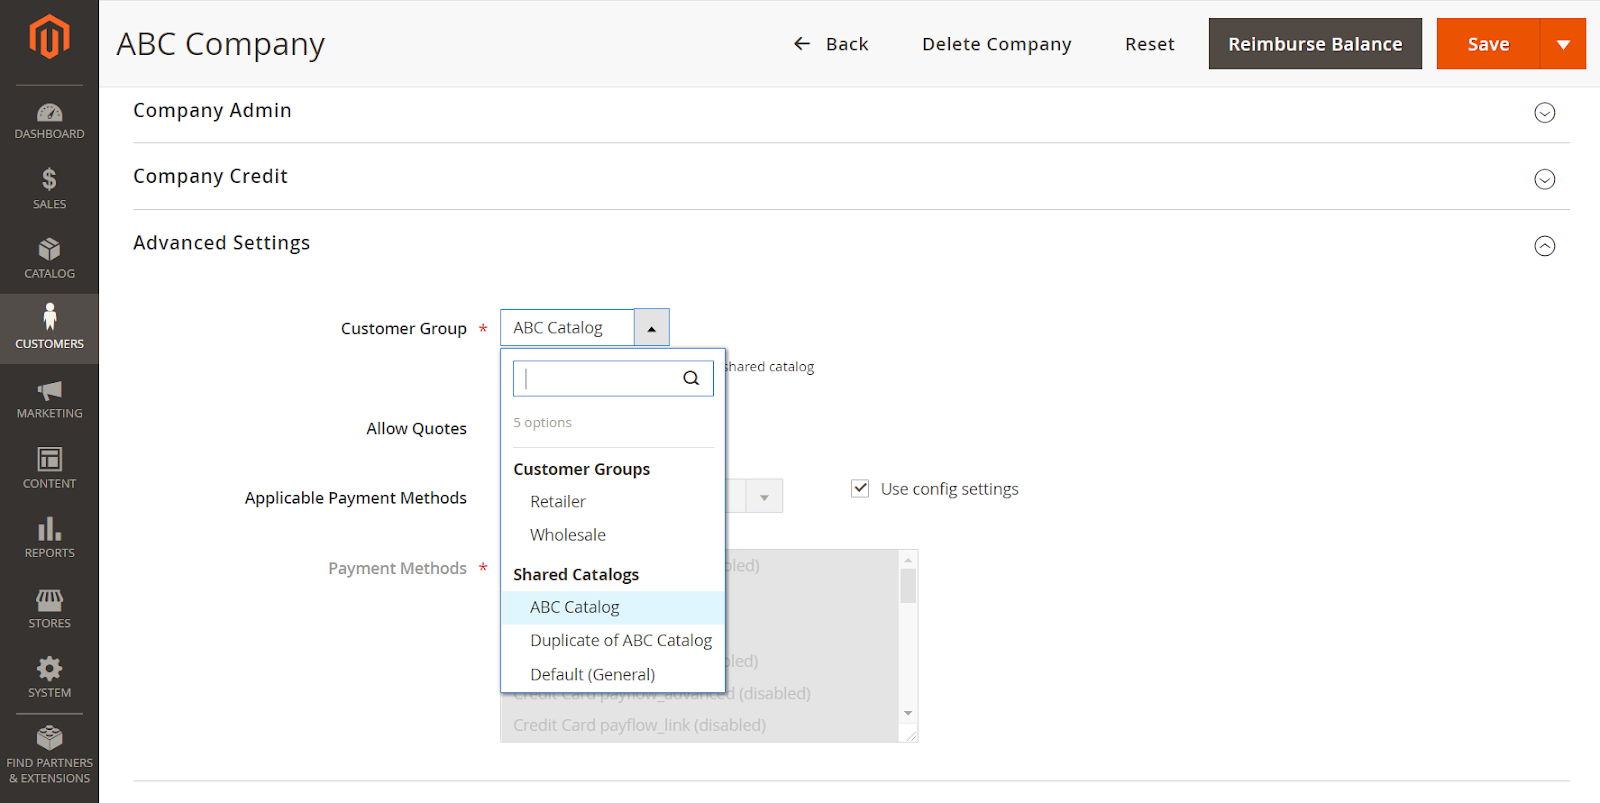
- Open the Companies grid by going to Customers > Companies.
- Click Edit at the Action column of the targeted company.
- Expand the Advanced Settings section and set Customer Group to the targeted shared catalog.
- Click Proceed and choose Save to complete.
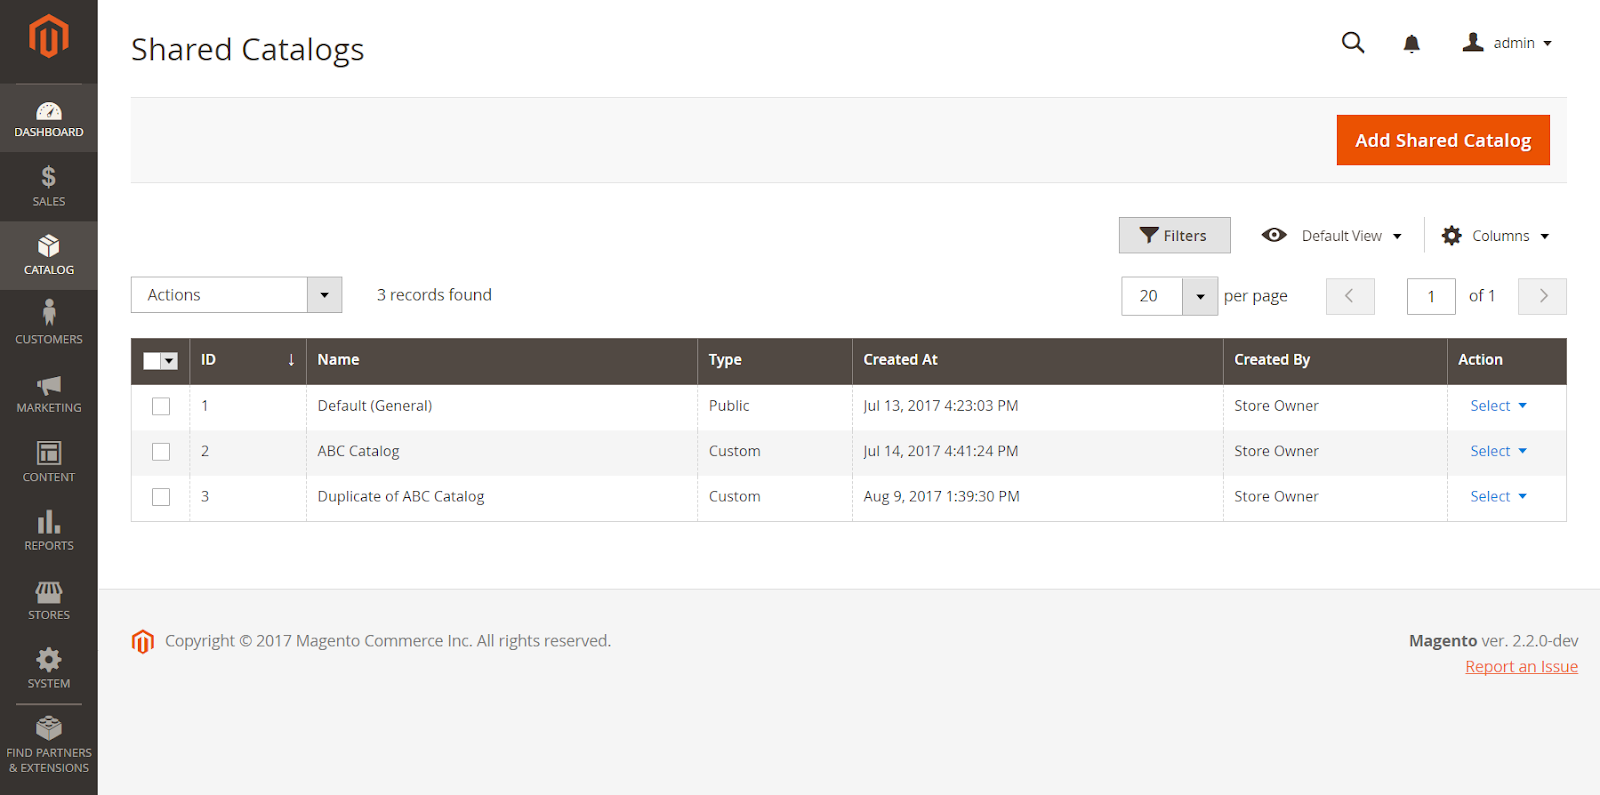
Shared Catalog Magento 2 Management

WANT MORE? CLICK HERE for the complete Magento 2 B2B features of Commerce edition!
You can easily manage a shared catalog with tools provided on the Shared Catalogs page. Such a page acts like a standard Admin workspace that you can effortlessly keep track of multiple shared catalogs in the form of a grid, managing with filters and action controls.
With action controls, you can configure created shared catalogs by:
- Setting pricing and structure
- Assigning companies
- General settings
- Deleting