When it comes to eCommerce platforms like Magento 2, image optimization plays a crucial role in improving the overall performance of the online store. High-quality images are essential for showcasing products, but they also consume significant bandwidth, which can slow down page load times and negatively impact the user experience and SEO.
Thanks to using the WebP image format in a Magento 2 store, you can achieve a balance between image quality and file size. This can lead to faster page load times, an improved user experience, and potentially higher conversion rates. In the following sections, BSS Commerce will delve deeper into Magento 2 upload WebP images and how to upload WebP format in Magento 2. Stay tuned!
What is WebP Images?
Table of Contents
WebP is a modern image format that offers high-quality lossless and lossy compression for web images. WebP is supported by default in Google Chrome, Safari, Firefox, Edge, the Opera browser, and various other tools and software libraries.
Thanks to WebP, website owners and developers can produce more compact, higher-quality images that enhance the speed of the web. WebP lossless images are 26% more compact than PNGs, while WebP lossy images are 25 – 34% smaller than JPEG images of similar quality, as measured by the SSIM index.
How Does WebP Work?
Lossy WebP compression uses predictive coding to encode an image, which is the same technique utilized by the VP8 video codec for compressing keyframes in videos. Predictive coding leverages neighboring blocks of pixels to forecast the values in a block, encoding solely the variance.
On the other hand, lossless WebP compression utilizes previously seen image fragments to precisely reconstruct new pixels. Additionally, it has the capability to utilize a local palette in cases where no suitable match is identified.
However, Magento doesn’t support uploading WebP directly in the back end. This is because some older versions of browsers in the market don’t fully support WebP images. To resolve this issue, many Magento 2 extensions have been released to support converting images to WebP automatically and saving them on the server.
One of the featured Magento 2 upload WebP image extensions in the marketplace is from the BSS Commerce provider.
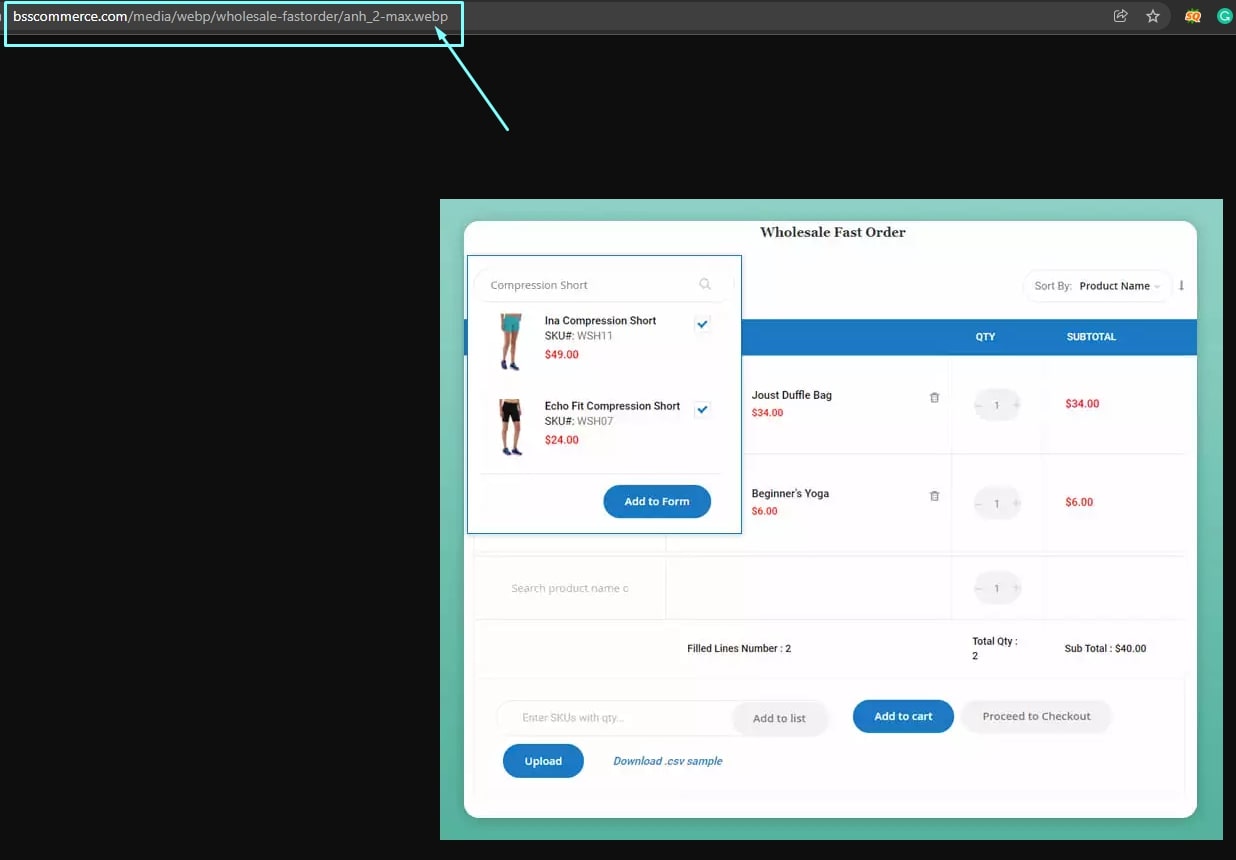
Magento 2 WebP Images extension by BSS Commerce is an awesome extension that allows store owners to transform all the photos from JPG, PNG, JPEG, etc. into WebP format automatically on many pages of the store. This functionality is aimed at providing an easy way to load your site while maintaining the image quality. You don’t need to convert images to WebP format on your own, this extension will help you.
How to Upload WebP Images in Magento 2?
Here are the 4 steps guide on how to Magento 2 upload WebP images with BSS Commerce’s WebP image converting extension:
Step 1. Install the Magento 2 Convert Images to WebP Extension
Start by installing the BSS Commerce’s Magento 2 WebP Images Converting extension. After successful installation, activate the extension in Magento 2 store. Utilizing this module in your store simplifies the process of Magento 2 upload WebP images, optimizing loading speeds, and elevating customer experiences on your Magento store.
Additionally, let’s explore our collection of the top 6 best Magento 2 Webp image extensions both free and paid for effectively optimizing your website’s performance.
Step 2: General Settings
To access the General Configuration settings for converting images to WebP format, kindly navigate to Stores ⇒ Configuration ⇒ BSS COMMERCE ⇒ Convert Image WebP ⇒ General Configuration.
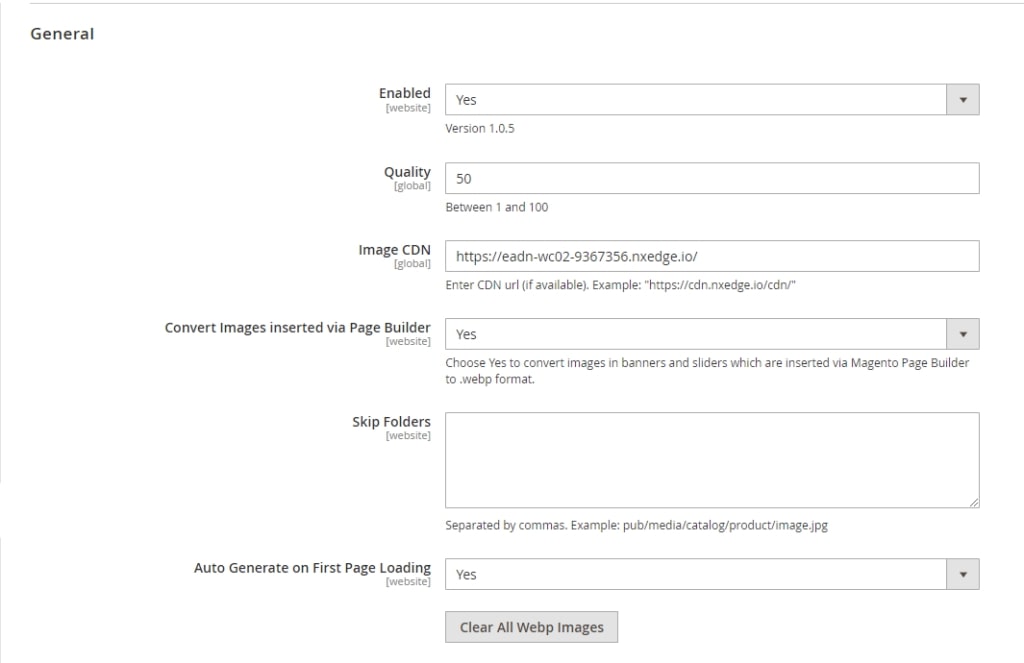
1. In the Enabled section, you have the option to choose between two settings:
- Yes: With this option, you will install the Magento 2 WebP online converter extension. This makes WebP images automatically convert into cover images you can use on your website.
- No: If you do not want to automatically convert WebP images on the site front, you can select this option, and the module will be disabled.
2. Quality: You may set the image quality by changing the quality value. This means that when the value is increased, the image quality will also be accordingly high. The default WebP quality is set to 75.
Please note that this configuration only applies when uploading images in Magento 2 or running commands. The WebP image quality displayed on the front end will not be affected by this value.
3. Image CDN: If you are using an image CDN, you can enter the CDN URL in the Image CDN field to ensure compatibility with the module.
4. Convert images inserted via page builder. Also, in case you need to convert all the images used on your site, either via the Page Builder (like banners, sliders, images, and product listings), to the WebP format, you can select “Yes” for the “Convert Images inserted via Page Builder” setting.
NOTE: If you allow the Auto Generate on the First Page Loading config and the former config, this module will do the conversion of the Page Builder images on the first-page load. On the other hand, the loading of the second load can still be slow if the page builder template contains many images.
5. Skip folders: Select the image folders that should not undergo automatic conversion to WebP images on the front end. Input the relative path of an image in its original format (jpg, png, etc.).
6. Auto generate on first-page loading: Opt for “Yes” to have images automatically converted to WebP format when loading pages containing images in jpg, jpeg, or png formats. Opt for “No” to retain images in JPG, JPEG, or PNG formats. This setting allows for the conversion of images from before the installation of this module without the need to execute CMD for conversion.
7. Clear All WebP Images: Delete all WebP images generated by the module (useful when updating to a new quality).
NOTE: You can enhance image quality by running the command php bin/magento bss_c_i_w:convert [<path>] [<quality>]. Specify the image location with [<path>] and set the new quality index with [<quality>] (e.g. php bin/magento bss_c_i_w:convert pub/media 80). This command allows you to update image quality without waiting for the system to remove old WebP images.
Step 3: Choose the Page to Convert WebP Images
Magento 2 Convert images to WebP extension by BSS Commerce allows you to effortlessly convert images to WebP format. With this functionality, you have the flexibility to select specific pages where you want the web images to be converted. The 4 primary locations where you can apply this conversion are the Product Page, Category Page, Home Page, and CMS Page.
#1. Product Page
To activate the automatic conversion of images to WebP on Product Pages, set Switch Enabled to Yes.
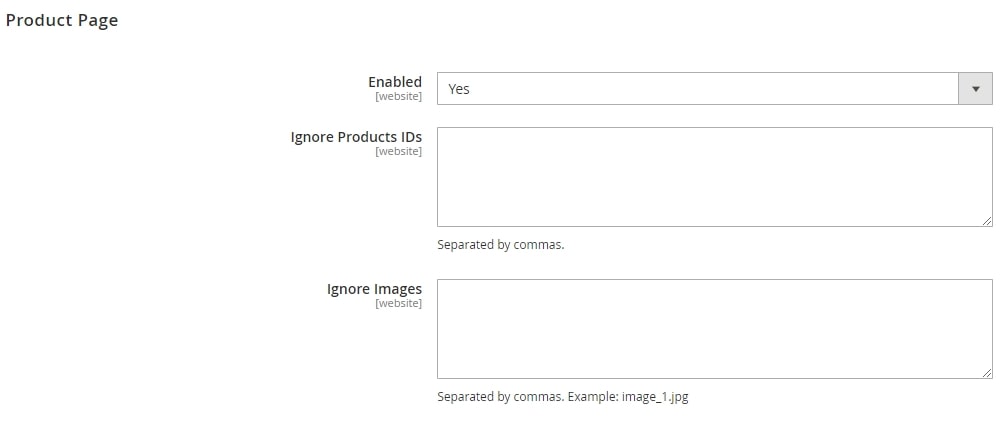
For specific Product IDs entered here, images on the corresponding product pages will remain in their original format.
To display images in their original format, enter the image names separated by commas. This is useful when the admin prefers to showcase images in full size and quality on the front end without converting them to .webp format.
NOTE: If you upload an existing image, Magento will automatically modify the image name. Therefore, ensure that you enter the precise image name.
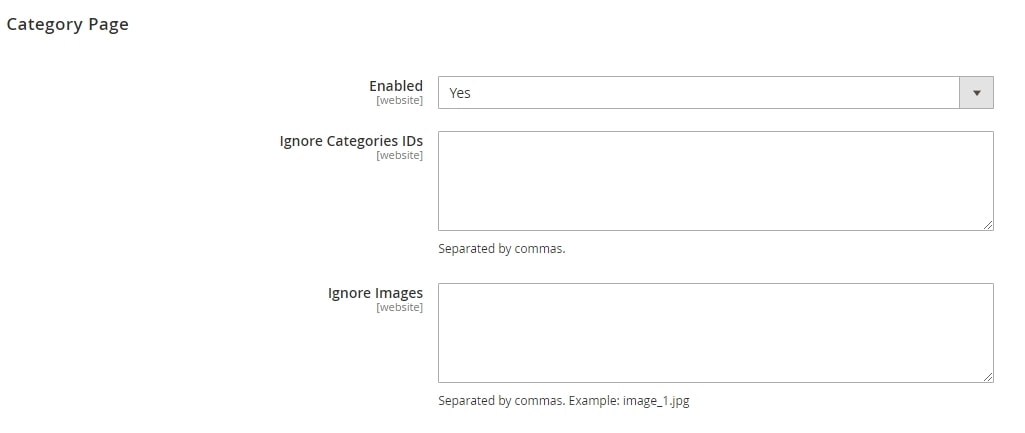
The same configurations are implemented on the remaining page categories
#2. Category Page
#3. Home Page

#4. CMS Page
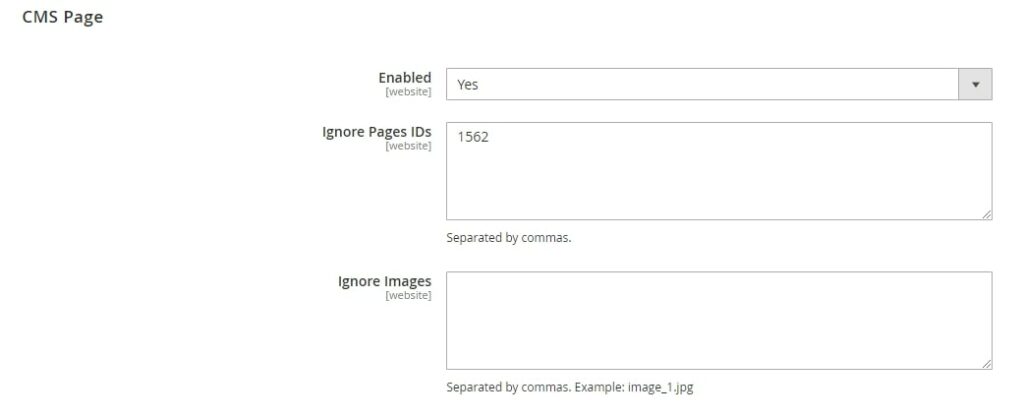
NOTE: The module does have the capability to convert the images of child items for configurable products on the product listing page when the user clicks on them. However, if there are an excessive number of variants, it may negatively impact the loading speed for the user during the initial page load.
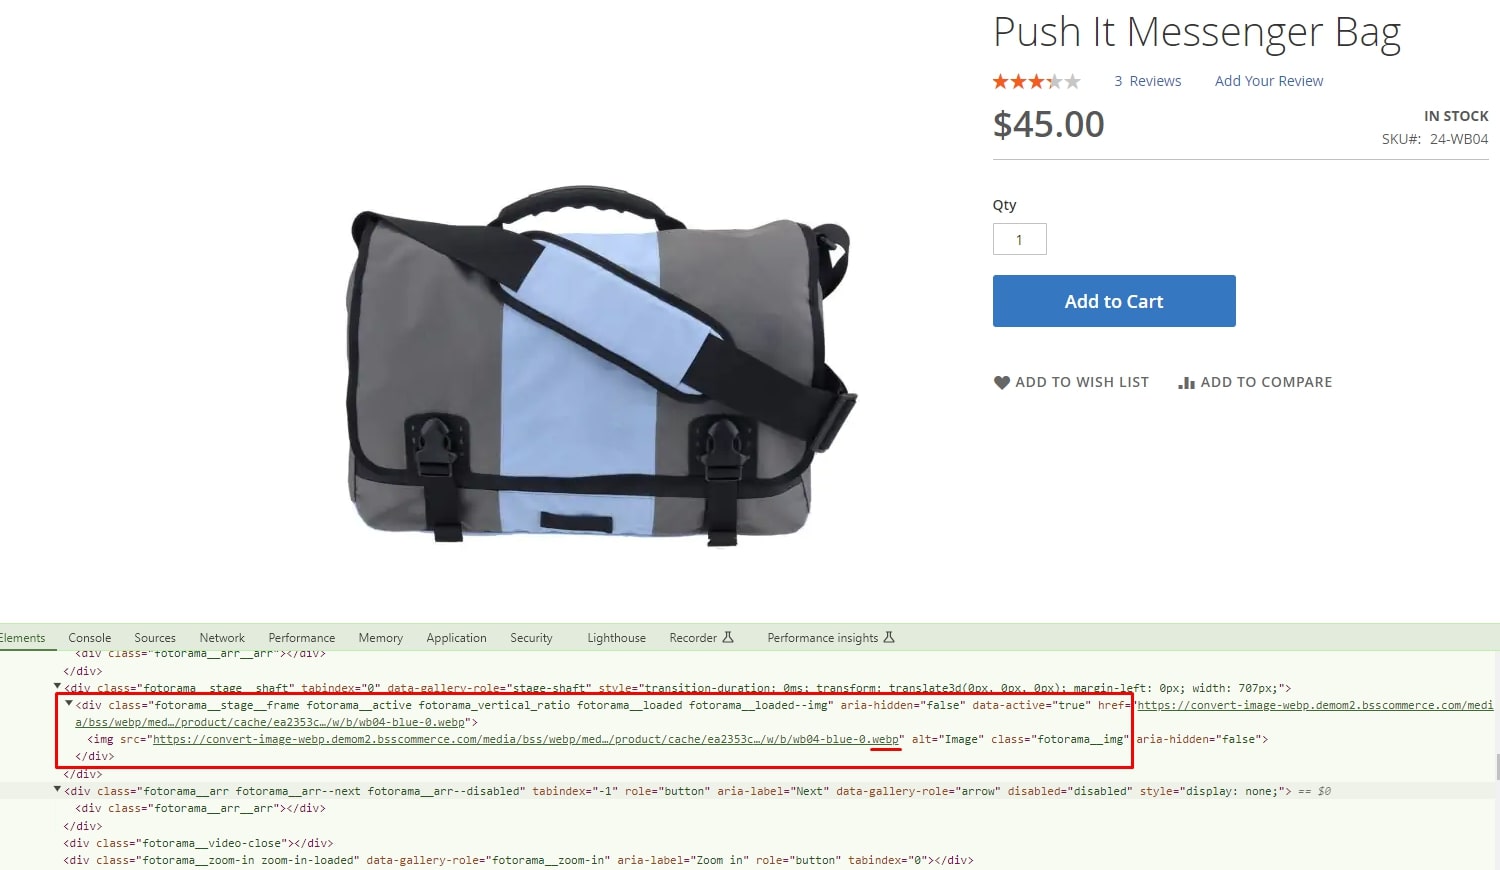
Step 4. Verify on the Front End
The final step of Magento 2 upload WebP images is to verify that the WebP images are working correctly. You can check this by examining the front end of your website.
Besides using WebP image, you can optimize other aspects to significantly enhance your Magento website loading speed. However, handling the technical work can be challenging. BSS Commerce is here to help you take care of the complexities to boost your website’s performance. With 11+ years of expertise, we are proud to be the top-class Magento 2 development agency in the world
From server audit, unused code detection to caching review, our experts are comitted to delivering the most comprehensive and efficient Magento 2 speed optimization service to your business. Don’t to reach out to us if you have any specific requests!
Benefits of Using the Webp Image Format for the Magento 2 Store
Using WebP images in Magento 2 provides numerous advantages that contribute to the success and effectiveness of your e-commerce store. Here are 6 benefits of implementing WebP images in the Magento 2 stores:
1. Better Compression Efficiency
WebP images offer superior compression efficiency compared to other formats like JPEG and PNG. It has smaller file sizes, which can significantly reduce the amount of data that needs to be transferred over the network, thereby resulting in cost savings in terms of data storage and bandwidth.
Alos, here are other tips to optimize images in Magento 2 stores: 7+ Best Ways To Optimize Magento 2 Image On Your Product Page
2. Lossless and Lossy Compression
WebP allows you to implement lossless and lossy compression. The compression level can be adjusted to ensure the file size and image quality is balanced. On the other hand, lossy compression achieves even smaller file sizes by discarding some of the image data. The level of compression can be adjusted to balance between file size and image quality.
3. Improved Website Performance
Smaller image file sizes mean faster page load times. This is particularly important for an eCommerce platform like Magento 2, where high-quality product images are essential. Faster page load times can improve the user experience and increase customer satisfaction.
4. Ecommerce Impact
High-quality images are crucial in eCommerce for showcasing products. However, they also consume significant bandwidth and can slow down page load times. With WebP, you can maintain high-quality images while reducing their file size, improving site performance, and potentially increasing conversion rates.
5. Responsive Design and Mobile Optimization
WebP images are well-suited for responsive design and mobile optimization. Because they are smaller in size, they load faster on mobile devices, which often have slower internet connections than desktop computers. This helps improve the mobile shopping experience, which is increasingly important as more and more consumers shop on their mobile devices.
6. SEO Benefits
Page load speed is a factor in search engine ranking algorithms. By reducing image file sizes and improving page load times, WebP can help improve your site’s search engine rankings. In addition, faster-loading pages can reduce bounce rates and increase the amount of time users spend on your site, both of which can positively impact SEO.
EXPLORE NOW: Top 6+ Best Magento 2 Image Optimization Extensions
To Sum Up – Magento 2 Upload WebP Images
It can be summarized that Magento 2 upload WebP images is one of the aspects that can immensely improve the speed of your online store, along with the convenience of shopping. WebP compresses images, gives you the advantage of high-quality visuals, and reduces the file size. As a result, load times for your pages get faster, and your SEO ranking may also be improved.
BSS Commerce hopes that these suggestions will help you upload web images in Magento 2 effectively. Finally, don’t forget to visit our site from time to time to get the latest news, knowledge, tips, and tricks to make the conversion rate of Magento stores higher.
