
Magento 2 send email can help store owners so much when you want to keep relationships between them and the customers.
Keeping a long-lasting relationship between the stores and customers is necessary. Email is a standard method to help store owners contact and communicate information to their customers.
This article will give you How To Send Email In Magento 2.
How To Send Email In Magento 2
Email is a popular way for suppliers and customers to communicate. Email marketing allows you to communicate with your customers in order to promote your brand and increase sales.
Many Magento 2 extensions demand their own emails with specific templates, parameters, and conditions in addition to the normal email templates.
Declare config module
Create etc/adminhtml/system.xml.
You can create a field to load the email template in section and group by app/code/Bss/EmailDemo/etc/adminhtml/system.xml.
<?xml version="1.0"?>
<config xmlns:xsi="http://www.w3.org/2001/XMLSchema-instance" xsi:noNamespaceSchemaLocation="urn:magento:module:Magento_Config:etc/system_file.xsd">
    <system>
        <tab id="bss" translate="label" sortOrder="300">
            <label><![CDATA[Bss Commerce]]></label>
        </tab>
        <section id="email" translate="label" sortOrder="20" showInDefault="1" showInWebsite="1" showInStore="1">
            <class>separator-top</class>
            <label>Bss Email Demo</label>
            <tab>bss</tab>
            <resource>Bss_EmailDemo::config_emaildemo</resource>
            <group id="demo" translate="label" type="text" sortOrder="2" showInDefault="1" showInWebsite="1" showInStore="1">
                <label>Please Choose Your Email Template</label>
                <field id="template" translate="label" type="select" sortOrder="3" showInDefault="1" showInWebsite="1" showInStore="1">
                    <label>Email Template</label>
                    <source_model>Magento\Config\Model\Config\Source\Email\Template</source_model>
                    <comment>Email template is chosen based on theme fallback when "Default" option is selected.</comment>
                </field>
            </group>
        </section>
    </system>
</config>
Please go to BSS COMMERCE -> Bss Email Demo to see the result.
Declare Email Template
Create app/code/Bss/EmailDemo/etc/email_templates.xml.
<?xml version="1.0"?>
<config xmlns:xsi="http://www.w3.org/2001/XMLSchema-instance" xsi:noNamespaceSchemaLocation="urn:magento:module:Magento_Email:etc/email_templates.xsd">
<template id="email_demo_template" label="This is email demo" file="email_demo_template.html" type="html" module="Bss_EmailDemo" area="frontend"/>
</config>
In which:
- Template id: Your template id you have created in Step 1.
- Label: Your Label will show in the dropdown email.
- file: Your email template file.
- type: Type of your email. module: Your module.
- area: Place your email in the module directory. view / frontend or view / adminhtml
Create Helper Email
Create app/code/Bss/EmailDemo/Helper/Email.php.
<?php
namespace Bss\EmailDemo\Helper;

use Magento\Framework\App\Helper\Context;
use Magento\Framework\Translate\Inline\StateInterface;
use Magento\Framework\Escaper;
use Magento\Framework\Mail\Template\TransportBuilder;

class Email extends \Magento\Framework\App\Helper\AbstractHelper
{
    protected $inlineTranslation;
    protected $escaper;
    protected $transportBuilder;
    protected $logger;

    public function __construct(
        Context $context,
        StateInterface $inlineTranslation,
        Escaper $escaper,
        TransportBuilder $transportBuilder
    ) {
        parent::__construct($context);
        $this->inlineTranslation = $inlineTranslation;
        $this->escaper = $escaper;
        $this->transportBuilder = $transportBuilder;
        $this->logger = $context->getLogger();
    }

    public function sendEmail()
    {
        try {
            $this->inlineTranslation->suspend();
            $sender = [
                'name' => $this->escaper->escapeHtml('Test'),
                'email' => $this->escaper->escapeHtml('humorgodfather9x02@gmail.com'),
            ];
            $transport = $this->transportBuilder
                ->setTemplateIdentifier('email_demo_template')
                ->setTemplateOptions(
                    [
                        'area' => \Magento\Framework\App\Area::AREA_FRONTEND,
                        'store' => \Magento\Store\Model\Store::DEFAULT_STORE_ID,
                    ]
                )
                ->setTemplateVars([
                    'templateVar'  => 'My Topic',
                ])
                ->setFrom($sender)
                ->addTo('testmagento321@gmail.com')
                ->getTransport();
            $transport->sendMessage();
            $this->inlineTranslation->resume();
        } catch (\Exception $e) {
            $this->logger->debug($e->getMessage());
        }
    }
}
In which:
- $sender: The sender’s information (‘name’: sender’s name and ‘email’: sender’s email)
- setTemplateIdentifier(’email_demo_template’): email_demo_template is ID of template email mentioned in Step 1 and 2.
- setTemplateVars: The information or variable in your email.
- addTo(‘testmagento321@gmail.com’): You can fill in the recipient’s email here.
Create Email by HTML
Create app/code/Bss/EmailDemo/view/frontend/email/email_demo_template.html.
{{template config_path="design/email/header_template"}}
<table>
    <tr>{{trans "Wellcome To: %templateVar." templateVar=$templateVar}}</tr>
</table>
{{template config_path="design/email/footer_template"}}
You can also send emails through Events or use the Plugin to add emails.
Catch Event
To test the email function, we test through the capture of the customer_register_success event when the customer registers the account successfully.
Create app/code/Bss/EmailDemo/etc/frontend/events.xml.
<?xml version="1.0"?>
<config xmlns:xsi="http://www.w3.org/2001/XMLSchema-instance" xsi:noNamespaceSchemaLocation="urn:magento:framework:Event/etc/events.xsd">
    <event name="customer_register_success">
        <observer name="bss_email_customer_register" instance="Bss\EmailDemo\Observer\CustomerRegisterObserver"/>
    </event>
</config>
Create Observer to Send Email
Create app/code/Bss/EmailDemo/Observer/CustomerRegisterObserver.php.
<?php
namespace Bss\EmailDemo\Observer;

use Magento\Framework\Event\ObserverInterface;
use Bss\EmailDemo\Helper\Email;


class CustomerRegisterObserver implements ObserverInterface
{
    private $helperEmail;

    public function __construct(
        Email $helperEmail
    ) {
        $this->helperEmail = $helperEmail;
    }
    public function execute(\Magento\Framework\Event\Observer $observer)
    {
        return $this->helperEmail->sendEmail();
    }
}
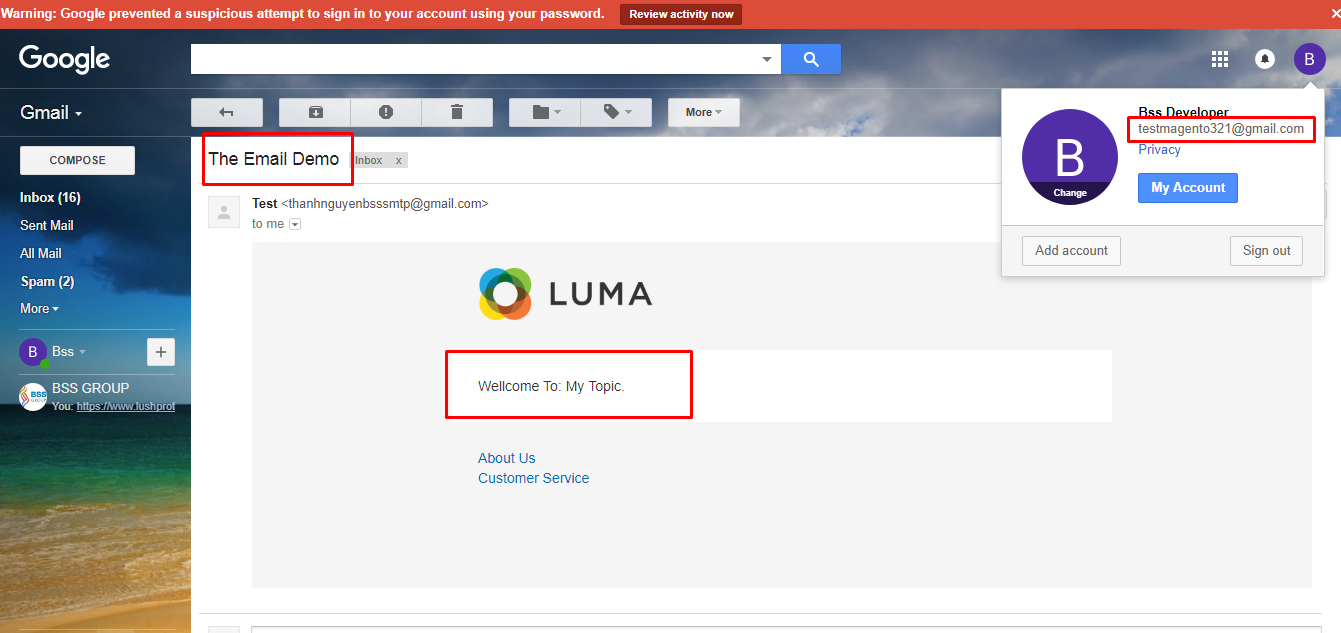
The Result
After the account is registered successfully, email will be sent automatically to the customer. Please take a look at the image below.
The result could be very greats if you know the right way to do it. These simple methods from us should assist you in effectively sending an email in Magento 2. We hope that this information was helpful in achieving your goals.
>>> Read more: [Solved] Magento Not Sending Emails: How To Fix?
Conclusion
This is all about how to send email in Magento 2 programmatically. You can check other things in our blog to know more about Magento 2.
BSS Commerce is one of the leading Magento extension providers and Magento 2 web development services in the world. With experienced and certified Magento developers, we commit to bringing high-quality products and services to optimize your business effectively. Furthermore, we offer FREE Installation – FREE 1-year Support and FREE Lifetime Update for every Magento extension.
CONTACT NOW to let us know your problems. We are willing to support you every time.
Hello Nguyen and thank you for your tutorial. If I wanted to include customer details of the customer that just registered in the email, how would I get the customerID (or directly the $customer variable) inside the sendEmail() funtion for example?
For your requirement, please follow:
Step 1: Construct Customer Session
use Magento\Customer\Model\Session;protected $customerSession;
/**
* Email constructor.
* @param Session $customerSession
*/
public function __construct(
Context $context,
Session $customerSession
) {
parent::__construct($context);
$this->customerSession = $customerSession;
}
Step 2: Get model customer from customer session and necessary info. For example, in the sendMail() function:
public function sendEmail(){
try {
$this->inlineTranslation->suspend();
$sender = [
'name' => $this->escape->escapeHtml('Test'),
'email' => $this->escape->escapeHtml('humorgodfather9x02@gmail.com'),
];
if ($this->customerSession->isLoggedIn()) {
$customer = $this->customerSession->getCustomer();
$transport = $this->transportBuilder
->setTemplateIdentifier('email_demo_template')
->setTemplateOptions(
[
'area' => \Magento\Framework\App\Area::AREA_FRONTEND,
'store' => \Magento\Store\Model\Store::DEFAULT_STORE_ID,
]
)
->setTemplateVars([
'templateVar' => 'My Topic',
'customerName' => $customer->getName(),
'customerAddress' => $customer->getAddresses()
])
->setFrom($sender)
->addTo('testmagento321@gmail.com')
->getTransport();
} else {
$transport = $this->transportBuilder
->setTemplateIdentifier('email_demo_template')
->setTemplateOptions(
[
'area' => \Magento\Framework\App\Area::AREA_FRONTEND,
'store' => \Magento\Store\Model\Store::DEFAULT_STORE_ID,
]
)
->setTemplateVars([
'templateVar' => 'My Topic'
])
->setFrom($sender)
->addTo('testmagento321@gmail.com')
->getTransport();
}
$transport->sendMessage();
$this->inlineTranslation->resume();
} catch (\Exception $e) {
$this->logger->debug($e->getMessage());
}
}
Hope this helps!
Hey,
Thanks for the great tutorial. I want to send email to individual or multiple customers e.g. sending them a coupon code, it will be easier if I can get a form in admin panel, and write the mail and send. Could you please help me with this? or is their such extension?