
Using Knockout JS is a great way to create interactive data-bound frontend components in a Magento 2 store. It allows developers to add a great deal of seamless functionality. For example, from a custom color picker to your custom image viewer, it can be used everywhere within the frontend.
In general, a Magento store uses Knockout JS to create components of the user interface (UI), such as checkout page, shopping cart, which makes a store more powerful and interesting.
The blog not only gives you the necessary knowledge about Knockout JS, but it also guides you with specific examples through two parts:
- Part 1: Knockout JS 101: from Beginner to Advanced
- Part 2: Knockout JS in Magento 2
Let’s get started with Knockout JS 101: from Beginner to Advanced (Part 1).
1. Knock JS Overview
1.1 What is Knockout JS?
Knockout JS is a JavaScript library that is used on the frontend in Magento 2. It executes Model-View-View Model (MVVM) design pattern.
To understand the term “Knockout JS,” let’s first have a quick view of MVVM.
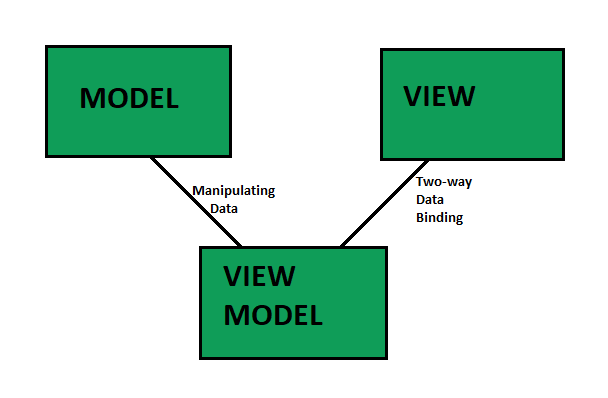
MVVM consists of three components:
- Model: contains all data of the application
- View: represents the user interface (UI)
- View Model: is the intermediate layer between Model and View. It manages and handles the application logic. A ViewModel can be used for multiple views.
For example, Model contains a list of information such as name, number, address, etc. View Model updates the data between Model and View and handles the format of the number, name, etc.
Knockout JS helps Web applications work smoothly and flexibly according to user actions. Here are its outstanding features:
- Elegant dependency tracking: automatically update related UI components when data changes (Observables)
- Declarative bindings: creates constraints of UI components with Model. Knockout JS processes data between View and Model using HTML tags to mark data components.
- Trivially extensible: easily reuse logic or similar HTML fragments by creating a custom binding, templates, components.
1.2 Installation and Initialization
- Installation:
Download the JS file or use CDN, then declare the JS file in HTM.
<script type='text/javascript' src='knockout-3.5.1.js'></script>
- Initialization:
// View layer (html)
// data-binding declares the properties of ViewModel
His name is <span data-bind="text: personName"></span>
He is <span data-bind="text: personAge"></span> years old

// Initialize ViewModel
var myViewModel = {
    personName: 'Bob',
    personAge: 35
};

// Activate knockout to map ViewModel to View
ko.applyBindings(myViewModel);
=> Output: His name is Bob He is 34 years old
⇒ Demo: https://learn.bsscommerce.com/ko-presentation/#/initialize
2. Observables
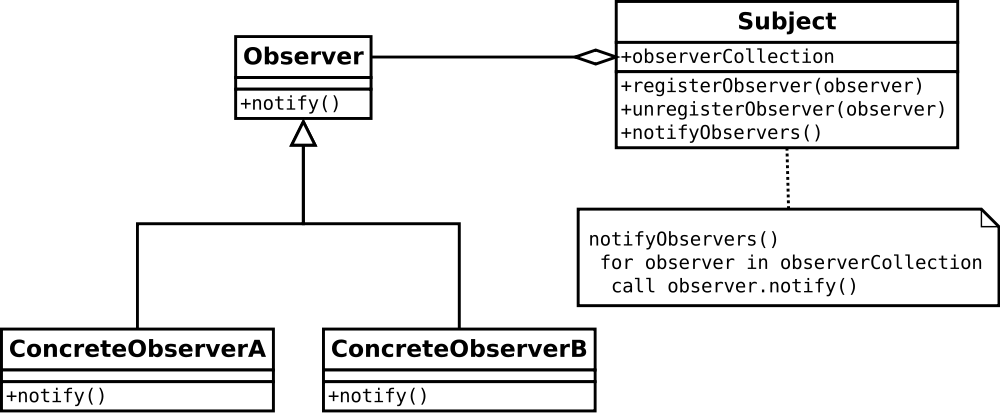
First, let’s take a look at the Observer Design Pattern in JavaScript to get an idea of Observables.
In the Observer Pattern, a Subject manages a list of objects that depend on it (Observer), automatically notifying them when there is any change. The dependency of Observers on a Subject depends on two actions of “subscribe()” and “unsubscribe(),” corresponding to assigning or unassigning the Observer to a Subject. The “notify ()” is called when a value is changed. For example, when an input is changed, JavaScript will capture the event using the addEventListener function. The Subject will run around to update new data for all its Observers.
Learn more about this pattern here.
In Knockout JS, the Subject of the Observer Pattern corresponds to ViewModel, while the Observables are properties of ViewModel – the component determines which part of the UI will be automatically updated when changes are made to ViewModel.
2.1 Declaration
this.property = ko.observable('value');
Return to the example above:
// Initialize ViewModel
var myViewModel = {
    personName: 'Bob',
    personAge: 35
};
The “personName” and “personAge” still have the default values, now we will apply Observable to these 2 properties:
var myViewModel = {
    personName: ko.observable('Bob'),
    personAge: ko.observable(35)
};
(***)Note: ko.observable is a getter/setter function. Therefore, the way of calling and passing the value is the same as calling the function.
⇒ Demo: https://learn.bsscommerce.com/ko-presentation/#/observable1
2.2 Read and write the value of Observable
- Read: call an Observable without the same parameter:
myViewModel.personName();
- Write: call the Observable with the parameter is the value you want to set:
myViewModel.personName('Bob');
- Write multiple Observables at the same time:
myViewModel.personName ('Bob'). PersonAge (35);
2.3 Subscribe
It is used when you want to treat an Observable when its data changes, for example:
myViewModel.personName.subscribe(function(newValue) {
    alert("The person's new name is " + newValue);
});
- To get a new value of Observable:
myViewModel.personName.subscribe(callback(newValue),this,event=”change”)
- To get the old value, the event will be replaced with “beforeChange”:
myViewModel.personName.subscribe(function(oldValue) {
    alert("The person's previous name is " + oldValue);
}, null, "beforeChange");
⇒ Demo: https://learn.bsscommerce.com/ko-presentation/#/observable2
Other options of Observables
- ko.when
This feature was added from KnockoutJS 3.5 version onwards. The purpose of using this option is the same as for “ Subscribe.” However, the only difference is that an observable is only caught when there is a change with a certain value. For example:
ko.when(function () {
    return myViewModel.personName() !== undefined;
}, function (result) {
    myViewModel.isInitialized(true);
});
- Notice changes of Observable
Changes of Observable are always noticed even when the data is changed to be the same as the current data.
myViewModel.personName.extend({ notify: 'always' });
2.4 Observable Arrays
Similar to arrays in native JavaScript, but Observable Arrays can also track each child element of the array. They are very useful when you want to display or change several UI elements in a list.
- Declaration:
this.arrayName = ko.observableArray(); // It's an empty array
- Initialization:
this.arrayName = ko.observableArray(['scott','jack']);
- Read a child element of an Observable array:
alert('The second element is ' + arrayName()[1]);
Output: ‘jack’
Processing functions of Observable arrays are similar to the array processing functions of native JavaScript, such as push, pop, splice, etc.
⇒ Demo: https://learn.bsscommerce.com/ko-presentation/#/observable4
3. Computed observables
The Computed Observable is a function consisting of one or more Observables. It is similar to a group of many Observables, which can handle the logic in its function. It automatically updates the value when an Observable inside it changes.
function AppViewModel() {
    this.firstName = ko.observable('Bob');
    this.lastName = ko.observable('Smith');
this.fullName = ko.computed(function() {
        return this.firstName() + " " + this.lastName();
    }, this);
}
Add Observerbal into HTML:
<input type=”text” data-bind=”value: firstName”>
<input type=”text” data-bind=”value: lastName”>
The name is <span data-bind="text: fullName"></span>
When you change the two inputs “firstName” and “lastName,” the span containing Observable fullName will also be updated.
⇒ Demo: https://learn.bsscommerce.com/ko-presentation/#/computed
4. Bindings
The ‘data-bind’ syntax makes the connection between the UI and ViewModel by marking the position of the Observable on the HTML tag.
4.1 Binding syntax
- One Binding syntax contains two components: binding name, and value. For example:
<span data-bind="text: whatDay"></span>
- Bindings are separated by commas.
<input data-bind="value: someValue, valueUpdate: 'afterkeydown'"/>
- Binding name is the default binding of KO, such as value, text, enable, etc. You can also customize a binding (part 5).
- Binding value can be a certain value, an Observable, or an expression.
The item is <span data-bind="text: price() > 50 ? `expensive` : `cheap`"></span>.
4.2 Controlling text and appearance bindings
The “text” binding
To use a text binding:
Today is : <span data-bind = "text: whatDay"></span>
Observable “whatDay” will be marked with binding as “text.”
In case of multiple Observable, use commas to separate for each binding as follows:
Your name: <input data-bind = "value: yourName, valueUpdate: 'afterkeydown'" />
The value of the input above will be updated every time the user changes it.
Other types of bindings:
- The “html” binding
<div data-bind="html: details"></div>
- The “class” bindings
<div data-bind="class: profitStatus">
- The “css” bindings
Css binding allows parsing JS objects, so it is possible to apply many classes at the same time.
<div data-bind="css: { profitWarning: currentProfit() < 0, majorHighlight: isSevere }">
- The “style” binding
It allows parsing one object with multiple css styles.
<div data-bind="style: { color: currentProfit() < 0 ? 'red' : 'black' }"></div>
- The “attr” binding
<a data-bind="attr: { href: url, title: details }"> Report </a>
(***)Note: If attr or css style is not an ordinary format, or has characters, eg data-name, or font-weight:
<div data-bind="attr: { 'data-name': someValue }">...</div>
<div data-bind="style: { 'font-weight': someValue }"></div>
<div data-bind="style: { fontWeight: someValue }"></div>
⇒ Demo:
https://learn.bsscommerce.com/ko-presentation/#/binding1
https://learn.bsscommerce.com/ko-presentation/#/binding2
4.3 Interactive Binding
- The “click” binding
<button data-bind="click: handleClick">Click</button>
- The “event” binding
<span data-bind="event: { mouseover: handleMouseover, mouseout: handleMouseout }">Mouse event</span>
- The “submit” binding
<form data-bind="submit: handleSubmit">
 ... form contents go here …
<button type="submit">Submit</button>
</form>
- The “enable” and “disable” binding
<input type='checkbox' data-bind="enable: isEnable"/> is enable
- The “value” bindings
<input data-bind="value: username" />
- The “checked” binding
<p>Send me spam: <input type="checkbox" data-bind="checked: isChecked" /></p>
⇒ Demo: https://learn.bsscommerce.com/ko-presentation/#/binding2
4.4 Control Flow Bindings
Process Observables in loops, with conditions outside the View.
- The “foreach” binding
Here is an example of working with one Observable array.
<table>
    <thead>
        <tr><th>First name</th><th>Last name</th></tr>
    </thead>
    <tbody data-bind="foreach: people">
        <tr>
            <td data-bind="text: firstName"></td>
            <td data-bind="text: lastName"></td>
        </tr>
    </tbody>
</table>
<script type="text/javascript">
    ko.applyBindings({
        people: [
            { firstName: 'Bert', lastName: 'Bertington' },
            { firstName: 'Charles', lastName: 'Charlesforth' },
            { firstName: 'Denise', lastName: 'Dentiste' }
        ]
    });
</script>
(***)Note: To use “foreach” blinding without assigning to HTML element, use it like 1 HTML comment as follows:
<ul>
    <li class="header">Header item</li>
    <!-- ko foreach: myItems -->
        <li>Item <span data-bind="text: $data"></span></li>
    <!-- /ko -->
</ul>
<script type="text/javascript">
    ko.applyBindings({
        myItems: [ 'A', 'B', 'C' ]
    });
</script>
Here are the events can be used while working with “foreach” binding: afterRender/afterAdd/beforeRemove/beforeMove/afterMove
Those events correspond to: after rendering a loop is complete, after adding a new element, after removing an element, before sorting, and after sorting the array.
⇒ Demo: https://learn.bsscommerce.com/ko-presentation/#/flow-binding
- The “if” and “ifnot” binding
Here is an example of processing the condition of Observables in the UI.
<div data-bind="if: isDisplayMessage">Here is a message.</div>
<div data-bind="ifnot: isHideName">Here is a Name.</div>
ko.applyBindings({
    isdisplayMessage: ko.observable(false),
    isHideName: ko.observable(true)
});
⇒ Demo: https://learn.bsscommerce.com/ko-presentation/#/if-binding
- The “with” and “using” bindings
The “with” binding and “using” binding are used to represent an object Observable.
<h1 data-bind="text: city"> </h1>
<p data-bind="using: coords">
    Latitude: <span data-bind="text: latitude"> </span>,
    Longitude: <span data-bind="text: longitude"> </span>
</p>
<script type="text/javascript">
    ko.applyBindings({
        city: "London",
        coords: {
            latitude:  51.5001524,
            longitude: -0.1262362
        }
    });
</script>
In the above example, use “using” with the Observable which is a “coords” object, then we can refer directly to the “latitude” and “longitude” elements of the object.
“With” can also replace “using” in this case, but the difference is that “with” will be able to work with arrays whose initial value is null/undefined, see the following example:
<div data-bind="with: resultData">
    <h3>Recent tweets fetched at <span data-bind="text: retrievalDate"> </span></h3>
    <ol data-bind="foreach: topTweets">
        <li data-bind="text: text"></li>
    </ol>
    <button data-bind="click: $parent.clearResults">Clear tweets</button>
</div>
<script>
function AppViewModel() {
    var self = this;
    self.twitterName = ko.observable('@example');
    self.resultData = ko.observable(); // No initial value
    self.getTweets = function() {
        var name = self.twitterName(),
            simulatedResults = [
                { text: name + ' What a nice day.' },
                { text: name + ' Building some cool apps.' },
                { text: name + ' Just saw a famous celebrity eating lard. Yum.' }
            ];
        self.resultData({ retrievalDate: new Date(), topTweets: simulatedResults });
    }
    self.clearResults = function() {
        self.resultData(undefined);
    }
}
ko.applyBindings(new AppViewModel());
</script>
The Object “resultData” will not be valid until the form is submitted. If you use “using” in this case, “resultData” will not have a chance to render again after it has data.
- The “let” binding
It is used to work with multiple arrays in the same binding. For example:
<!--ko let: {inventory: {suppliers: suppliers, bins: bins}, calculatedDisplay: someCalculation}-->
    <div data-bind="foreach: {data: inventory.suppliers, as: 'supplier'}>
        <div data-bind="foreach: {data: inventory.bins, as: 'bin'}">
            <span data-bind="text: calculatedDisplay(supplier, bin)>
        </div>
    </div>
<!--/ko-->
<script type="text/javascript">
    ko.applyBindings({
        suppliers: [...],
        bins: [...],
        someCalculation: function (supplier, bin) {
            /* return some calculated value based on parameters */
        }
    });
</script>
4.5 Binding context
This includes special objects of Knockout JS used to refer to elements in arrays. Here are types of binding context:
- $parent: designates a parent element on par with the original array.
<h1 data-bind="text: name"></h1>
<div data-bind="with: manager">
    <!-- Now we're inside a nested binding context -->
    <span data-bind="text: name"></span> is the
    manager of <span data-bind="text: $parent.name"></span>
</div>
- $parents: refers to all parent Observables.
$parents[0] // refers to $parents level 1
$parents[1] // refers to $parents level 2
- $data: refers to the current element in the loop.
<ul data-bind="foreach: ['cats', 'dogs', 'fish']">
    <li>The value is <span data-bind="text: $data"></span></li>
</ul>
- $index: This is an index of the element in the array. It is also an Observable, which is updated when the element changes.
- $parentContext: is similar to Sparent, but it has an additional $index.
For example: $parentContext.$index
- $rawData: is similar to $ data, but the element referred to is an Observable.
⇒ Demo: https://learn.bsscommerce.com/ko-presentation/#/binding-context
4.6 Rendering templates
Rendering templates allows declaring a template and supports reuse. For example:
<h2>Participants</h2>
Here are the participants:
<div data-bind="template: { name: 'person-template', data: buyer }"></div>
<div data-bind="template: { name: 'person-template', data: seller }"></div>
<script type="text/html" id="person-template">
    <h3 data-bind="text: name"></h3>
    <p>Credits: <span data-bind="text: credits"></span></p>
</script>
<script type="text/javascript">
     function MyViewModel() {
         this.buyer = { name: 'Franklin', credits: 250 };
         this.seller = { name: 'Mario', credits: 5800 };
     }
     ko.applyBindings(new MyViewModel());
</script>
In the example above, we created a template with the name “person-template” using the script tag; then, use the binding as a “template” and having data transfer, is an Observable.
Template parse that data into and map data
Other options in Template:
- name: an ID to identify the template
- data: an object to transfer data into the template
- if: determines whether the template will render or not.
- foreach: used similar to binding foreach.
- as: declares the element’s representation in the loop
- afterRender, afterAdd, or beforeRemove: handle the corresponding event after the template renders, after adding or removing elements when working with arrays.
⇒ Demo: https://learn.bsscommerce.com/ko-presentation/#/render-template
5. Custom bindings
Knockout JS supports creating a Custom binding name, like value, text, etc. Declaration:
ko.bindingHandlers.yourBindingName = {
    init: function(element, valueAccessor, allBindings, viewModel, bindingContext) {
        // This will be called when the binding is first applied to an element
        // Set up any initial state, event handlers, etc. here
    },
    update: function(element, valueAccessor, allBindings, viewModel, bindingContext) {
        // This will be called once when the binding is first applied to an element,
        // and again whenever any observables/computeds that are accessed change
        // Update the DOM element based on the supplied values here.
    }
};
To use a custom binding: The “init ()” function is used to initialize the first binding’s value outside the UI. The “update ()” function will be called when the Observable is updated. Meaning of the parameters:
- element: The DOM element of the tag is declared with a binding.
- valueAccessor: The current value of the Observable, called as an observable.
- allBindings: is a JavaScript object used to get the value of other bindings, using: allBindings.get (‘name’)
- viewModel: like using $ data in an array.
- bindingContext: allows reference to $data, $parent, $parents, and $root contexts when working with arrays.
⇒ Demo: https://learn.bsscommerce.com/ko-presentation/#/custom-binding
6. Components
Components in Knockout JS, representing a ViewModel, can be combined with a template to create a widget. It is very useful to use Component to replace the same HTML fragments and reuse. See the following example for the usage.
<h4>Component binding without parameters</h4>
      <div data-bind = 'component: "calculate-sum"'></div>
      <h4>Component binding passing parameters</h4>
      <div data-bind = 'component: {
         name: "calculate-sum",
         params: { number1: 2, number2: 3 }
      }'></div>
      <script>
         ko.components.register('calculate-sum', {
            viewModel: function(params) {
               this.number1 = ko.observable(params && params.number1);
               this.number2 = ko.observable(params && params.number2);
               this.result = ko.computed(function() {
                  var sum = Number(this.number1()) + Number(this.number2());
                  if ( isNaN(sum) )
                  sum = 0;
                  return sum;
               },this);
            },
            template: 'Enter Number One: <input data-bind = "value: number1" /> <br> <br>'+
               ' Enter Number Two: <input data-bind = "value: number2" /> <br> <br>'+
               ' Sum  = <span data-bind = "text: result" />'
         });
         ko.applyBindings();
      </script>
Component can be declared in HTML as an HTML tag:
<calculate-sum params=”number1: 2, number2: 3”></calculate-sum>
In addition, ViewModel or Template can be declared from the file:
ko.components.register('like-or-dislike', {    viewModel: { require: 'files/component-like-widget' },
    template: { require: 'text!files/component-like-widget.html' }
});
⇒ Demo: https://learn.bsscommerce.com/ko-presentation/#/component
7. Pros and Cons
Applying MVVM model to Knockout JS, like everything, has a two-side effect. A clear understanding of its pros and cons can help you control your system better. Pros:
- Three classes (including View, Model, ViewModel) are independent of each other, so it’s easy to test them.
- It brings a lightweight library that supports Data binding, which automatically updates the UI.
- Full documentation.
Cons:
- There is no organization of source code, no division according to a modular structure, which makes it difficult to manage when extending the application.
- In compare with Javascript framework, when building a SPA application, using Knockout JS is unreasonable because it still has to handle many issues such as Routing, Data storage, etc. Using JS frameworks like Angular / ReactJS / VueJS is a better choice.
- Regarding performance, it is inferior in data rendering ability compared to other frameworks.

For more detail, please go here.