
Magento 2 Design Patterns can be very helpful if you know the right way to do it.
As all of you already know, design patterns are dispensable in software programming. Thanks to design patterns, code becomes more organized and easier to develop and work with.
Today we will discuss Magento 2 design patterns in detail to explore what Magento 2 Design Patterns offers and how to handle them.
1. Object Manager
Compared with other programming languages, object-oriented programming, which just appeared from PHP 5, contains a lot of limitations.
In Magento 1, almost all objects are implemented and called via the Mage class. In Magento 2, Object Manager is used to replace the Mage class. This helps to solve some problems when you instantiate parameters by creating a close relationship between 3 patterns: object management, dependency injection, and plugins. (I will explain more details about the “How Magento 2 generates code” section).
Object Manager takes the primary responsibility in instantiating and configuring Objects via the two main methods: GET and CREATE.
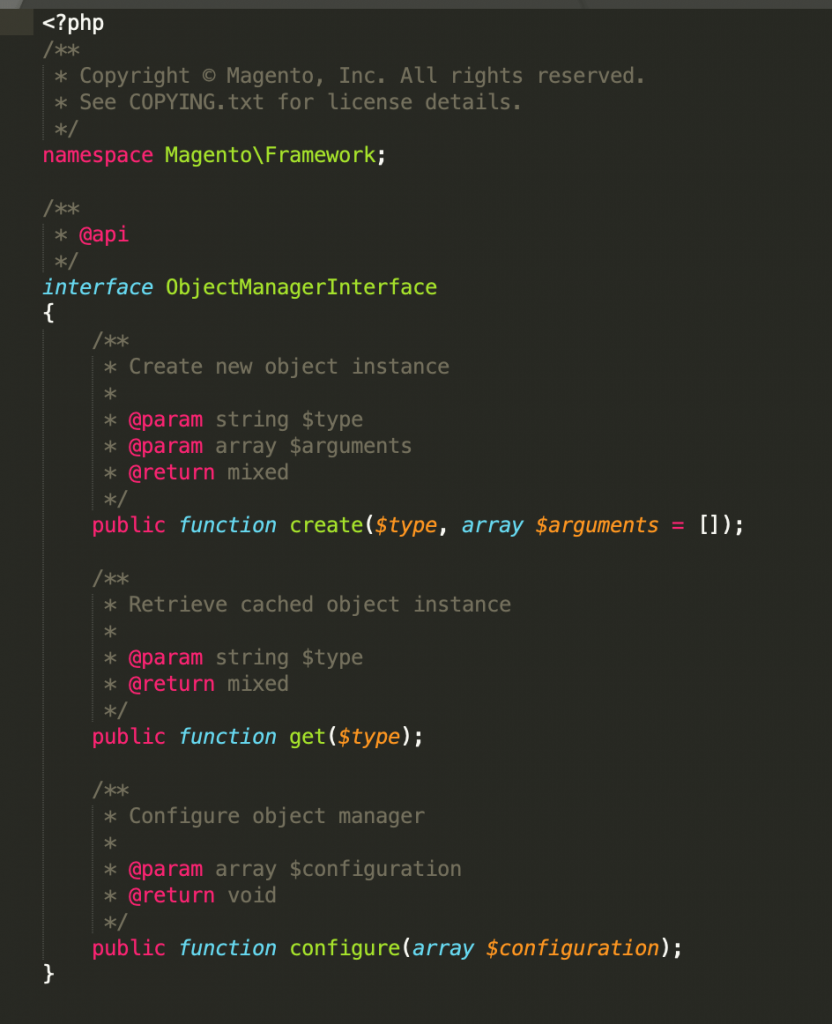
- GET returns a singleton object (an instance of the class is used to share between components when running Magento, on the other hand).
- CREATE returns an entirely new object (a new class instance).
Hence, if you call the GET method from 2 places, the same result will be generated. On the contrary, you will receive a new object if you use the CREATE method.
So what is the purpose of Object Manager? Let’s find answers in the following:
- Instantiate Object Manager. Magento uses Object Manager to instantiate and insert the class declared in the constructor.
- Implement the singleton pattern (See more HERE)
- Manage dependencies
- Instantiate parameters automatically
According to the Magento core team, you shouldn’t use Object Manager in modules because it makes the class lose its dependency.
2. Dependency Injection
2.1. Overview
Dependency Injection (DI) is a design pattern to solve programming dependencies and replace the Mage class in Magento 1.
Basically, Dependency Injection includes four components:
- Service object: is used to declare dependencies
- Client object: depends on service object and inherits from dependencies
- Interface object: defines methods that client can use the service’s dependencies
- Injector object: implements the service’s dependencies and gives them to the client object.
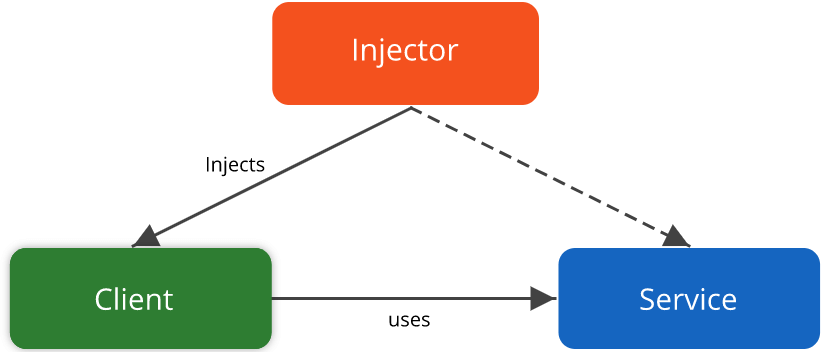
Dependency is also called a function of services, and injection is an action that gives dependence to its dependent object (client). The client can now use the service without building a new one.
2.2. Magento 2 Dependency Injection
The Magento 2 Dependency Injection(DI) is a system of object management based on Object Manager or Factory to create Objects with available configuration.
DI is a design pattern allowing class A to declare dependencies so that class B can use those dependencies. Class A often uses Interface class and provided class B to implement things in that interface.
Hence, there’s no need for class B to consider the dependency declaration because class A takes over, which shows a responsibility division in the structure building. This is quite important for developers to understand how Magento builds its structure.
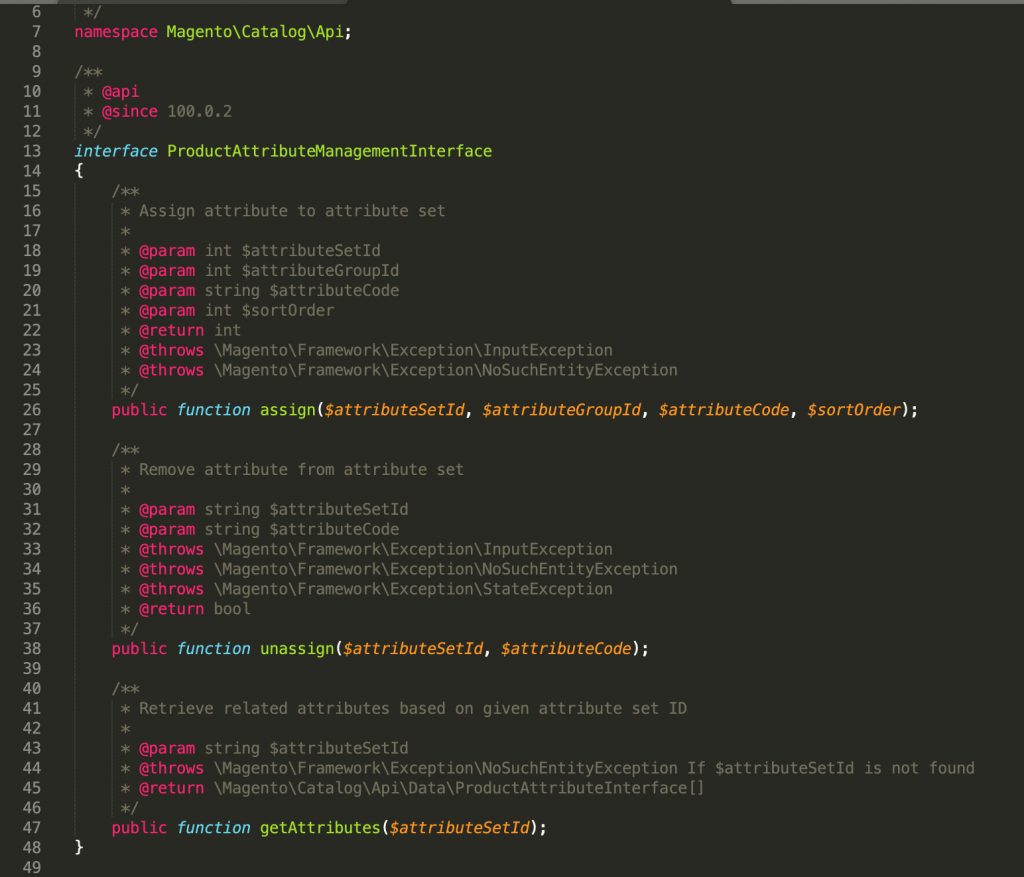
There are 2 ways of Magento 2 Dependency Injection:
- Via Constructor:
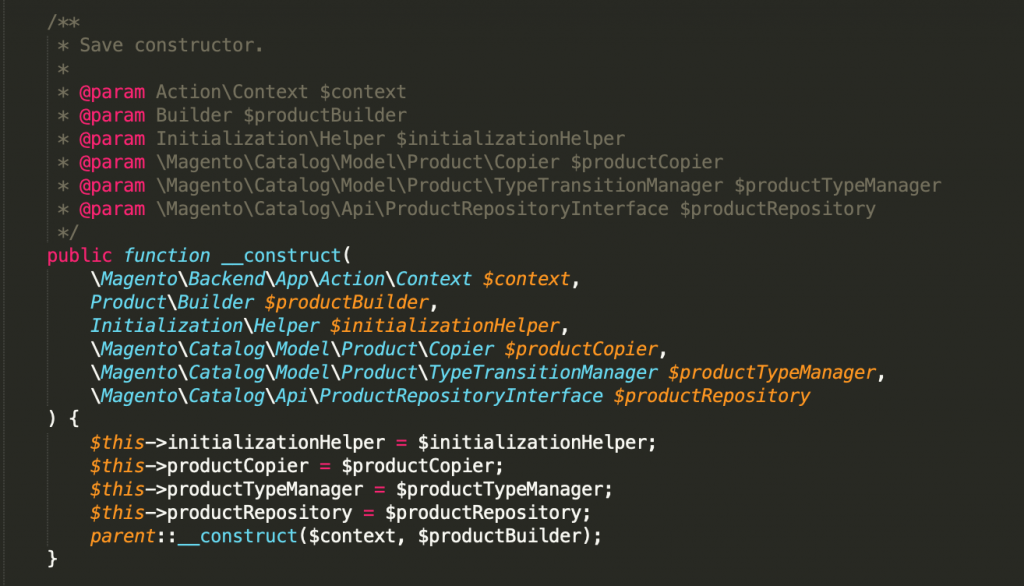
*For example: Magento\Catalog\Controller\Adminhtml\Product\Save
- Via Method: API often uses this method.
*For example: Magento\Catalog\Api\ProductAttributeManagementInterface
3. Factories
3.1. Overview
Factory is a non-injectable object – a Magento 2 Design Patterns that allows Magento to instantiate a representative object for an Entity. Object Manager and business code instantiate it. Magento automatically instantiates Factory (in the folder generated) with the type as: <class-type>Factory.
For example: Magento\Catalog\Block\Product\ImageFactory
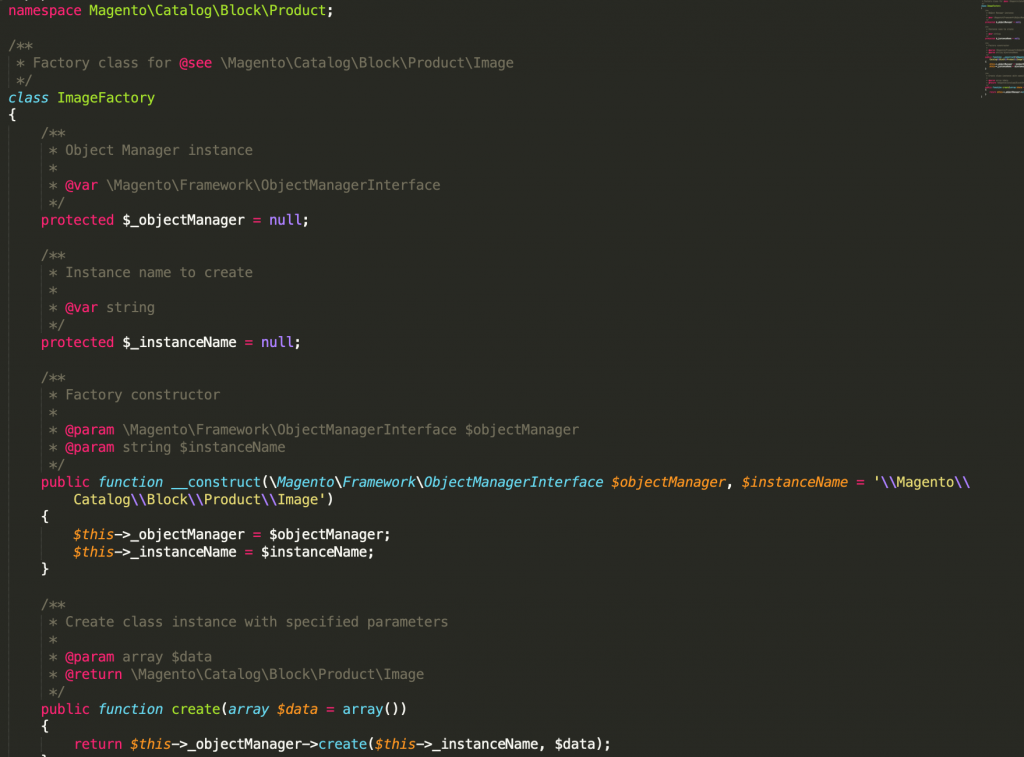
3.2. How to use Factory
- Call Factory in the Constructor:
function __construct ( \Magento\Cms\Model\BlockFactory $blockFactory) {
    $this->blockFactory = $blockFactory;
}
Call the create() method to create a copy of the object:
$block = $this->blockFactory->create();
- For a few classes that require some parameters (for example: Magento\Search\Model\Autocomplete\Item).
You will directly transfer params to create():
$resultItem = $this->itemFactory->create([
   'title' => $item->getQueryText(),
   'num_results' => $item->getNumResults(),
]);
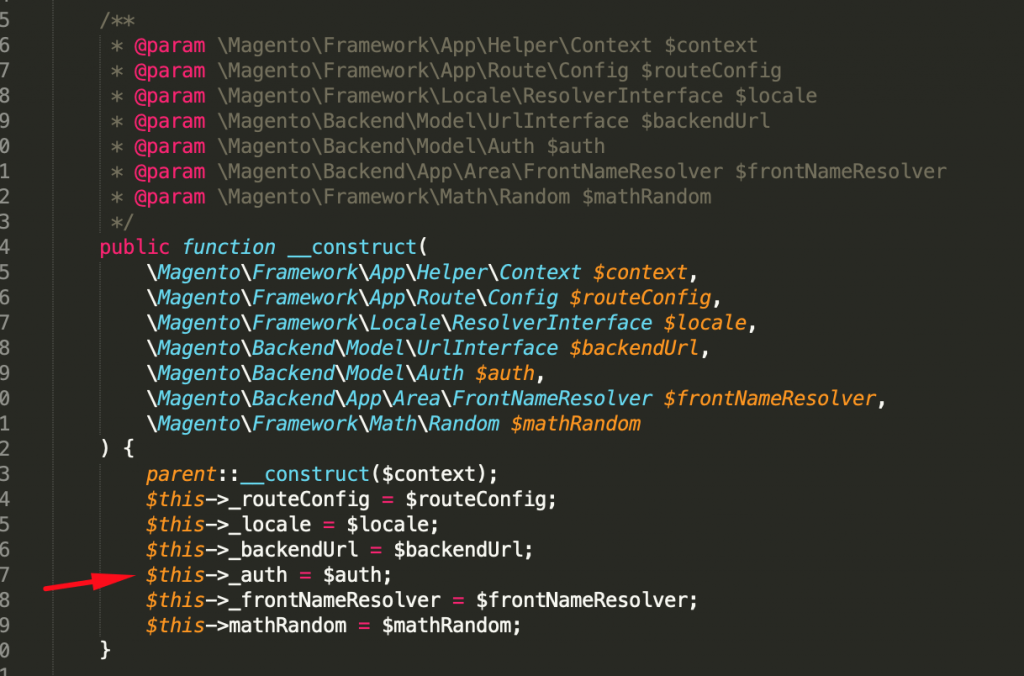
4. Proxies.
As mentioned above, Magento 2 Dependency Injection is a design pattern to manage object class and you can make dependency injection in 2 ways: inject via Constructor and via Method. If you inject into Constructor, class and its dependencies in that constructor are instantiated (a set of class instantiation) when you instantiate an object class.
Also, if there are any classes and their dependencies using many resources, the function’s performance is badly impacted. In reality, you may not use these dependencies taking many resources in the current class.
To handle this problem, Magento comes up with a solution as Proxy Class – a design pattern for the class whose functions negatively affect performance. It means if class A is dependency injected into a class B, class A is instantiated only when a function of class A is called in class B.
You can take a look at a structure to use Proxy: \Original\Class\Name\Proxy. This class is automatically instantiated in the folder generated.
For example, to use the Proxy class, you can transmit via the di.xml file: vendor/magento/module-backend/etc/di.xml.

In the class’s constructor: Magento\Backend\Helper\Data And the class Magento\Backend\Model\Auth is instantiated only when used.
⇒ Benefits:
- Easy to use, and you only need to declare the class/Proxy into the di.xml file
- Improve the program performance
- Contain structure that is clear to understand
5. Preferences
The Magento 2 object manager uses Magento 2 Preferences to expand the basic implementation. In Magento 2, you may use preferences to implement some interfaces or rewrite/override existing PHP classes and functions.
When you desire to modify a class or a function in Magento 2 Design Patterns core to extend or change functions, Magento 2 offers you a method as Preferences.
Preferences are managed in the following ways:
<moduleDir>/etc/di.xml (Global)
<moduleDir>/etc/<area>/di.xml
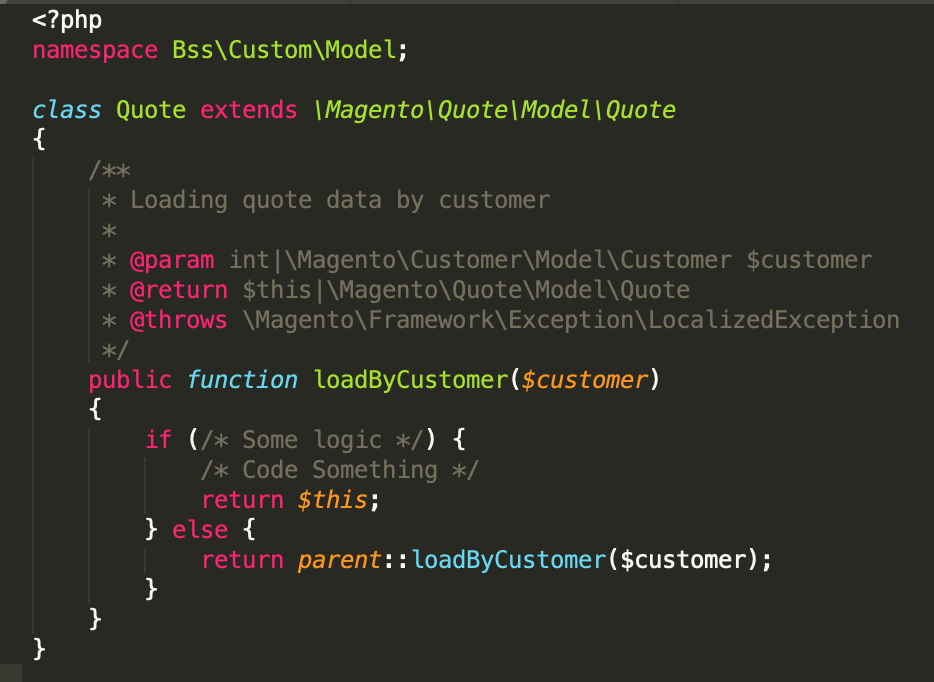
We take this file as an example: app/code/Bss/Custom/etc/di.xml
<preference for="Magento\Quote\Model\Quote"
type="Bss\Custom\Model\Quote" />
- Class A: Magento\Quote\Model\Quote
- Class B: Bss\Custom\Model\Quote
Then running to the loadByCustomer part, class B is called, not class A (B is required to extend A).
⇒ Strengths:
- Easy to use
- Easy to declare
- Modify almost class in the core, even abstract and interface
- Modify almost all functions, even protected and private
⇒ Weakness:
- Conflict with modules of 3rd parties
- Cannot modify if class calls directly via Object Manager
6. Argument Replacement
6.1. Overview
Argument Replacement is used via the di.xml file which includes dependencies and injection. You need Argument Replacement to change some dependencies injected into the constructor when instantiating that class. The name of Argument Replacement in the XML file is corresponding to the name used in class.
For example: In the file: vendor/magento/module-catalog/etc/di.xml
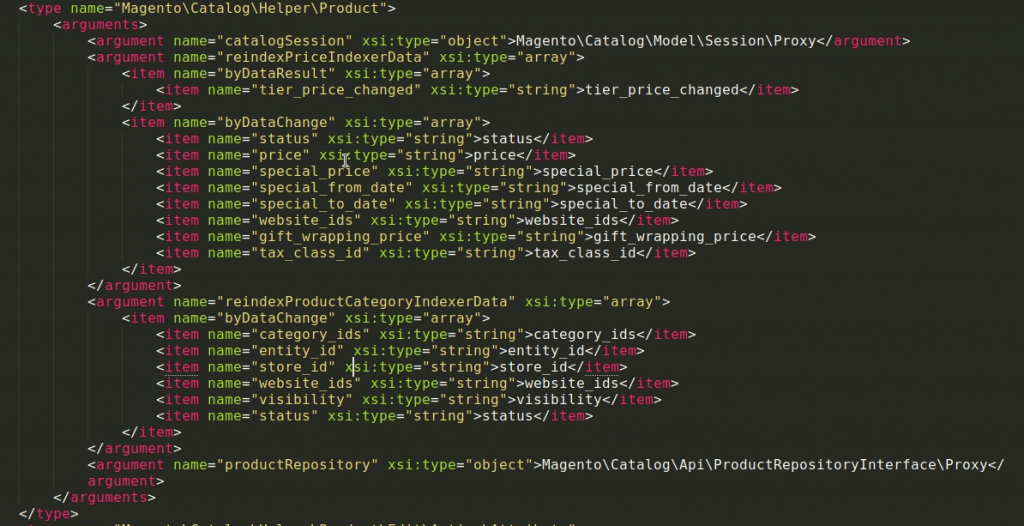
In the constructor of Magento\Catalog\Helper\Product class:
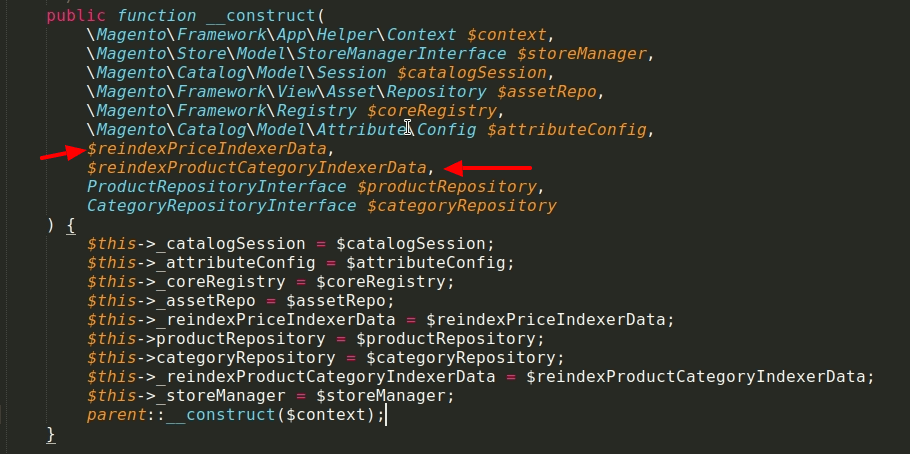
At this time, you will inject corresponding arguments into the Magento\Catalog\Helper\Product class when instantiating Object Manager.
6.2. Argument Types
- Object
Node Formats:
<argument xsi:type="object">{typeName}</argument>
<argument xsi:type="object" shared="{shared}">{typeName}</argument>
Instantiating a copy of class Name: class name, interface name, or virtual type as typeName.
Use “shared” to define the type of copy. There are two types called Singleton and Transient.
- String
<argument xsi:type="string">{strValue}</argument>
<argument xsi:type="string" translate="true">{strValue}</argument>
- Boolean
<argument xsi:type="boolean">{boolValue}</argument>
- Number
<argument xsi:type="number">{numericValue}</argument>
Allowed types contain integers, floats, or numeric strings.
- init_parameter
<argument xsi:type="init_parameter">{Constant::NAME}</argument>
{Constant::NAME}
You use it to instantiate global variables for a class. For example:
<type name="Magento\Framework\App\Arguments\ValidationState">
<argument
<argument name="appMode"
xsi:type="init_parameter">Magento\Framework\App\State::PARAM_MODE</argument>
</argument>
</type>
- Const
<argument xsi:type="const">{Constant::NAME}</argument>
.......
- Null
<argument xsi:type="null"/>
Format is Null
- Array
<argument xsi:type="array">
<item name="someKey" xsi:type="<type>">someVal</item>
</argument>
It is instantiating an array for argument – similar to an array in normal PHP.
⇒ Strengths:
- Various types to modify class such as an object, number, array, and so on
- High flexibility
⇒ Weakness:
- Complicated structure
- Require to declare following the right structure
7. Virtual Types
Virtual types are used via the di.xml file. They can use dependencies in the available class without changing that class.
For example, you create a session catalog in this file: vendor/magento/module-catalog/etc/di.xml
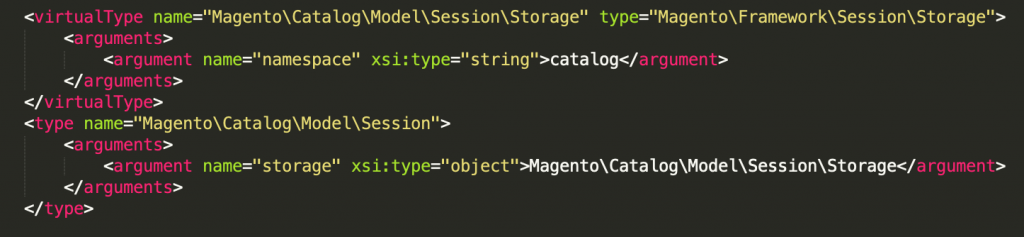
The class Magento\Catalog\Model\Session\Storage is the name of a virtual class (these virtual and name are set optionally) and inject dependencies as namespace into the constructor.
8. Events and observers
When you desire to modify a class or a function in Magento core, you often think of events and observers. So, what are events and observers?
8.1. Events
An action of a module activates events. Events share data with observers, and you can edit the input data. Magento also allows us to create customized events to modify data.
- Dispatching Events
You are able to create a new event by using this class: Magento\Framework\Event\ManagerInterface. You can also use the dispatch function provided by this class to instantiate the event name that you desire to dispatch.
Take a look at the code example here: https://devdocs.magento.com/guides/v2.3/extension-dev-guide/events-and-observers.html#dispatching-events
- Event Areas
It is divided into 3 types depending on the events.xml file:
+ etc/adminhtml/events.xml – adminhtml
+ etc/frontend/events.xml – frontend
+ etc/events.xml – global
8.2. Observers
Observers are used to catching events in order for changing the input data so that you can modify, logic, and so on.
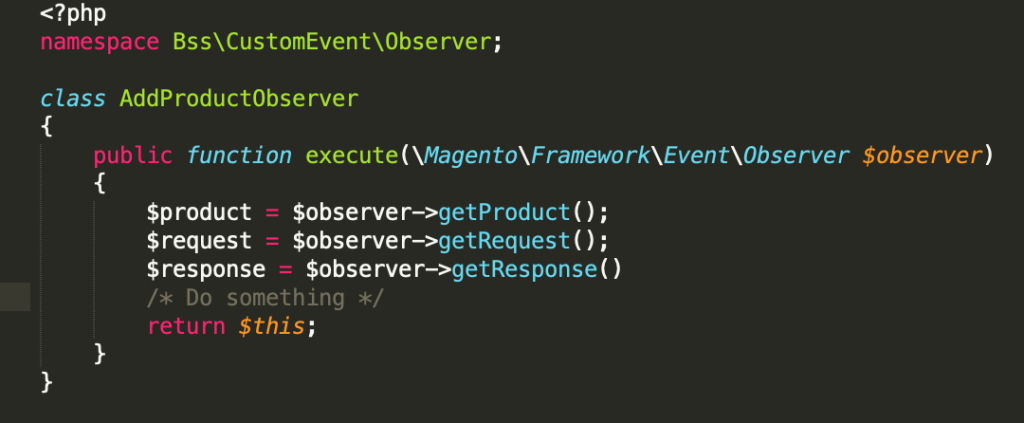
- Create an observer
To create a new observer, you need to put your file in the folder: <module-root>/Observer and the inherited class: Magento\Framework\Event\ObserverInterface
Take a look at the code example here:
- Subscribe events
You declare events and observers via the XML file.
For instance: <module-root>/etc/adminhtml/events.xml
<event name="checkout_cart_add_product_complete">
     <observer name="bss_admin_catalog_add_to_cart"
instance="Bss\CustomEvent\Observer\AddProductObserver"/>
</event>
Once adding products to the cart is completed, it will run to the execute part of the class AddProductObserver. You can modify data transmitted via the checkout_cart_add_product_complete event, including request and response.

To disable events, you just insert disabled=”true” behind the observer in the xml file.
9. Plugins
You can also consider the Plugin method to customize a function in Magento 2. It is applied to all public methods in class, interface, and framework.
The Plugin method can be only applied for the public method, and does not cover the following cases:
- Final method
- Final class
- Non-public method
- Static class method
- __constructor
- Virtual Type
- Object that is instantiated via Magento\Framework\Interception
To declare the Plugin, you need to use the di.xml file:
<config>
    <type name="{ObservedType}">
      <plugin name="{pluginName}" type="{PluginClassName}"
sortOrder="10" disabled="false" />
    </type>
</config>
⇒ Required things are:
- Type name: The name of class or interface you want to edit
- Plugin name: The name of plugin (in case the names are duplicated, they will be overwritten and only the plugin running at the last is taken)
- Plugin type: The name of plugin will be edited.
⇒ Non-required things are:
- Sort order: The running order of Plugin
- Disabled: Default value is False, and you can add the disabled attribute to disable the plugin.
There are three ways to use this Plugin method:
- Before: used to modify the input data of a function
- Around: used to modify the operation process of a function
- After: used to modify the output data
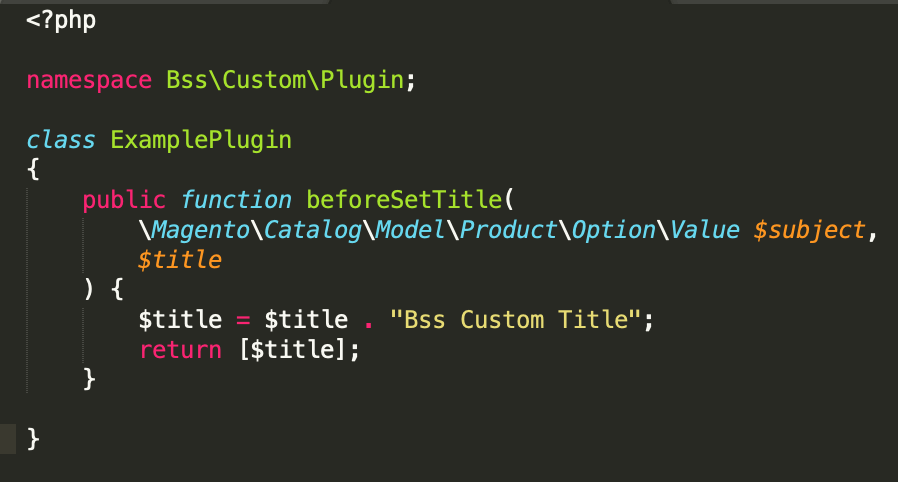
Before method: used to change the input data. For example, using the Plugin to edit titles of custom options.
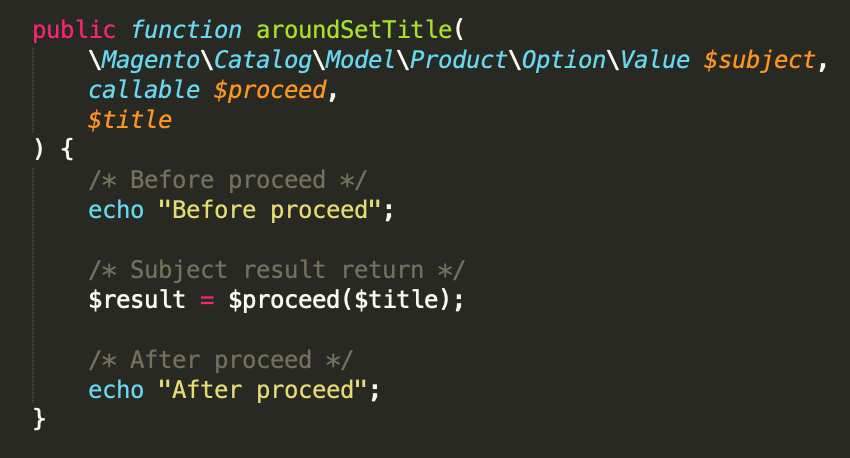
Around method: used to change business logic or logic flow.
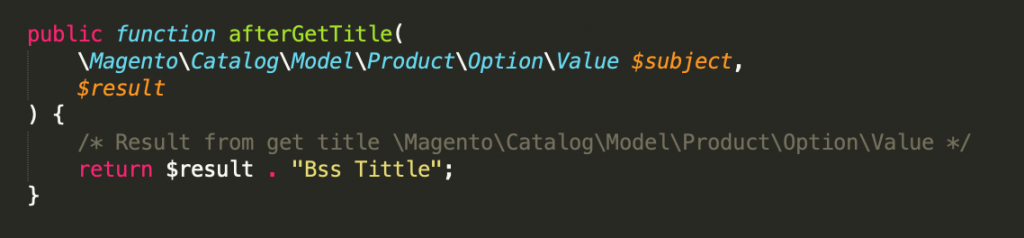
After method: used to change the returned results. For example, changing the returned title.
⇒ Strengths:
- Easy to use with a clear structure
- High flexibility – Few conflicts with 3rd parties
- Ability to modify almost functions (public method only)
⇒ Weakness:
- Not modify protected or private method
- Not call other protected or private methods in the current plugin. You have to entirely rewrite.
- Not be modified in case class is directly called via Object Manager
10. Repositories
Basically, Repositories and Factories share a lot of common things when they are used to read, edit, or remove entity or a list of entities. However, you will need Factories when you desire to create a new entity.
Repositories are parts of service contracts – interface, so they support Soap/Rest API.
Returning data is a little bit different when you use these two methods.
- ProductRepository: The returned data will be specified in the business code \Magento\Catalog\Api\Data\ProductInterface.
This will remove any excess data that you don’t use. If data exists in the cache, the disk will take it out without loading directly from the Model via the database.
- ProductFactory: returns full data of that model entity. Hence, much data is not necessary to be used as a result.
In a nutshell, in case of Repositories is enough for your demands, you should prefer Repositories to Factories.
11. Injectable/Non-Injectable Object
Via Magento 2 Dependency Injection, there are two types of Object such as Injectable and Non-Injectable.
- Injectable Object: is a singleton and shareable object instantiated by Object Manager via di.xml file and injected to the constructor. This object type can require other objects in the constructor.
- Non-injectable: are objects that Object Manager cannot instantiate. To have this object, you need to instantiate a new instance. These objects share some common things such as:
- Short life cycle
- Require input data to instantiate from the user or from the database before it can be instantiated.
Almost all Magento models are non-injectable objects. Product is a typical example because it needs the product ID to transmit. Hence, you have to use a new or empty instance to call this object. You can use Factory to instantiate a new object to overcome this limitation.
Conclusion
This is all about the Magento 2 Design Patterns. If you wish to know anything else, please do not hesitate to ask us in the comment section below.
BSS Commerce is one of the leading Magento extension providers and web development services in the world. With experienced and certified Magento developers, we commit to bringing high-quality products and services to optimize your business effectively. Furthermore, we offer FREE Installation – FREE 1-year Support and FREE Lifetime Update for every Magento extension.
CONTACT NOW to let us know your problems. We are willing to support you every time.