
If you have read Magento 2 Knockout JS 101: from Beginner to Advanced (Part 1), I am sure that you have a better understanding of Knockout JS.
In this article, we will deepen your knowledge about Magento 2 Knockout JS so that you can apply it to your work effectively.
Let’s enjoy it!
Why Magento 2 chooses Knockout JS
First of all, we want to remind you about the definition of Magento Knockout JS.
As we mentioned in part 1, Knockout JS (KO) is a JavaScript library that is used on the frontend in Magento 2.
Knockout JS is more simple and lighter than other frameworks, and Magento just needs some functions of KO such as data-binding and components. Because of simplicity, KO is more stable and reduces potential problems while other frameworks are in development.
1. Magento 2 Knockout JS Integration
In this part, we will explain how Magento 2 applies KnockoutJS bindings.
1.1. Initialization Magento 2 KnockoutJS
RequireJS declares the KO library in this file: module-ui/view/base/web/js/lib/knockout/bootstrap.js
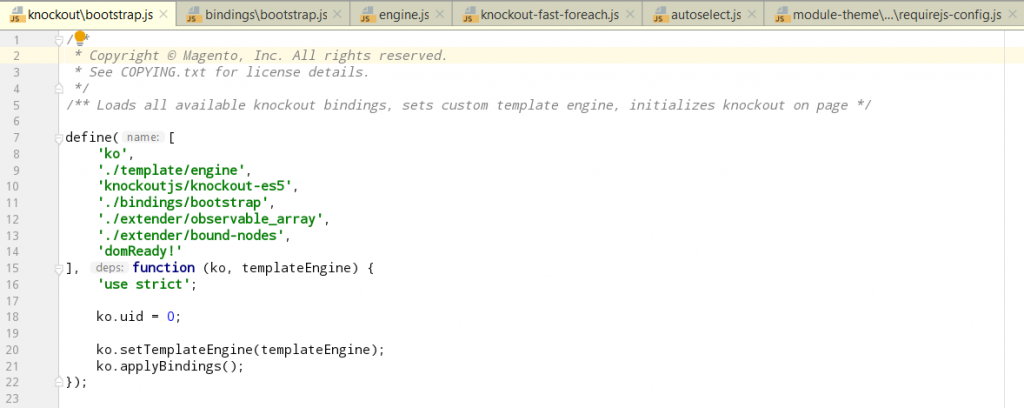
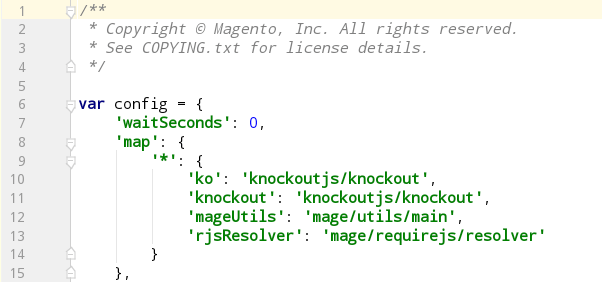
- Ko: is an alias mapped to the Magento 2 Knockout JS library and declared in the file: module-theme/view/base/requirejs-config.js
- template/engine: the library to rewrite KO’s binding template.
- bindings/bootstrap: custom bindings of this Magento file: module-ui/view/base/web/js/lib/knockout/bindings/bootstrap.js
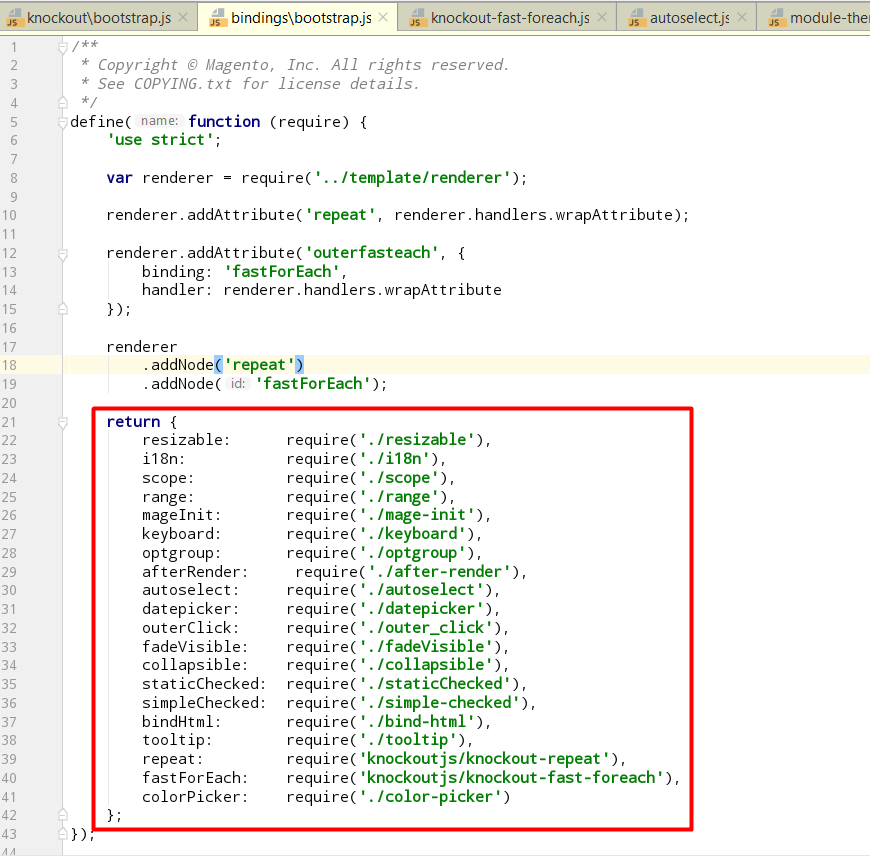
Besides Magento’s custom binding, repeat and fast-foreach are the two libraries written by communities.
- extender/observable_array: is used to write more functions for Observable arrays, such as ‘each,’ ‘map,’ ‘filter’,…
1.2. Template Engine
When you work with Ko’s templates, you need to declare an HTML snippet on Client side 1. This HTML code snippet is covered by the <script type=”text/html” id=”my_template”> tag.
In Magento, templates are rendered from the Service side depending on how you process a page. Ko’s components can make a template be loaded from a URL on the server-side. However, that template must be assigned to a ViewModel while it is necessary to get flexibility between ViewModel and Template.
Hence, Magento rewrites KO’s templates in order to download and cache templates from the server-side.
The engine template is handled in this file: module-ui/view/base/web/js/lib/knockout/template/engine.js
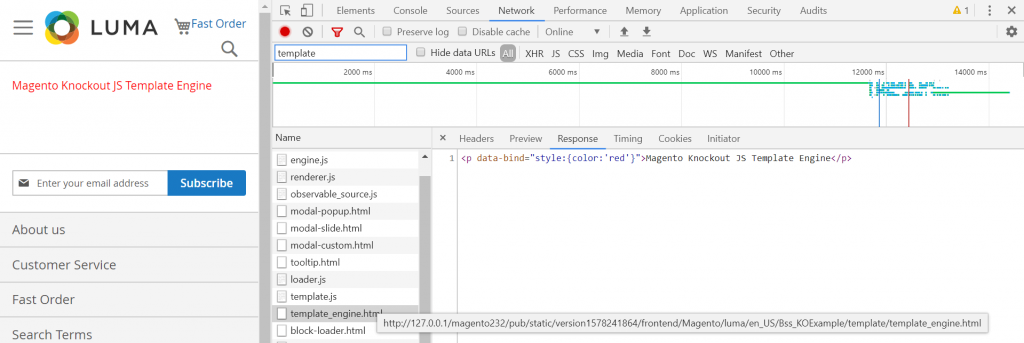
To prove the template render from an URL, let’s take a look at the following example:
- Create a controller and insert a block into the controller’s layout, with template phtml as Bss_KOExample::template_engine.phtml.
- Create app\code\Bss\KOExample\view\frontend\templates\template_engine.phtml with this content:
<div data-bind="template: {name: 'Bss_KOExample/template_engine', data: {}}"></div>
Magento creates an URL for the above template and link to this file: view\frontend\web\template\template_engine.html
- Create a file: app\code\Bss\KOExample\view\frontend\web\template\template_engine.html with the content:
<p data-bind="style:{color:'red'}">Magento Knockout JS Template Engine</p>.
Access the route to see that Magento 2 Knockout template is already loaded from the server:
1.3. Components
As you already know, the Component of KO contains ViewModel and Template (https://knockoutjs.com/documentation/component-binding.html).
The Magento’s Component based on the KO’s Component becomes uiComponent including Component (corresponding to ViewModel) and Template. Magento creates it to aim at flexibly processing many components on a page and nested components (including child components).
There are two ways to declare Component:
- Declare Component from Layout (XML file): Create a node inside the Block tag, following this structure:
<arguments>
    <argument name="jsLayout" xsi:type="array">
        <item name="components" xsi:type="array">
            <item name="component-alias" xsi:type="array">
            </item>
        </item>
    </argument>
</arguments>
*Note: <item name=”component-alias” xsi:type=”array”> ⇒ Declaring the identifier of a component
⇒ Let’s take a look at an example:
<block class="Bss\CatalogSearch\Block\ListProduct" name="catalogsearch.product_list"
   template="Bss_CatalogSearch::catalog/products.phtml">
 <arguments>
   <argument name="jsLayout" xsi:type="array">
      <item name="components" xsi:type="array">
        <item name="productList" xsi:type="array">
         <item name="component" xsi:type="string">Bss_CatalogSearch/js/catalog/products</item>
         <item name="config" xsi:type="array">
            <item name="template" xsi:type="string">Bss_CatalogSearch/catalog/product-list</item>
         </item>
       </item>
      </item>
    </argument>
  </arguments>
</block>
- Directly declare by Script tag (PHTML file)
For instance:
<script type="text/x-magento-init">
     {
        "*": { "Magento_Ui/js/core/app": {
            "components": {
                "productList": { // => component identifier
                        "component": "Bss_CatalogSearch/js/catalog/products",
                        "config": {
                            "template": "Bss_CatalogSearch/catalog/product-list"
                        }
                    }
                }
            }
        }
     }
</script>
(The keyword “component” is considered as ViewModel in Ko Component).
The “product list” Node is declared in the “components” node with Components as “Bss_CatalogSearch/js/catalog/products”, and Template file as “Bss_CatalogSearch/catalog/product-list.”
In case you declare Component from the Layout, you need to initialize Component that Component as below:
<script type="text/x-magento-init">
    {
        "#products-wrapper": {
            "Magento_Ui/js/core/app": <?php /* @escapeNotVerified */ echo $block->getJsLayout(); ?>
        }
    }
</script>
getJsLayout() parses content from the jsLayout node from layout and converts it into JSON.
Magento_Ui/js/core/app
It parses components that are declared in JsLayout. Then call the layout.js file (vendor/magento/module-ui/view/base/web/js/core/renderer/layout.js) to initialize UiComponent instance for each Component and save components in uiRegistry.
uiRegistry
Source code: vendor/magento/module-ui/view/base/web/js/lib/registry/registry.js. uiRegistry caches components that are declared into memory. You can read more information about uiRegistry HERE.
uiComponent
uiComponent (or uiCollection) is the base component of Magento 2 Knockout JS. It means that every declared component needs to be extended. UiComponent initializes and renders child components that are declared inside. You can file its source code in the file: vendor/magento/module-ui/view/base/web/js/lib/core/collection.js. Read this document for more details about UiComponent!
1.4. Scope binding
Magento creates ‘scope’ binding to apply Component in View layer (phtml file). It helps determine the identifier of the corresponding Component in JSON data to load the Javascript processing section, thereby rendering the Magento 2 Knockout template.
For example, you declare “product list” component in the layout:
<item name="components" xsi:type="array">
    <item name="productList" xsi:type="array">
        <item name="component" xsi:type="string">Bss_CatalogSearch/js/catalog/products</item>
        <item name="config" xsi:type="array">
            <item name="template" xsi:type="string">Bss_CatalogSearch/catalog/product-list</item>
        </item>
    </item>
</item>
To map this content to View, you use:
<div id="products-wrapper" data-bind="scope: 'productList'" class="container-default">
...
</div>
*Note: scope binding is only applied to the main component, not to the child component.
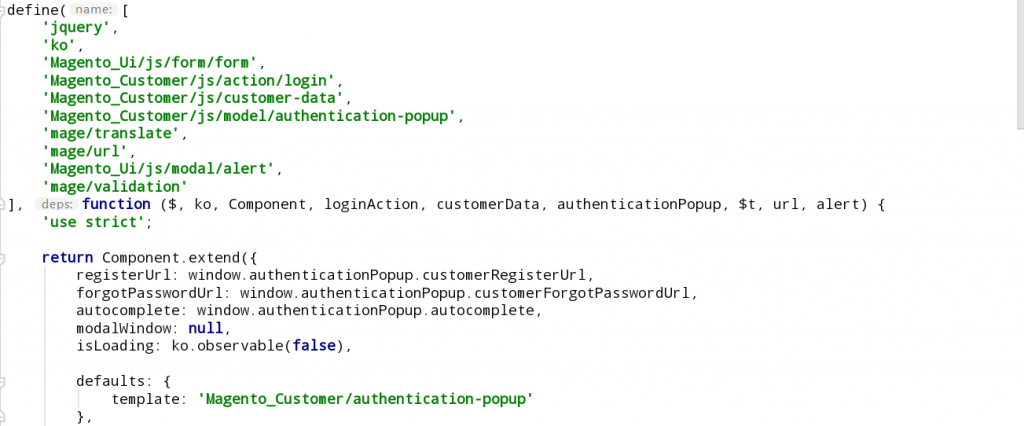
1.5. getTemplate function
To call Magento 2 Knockout Template from a Component, you use the syntax:
<!-- ko template: getTemplate() --><!-- /ko →
This function is declared in the file: module-ui/view/base/web/js/lib/core/element/element.js
/**
* Returns path to elements' template.
*
* @returns {String}
*/
getTemplate: function () {
   return this.template;
},
*Note: To declare Template from Component (JS file), you add the following config into ViewModel:
defaults: {
   template: 'template_path'
}
For example, the file: module-customer/view/frontend/web/js/view/authentication-popup.js.
2. Checkout page
As you know, Magento 2 uses the Knockout JS framework to build the dynamic checkout page.
So in this part, we will dive into all aspects of the Magento 2 checkout page.
2.1. How Magento 2 Knockout JS works on the checkout page?
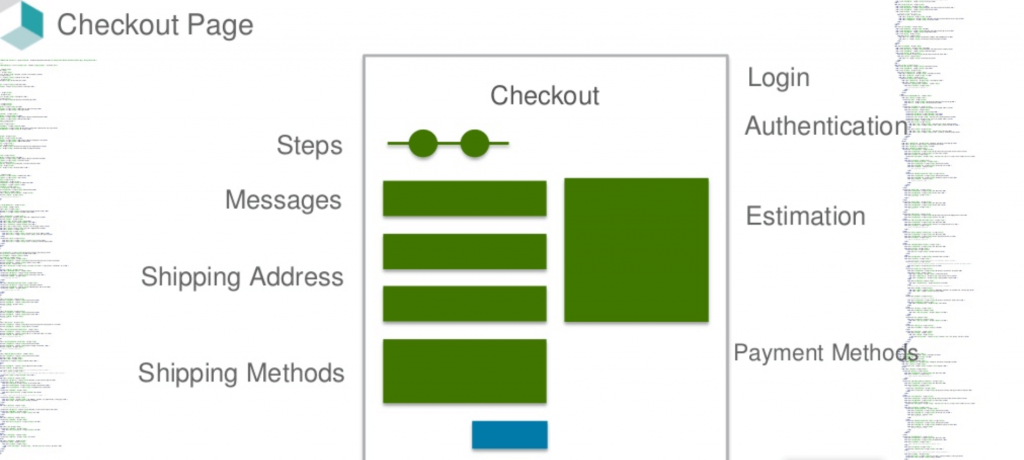
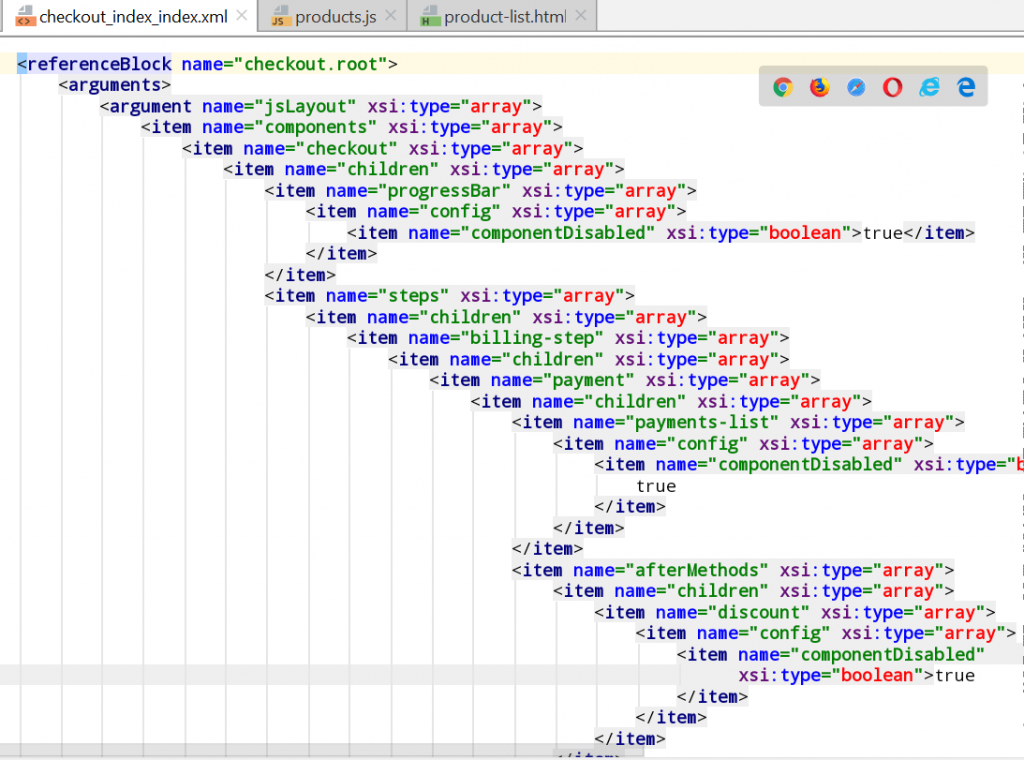
A checkout page includes elements such as authentication, steps, message, shipping address, billing address, shipping methods, estimation, payment methods, sidebar, and so on. Each element is declared as an uiComponent with a Magento 2 Knockout template and configs of that element. You can also declare child elements, arrange and customize display right on the XML file.
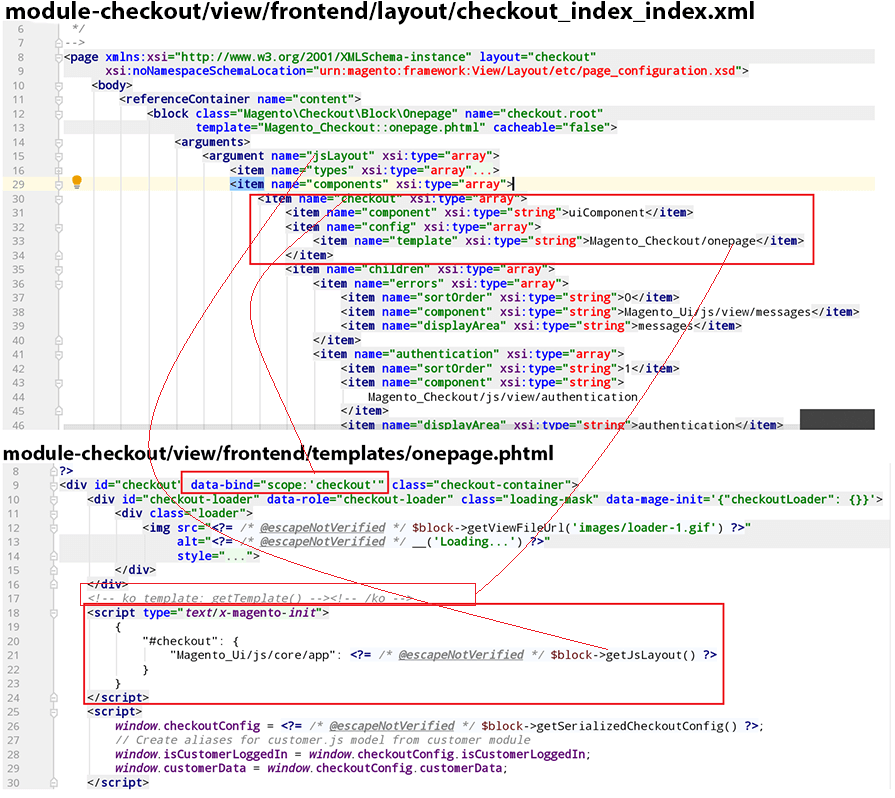
Magento processes the checkout_index_index.xml layout via the LayoutProcessor class, parse nodes to create an array and then convert to JSON format. That JSON data will be rendered out of the Block view (phtml file) through the getJsLayout () function declared in the script tag.
JSON data can be:

window.checkoutConfig = <?= /* @escapeNotVerified */ $block->getSerializedCheckoutConfig() ?>;
Configs of the checkout page are declared in JavaScript by the Global variable. This becomes a condition to process uiComponents.
Magento_Ui/js/core/app initializes components and child components declared in JSON data into uiComponents, and caches to memory and arrange positions.
The main component of the page with the identifier as checkout declares with the base component as uiComponents because logics are processed in the child component of the “child” node.
The main template of the checkout page as Magento_Checkout/onepage will be rendered out of view-layout by Magento’s custom binding “scope”:
< div id="checkout" data-bind="scope:'checkout'" class="checkout-container">
Child components are respectively declared in the “children” node. Child Component also includes nodes declaring Component and Config/Template which is similar to Component. Also, the “displayArea” node is used to determine the position of Child Component on DOM. To render Child Component, you should use the “getRegion” binding. For example:
<!-- ko foreach: getRegion('estimation') -->
   <!-- ko template: getTemplate() --><!-- /ko -->
<!--/ko→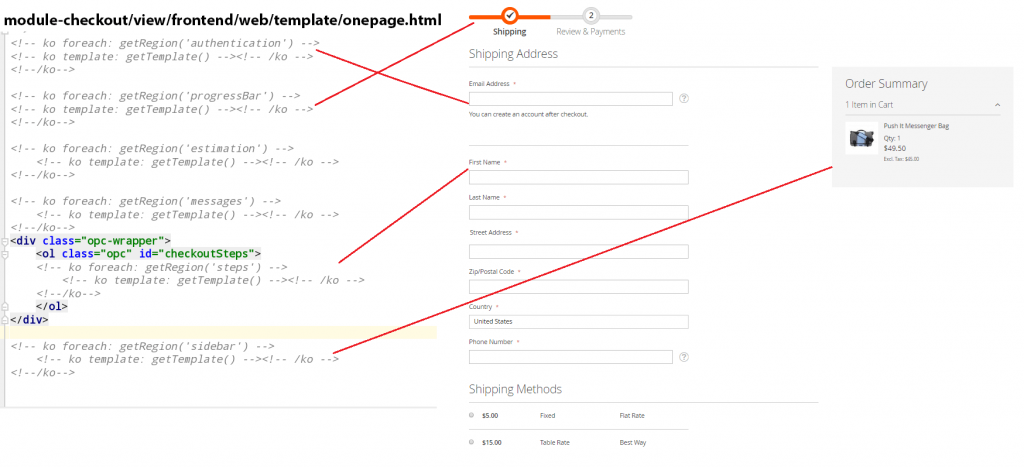
In addition, you can use “sortOrder” node to arrange the display order of the child Component conveniently. The bigger the value is, the lower position the component can stay at. Magento_Ui/js/core/app initially parses JSON data according to the value order of “sortOrder”.
For example:
<item name="sortOrder" xsi:type="string">0</item>
2.2. Notices to work on the checkout page
To change elements on the checkout page, you have to interfere with the “jsLayout” node because LayoutProcessor uses this node to parse the declaration of elements. There are two ways to change “jsLayout”:
- Interfere with the checkout_index_index.xml layout to customize the layout
Declare a plugin for the class: \Magento\Checkout\Block\Checkout\LayoutProcessor::process to process array. This method should be used when you have to implement complex logic or can not perform on XML files, such as handling display conditions, custom templates, …
- Use RequireJS mixins, maps to customize uiComponent and template
- Components must extend “uiComponent” according to the following principle:
define([
   'uiComponent',
], function (Component) {
   return Component.extend({
       initialize: function () {
           this._super();
       }
   })
})
- To disable a Component, use the “componentDisabled” node in the “config” node, for example:
<item name="config" xsi:type="array">
    <item name="componentDisabled" xsi:type="boolean">true</item>
</item>
- To hide a component, use the “visible” node, for example:
<item name="visible" xsi:type="boolean">false</item>
For additional information on Customize Checkout topics, please take a look at the following articles:
https://devdocs.magento.com/guides/v2.3/howdoi/checkout/checkout_overview.html
Wrap Up
So this is the end of part 2, which is the last part of the series of mastering Magento 2 Knockout JS.
I hope that the series of Knockout JS and Magento 2 Knockout JS will give you helpful knowledge to better your understanding and contribute to your work.
BSS Commerce is one of the leading Magento extension providers and web development services in the world. With experienced and certified Magento developers, we commit to bringing high-quality products and services to optimize our business effectively.
CONTACT NOW to let us know your problems. We are willing to support you every time.