Many merchants believe that the less information in the checkout process, the happier customer is. However, it’s completely wrong. The process must be accessible, have excellent navigation, and help you gather more data. That’s why we need to learn more about Magento checkout customization.
Even though you can manually add content by coding, it is challenging. To help you do it efficiently, we provide the following guide. Also, you can refer to alternative ones if not like a hard path.
Before diving in, just look at how Magento checkout customization can help you.
Default Feature & How Magento Checkout Customization Can Help Your Store
Table of Contents
Magento default feature
There are numerous distinctions between Magento 1 and Magento 2, including the checkout step. Unlike Magento 1, with a complicated checkout process, Magento 2 has a lot of enhanced. For example, instead of six steps that a user had to go through in Magento 1, the second version has better user navigation that only offers a two-step checkout.
Besides, a Magento guest checkout is also now available. Additionally, Magento 2 can automatically search for and analyze existing registered clients. The checkout procedure was sped up by 38 percent thanks to streamlining the order-making process and the usage of prominent payment gateways.
However, there are still limitations here. Magento 2 doesn’t support changing checkout style or adding more content to the default version. That’s why we need this Magento checkout customization guide below.
How Magento checkout customization can help your store

It is a common misconception that the checkout process should be straightforward and not require adherence to the store’s theme. However, every store owner should be aware that making the checkout page different from the rest of the site can cause problems, including a drop in sales. The cause for this issue is that the discrepancy from the checkout page affects your customers, making your site untrustworthy.
In fact, customers may require store owners to show the details for their orders and deliveries. Customers may need to be informed about the things they are ordering. To accomplish this, Magento store owners must add custom text to the checkout order summary.
Magento checkout customization can help customize the checkout process and make it easier and more pleasant for the end-user. You can enable Magento’s one-step checkout or add more content.
Once a customer has completed their order, you can add fields to get customer insights and create a brief survey. As a result, you can swiftly rectify issues with your website’s purchasing experience, enhancing your company’s reputation.
Magento 2 Checkout Customization Guide
Several third-party modules can help generate Magento checkout customization and make it easier and more pleasant.
Otherwise, you can also manually add a custom step. This can be time-consuming and risky if you don’t have coding experience. In this case, you should not modify the Magento code to ensure compatibility, easy upgrades, and simple maintenance.
The decision depends on your resources. Thus, to understand each way, we have the following step-by-step guide.
Manually coding
Because Magento uses UI components for checkout implementation, you can change the JavaScript implementation or template for an element, add, remove, or disable a feature to customize each phase.
Step 1: Update the component’s “.js” implementation and template.
You must declare the new files in the checkout page layout to alter the “.js” implementation and template used for component rendering. Take the following steps to accomplish this:
- Create the following new file in your custom module directory: <your module dir>/view/frontend/layout/checkout index index.xml. The Magento Checkout module should be the foundation for your checkout modification to work successfully.
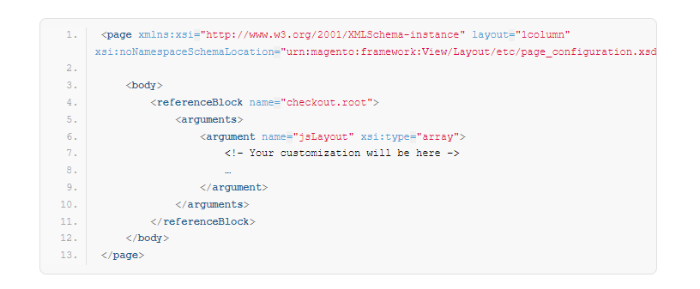
- Then, add the following to this file:

Source: Magento Commerce Devdoc
- In the <Magento_Checkout_module_dir>/view/frontend/layout/checkout_index_index.xml file, find the component you have to personalize. Copy the corresponding node and all parent nodes up to <argument>. There is no need to leave all the attributes and values of parent nodes, as you will not change them.
- Modify the component’s “.js” file path, template, or other property.
Step 2: Toss in the new component to the layout of the checkout page.
Any UI component in the checkout index index.xml is added similarly to how a checkout step component is introduced.
Make sure you declare a component to render it correctly so that the parent component can cause it.
- If a parent component is a generic UI component (referred to by the UI component alias), its children are presented as-is.
- If a parent component is an expansion of a universal UI component, the rendering of children may be limited in some way.
A component, for example, can render just children from a specific displayArea.
Step 3: Make a component move.
To change the position of any component on your checkout page, locate the part (parent) where it should go and paste your element as a child of the parent.
- Disable a component
Use the following procedures to disable the component in your checkout index index.xml:

(Source: Simicart)
- Remove a component
Build a plugin for the “Magento\Checkout\Block\Checkout\LayoutProcessor::process” function to remove a component from layout rendering. Implement the surround method in your plugin to remove the corresponding layout nodes at runtime.
The around method is used to remove a component in the following example:

(Source: Simicart)
Leveraging third-party extension
However, as I said above, the previous one is not an intelligent way, especially for those who are not familiar with coding.
Instead of modifying the default code, use the extension to create a Magento checkout customization for compatibility, future upgradability, and ease of maintenance. The majority of these extensions enable Magento’s one-step checkout. On the official marketplace, you can find various ready-made solutions.
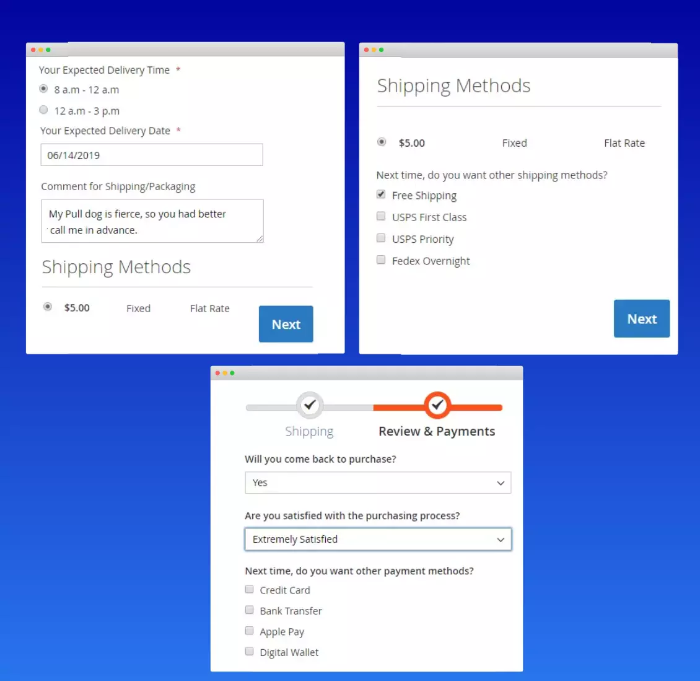
Magento 2 Checkout Custom Field (also known as Magento 2 Order Attributes module) lets you create new custom fields on the checkout process for any information you want to add for order fulfillment. The extension offers you three fields where additional attributes can be displayed:
- Shipping Addresses
- Shipping Methods
- Review & Payments
Furthermore, you should not allow your B2B and B2C customers to check out using the same information if you have both. Your store will profit from personalizing this approach and limiting undesirable fields. You may choose which customer groups will view the checkout custom field with this module.

Don’t forget to try the Magento 2 Order Attributes module demo site here. You can also book a live demo.
Tips For Generate Seamless Magento Checkout Process
No surprise costs
If potential customers discover additional expenses after completing the checkout process, they may abandon their purchase. One of the most prevalent causes of checkout abandonment is the cost of shipping, taxes, and fees.
Statistics back this up: 61% of people who leave an order incomplete do so because of the significant additional expenses. As a result, it should be the initial step in your checkout optimization process.
6-8 fields maximum
A lengthy checkout process turns off 26% of potential customers. If you keep things simple for every website user, you’re more likely to convert individuals who value their time too highly to waste more than 5 minutes on a single order.
There is a tried-and-true method for reducing the number of needless fields in your checkout. First and foremost, instead of the First and Last Name fields, you can add a single Name field. Second, by default, you can make the billing address the same as the shipping address. But be careful with this; you should still provide the user the ability to change the default option.
Combine Custom Checkout Fields with One Step Checkout to streamline your checkout process and collect essential customer data in one go, providing a seamless shopping experience.
Explore the One Step Checkout Magento 2 extension now!
There are no other products, no sale ads, and no distractions.

It could seem like a good idea to show off some of your best-selling items to someone about to purchase. However, it will not boost your average cart value in most circumstances.
Consider the following scenario: you offer shoes, and someone who wants to buy a pair from you notices other attractive sandals on the checkout page. Your potential consumer may then leave the checkout page to investigate this other pair further. It causes customers to return to the previous step, the actual checkout.
As a result, you should avoid showcasing the same or random objects. However, there’s a chance you might do even better by presenting the appropriate product when doing Magento checkout customization based on the customer’s initial interest. However, you must approach this method with caution and knowledge of up-selling, cross-selling, and related products.
As soon as feasible, capture the user’s email address.
You’ll have an opportunity to remind consumers of a product they used to be interested in if they leave the checkout page anyway. But only if you receive emails from customers prior to their departure. There are various benefits to sending an abandonment email to a potential customer.
To begin with, you can be confident that the person was or is currently interested in the product. Second, they may have forgotten about the transaction because they were distracted. As a result, they will just complete the order if you remind them. Another significant benefit is that email marketing does not require a lot of resources in terms of both money and time. Installing and maintaining email-sending systems is not expensive, and automation can save time.
Multiple payment gateways
When users see a recognized payment method on your checkout page, they will feel at ease. This step is critical for your checkout optimization journey if you ship abroad. Consider which payment gateways are most often used in the country or market you’re targeting, and provide various options such as PayPal, Authorize.Net, Braintree, Klarna, or any other.

For more tips to generate an excellent Magento checkout customization, you should check out 8 Tips For Magento 2 Checkout Customization To Steal NOW!
The Conclusion
It all starts and finishes on the checkout page. As an online retailer, your goal should be to design and create this page so that your clients will never want to purchase anywhere else.
To get the intended result and provide a user-oriented purchasing experience, consult our guide and follow the steps outlined above.
BSS Commerce is one of the leading Multi-platform eCommerce solutions and web development services providers globally. With experienced and certified developers, we commit to bringing high-quality products and services to optimize your business effectively.
CONTACT NOW to let us know your problems. We are willing to support you every time.

