
1. Magento Detail Requirement:
I have a 2-year Magento store. I’d like to implement Magento 2 Braintree Payment on our One Step Checkout (OSC) page. I bought a Magento 2 One Step Checkout extension from BSS Commerce. Their support team was great and I have successfully installed some payment methods on my checkout page. However, my old freelance developer made something wrong last month, therefore, the Magento Braintree Payment method isn’t working now.
Please note that we also customized some Magento features which are related to javascript, as I remember they are KnockOut Js changes.
I’m looking forward to having a fast response from your Magento Agency.
2. Solutions from Our Magento Development Team
Thank you so much for choosing our Magento 2 One Step Checkout extension. We are happy to hear that our module works well with your payment methods.
Regarding your Magento 2 Braintree payment integration, I’m a bit confusing. What is your solution to integrate Magento 2 Braintree? As far as I know, Magento 2 already supports this payment method. You can easily enable it from the Admin panel. In Store > Configuration > Sales > Payment Methods, there is a Braintree configuration.
The details are:
- Basic Magento 2 Braintree Settings
- Advanced Braintree Settings
You can fill in your Braintree credentials, enable the method, and then enjoy this great service.
We hope that you can find the right solution to integrate Magento 2 Braintree after reading this post.
READ NOW: Braintree Payments to learn how to configure in the backend.
3. Magento 2 Braintree Setup
Although it’s not too difficult to master, Magento 2 Braintree still requires some solid foundation knowledge. If you don’t know how to set up Magento Braintree for your website, then explore immediately. Right below is a step-by-step tutorial for you to set up this great feature.
Step 1: Get your Braintree credentials
Go to Braintree Payments and sign up for an account.
Step 2: Move to Basic Settings
On the Admin sidebar, go to Stores > Settings > Configuration.
Look to the left, expand Sales, and click Payment Methods.
- For any Magento store that has multiple websites, stores, or views, choose the Store View where the configuration applies in the upper left corner.
- In the Merchant Location section, make sure to set Merchant Country to the location of your business.
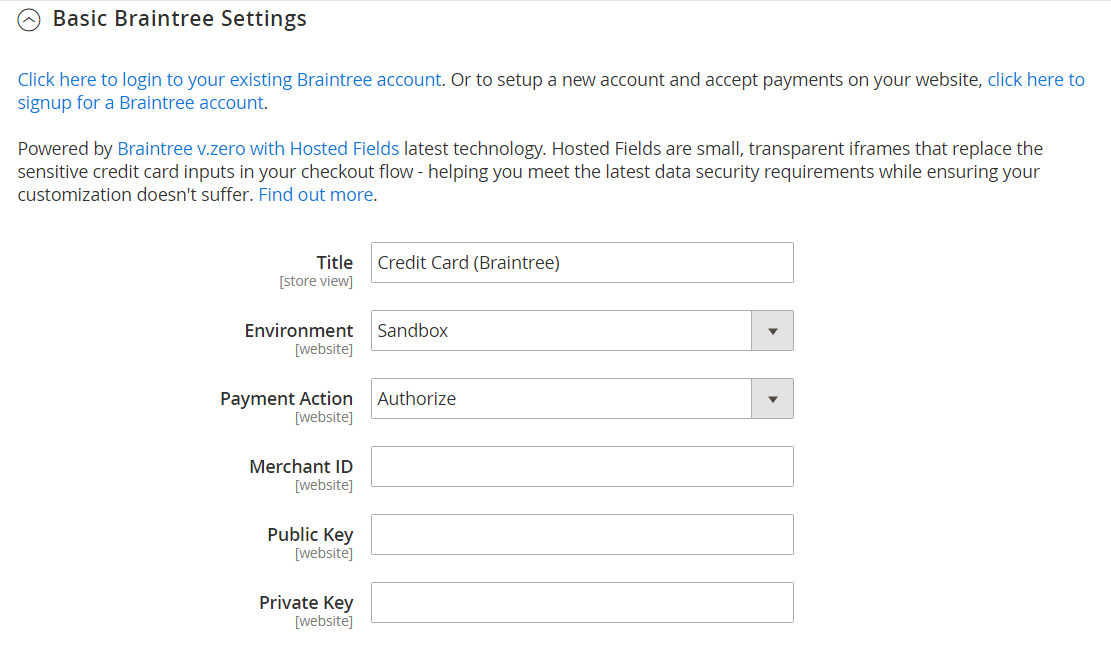
At Recommended Solutions, in the Braintree section, choose Configure and do as follows:

- Fill in a Title to define Braintree as a payment option during checkout.
- Set the current operating Environment for Braintree transactions to
SandboxorProduction
When you test the configuration in a sandbox, remember to use only Braintree Payments that are recommended by Braintree. If you’re ready to go live with Braintree, set Environment to Production.
- Set Payment Action to one of the following:
| Authorize Only | Approves the purchase and puts a hold on the funds. The amount is not withdrawn from the customer’s bank account until the sale is “captured” by the merchant. |
| Authorize and Capture | The amount of the purchase is authorized and immediately withdrawn from the customer’s account. |
- Enter the Merchant ID from your Braintree account.
- Type the following credentials from your Braintree account: Public Key & Private Key.
- Change Enable this Solution to Yes.
- Set Enable PayPal through Braintree to Yes to identify PayPal as a payment option with Braintree.
- Turn Vault Enabled to Yes. This allows you to keep customer information securely, so customers don’t have to reenter it each time they go shopping in your store.

Step 3: Complete the Advanced Settings
Open the Advanced Braintree Settings section.
Next, in Vault Title, fill a descriptive title for your reference that identifies the vault where your customer card information is stored.
Then, type the Merchant ID from your Braintree account.
Set Advanced Fraud Protection to Yes if you want to use Braintree fraud protection for all transactions. Ensure to activate Advanced Fraud Protection in the Settings/Protection section of your account.
Turn Debug on (set Yes) for the system to save a log file of interactions between your store and Braintree.
Change CVV Verification to Yes to require customers to provide the three-digit security code from the back of a credit card. However, don’t forget to activate AVS and/or CVV.
For Credit Card Types, select each credit card that is accepted by your store as payment through Braintree.
In the Sort Order field, enter a number to determine the sequence in which Braintree appears when listed with various payment methods during checkout.

Step 4: Complete the country-specific settings
In the Payment from Applicable Countries section, you will see two options:
- All Allowed Countries: The payment method is valid for customers from all countries specified in your store configuration.
- Specific Countries: This allows you to customize the Payment to Specific Countries. Hold down the Ctrl key and select each country on the list where customers can make purchases from your store.
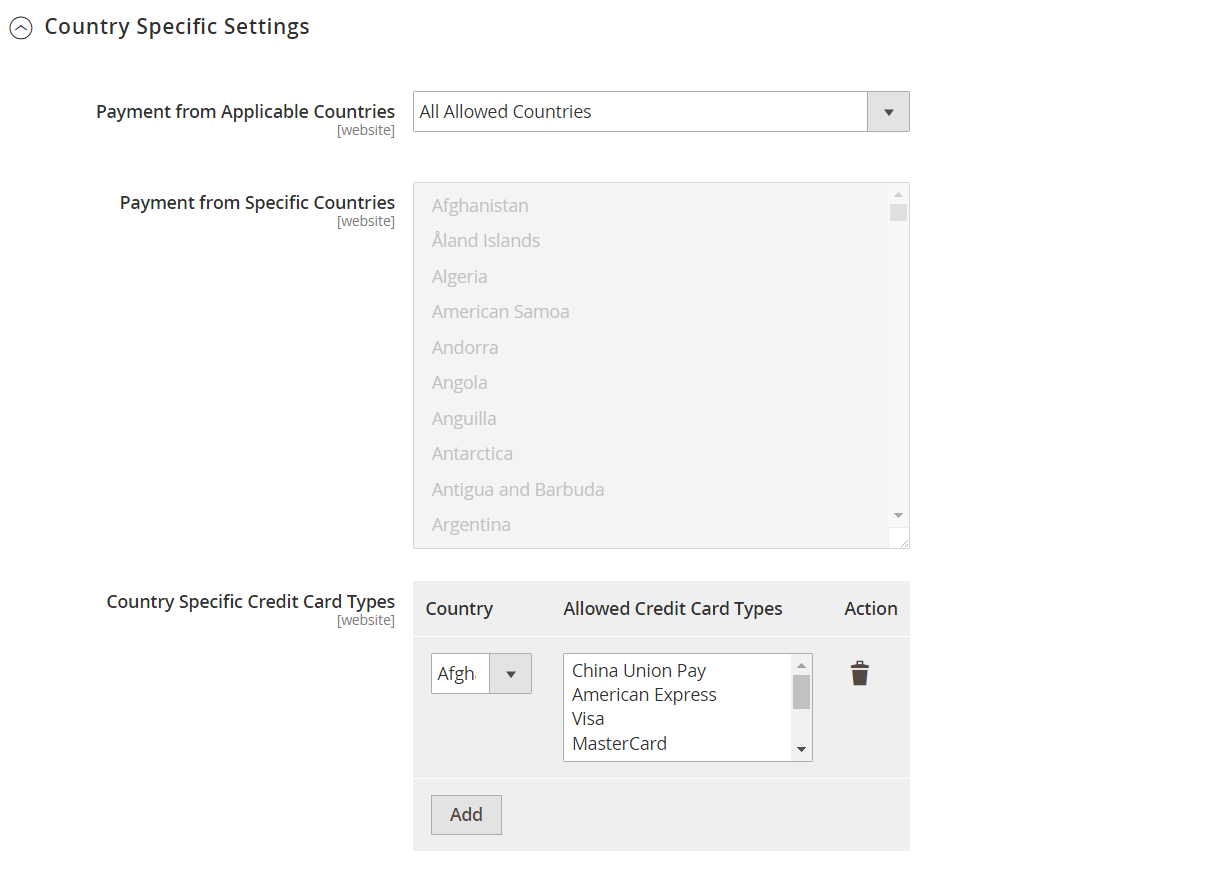
To set up Country Specific Credit Card Types, do the following:
- Press Add.
- Set the Country and choose each Allowed Credit Card Type.
- Repeat to identify the credit cards that are accepted from each country.
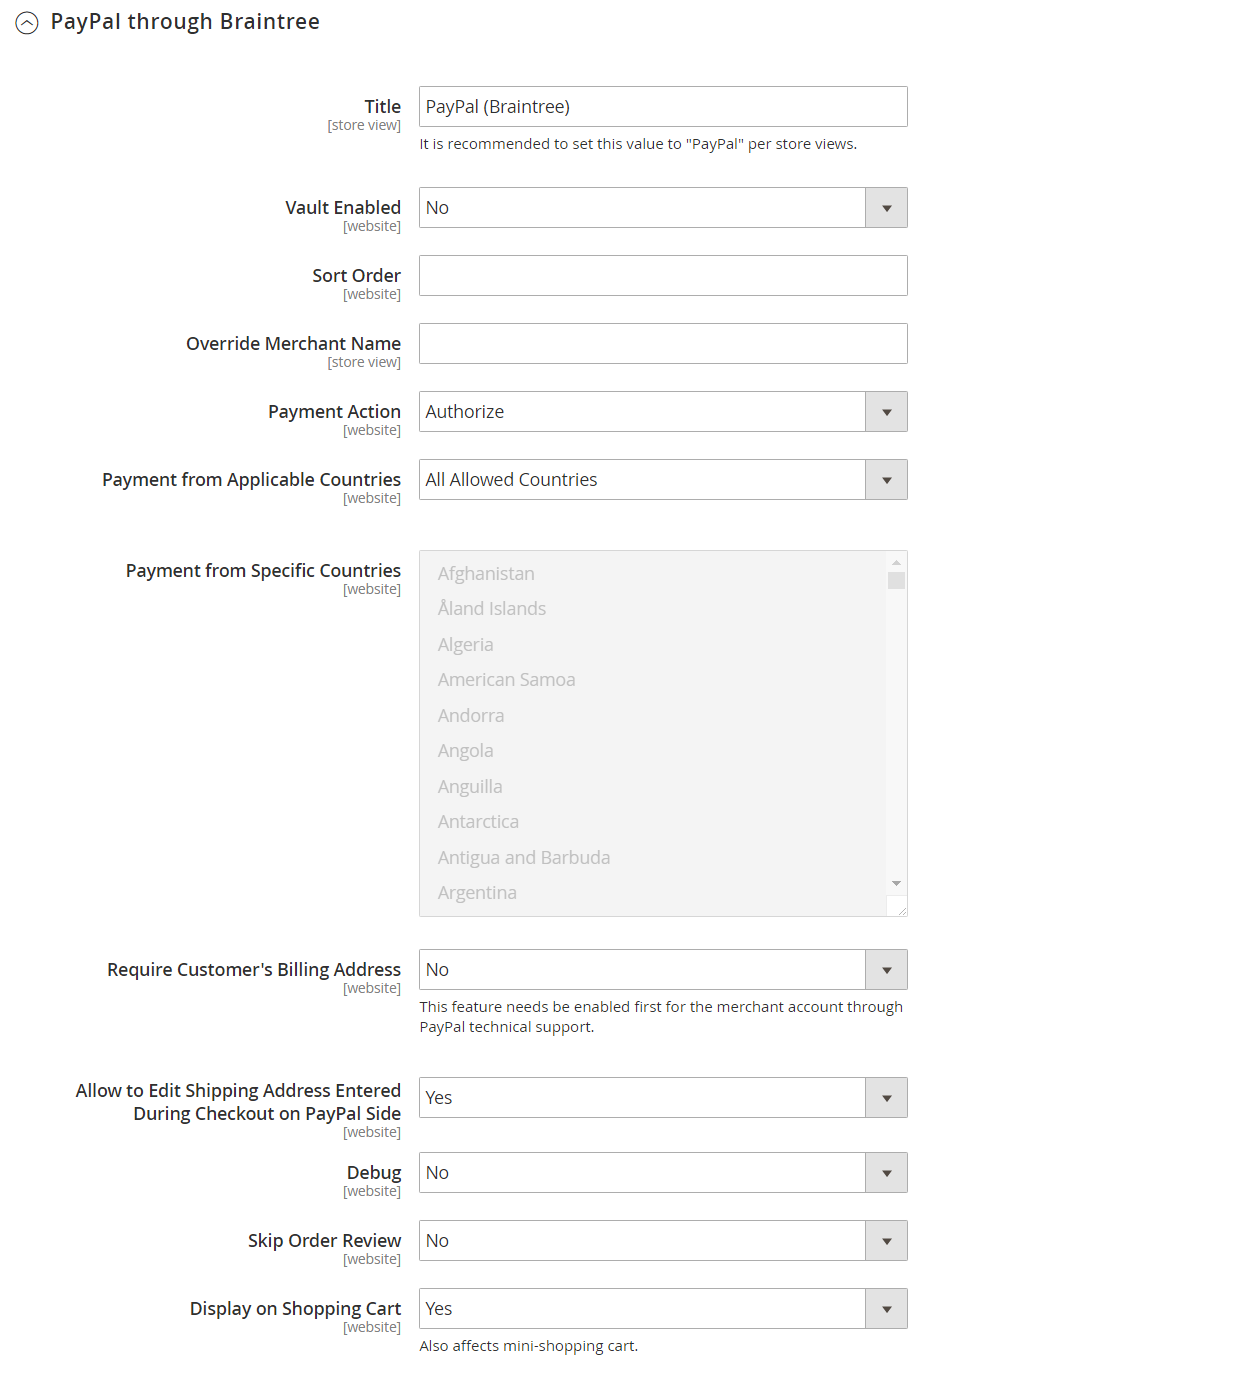
Step 5: Set up the PayPal through Magento 2 Braintree
To identify your PayPal through Braintree configuration, follow these actions:
- Type a Title to identify Braintree’s payment by PayPal option during checkout.
- For Vault Title, write a descriptive title to categorize the vault where stores your customer card information.
- For Sort Order, enter a number to determine the sequence in which Braintree’s PayPal payment option appears when listed with other payment options during checkout.
- To display your different merchant name, in the Override Merchant Name field, enter the name as you want it to appear.
At Payment Action, choose one of the following:
- Authorize Only: This option approves the purchase and puts a hold on the funds. t’s not until the sale is “captured” by the merchant that you withdraw the amount from the customer’s bank account.
- Authorize and Capture: The amount of the purchase is authorized and immediately withdrawn from the customer’s account.
Set Payment from Applicable Countries to one of the following for Braintree transactions processed by PayPal: All Allowed Countries & Specific Countries (similar to Step 4)
To insist on customers providing a billing address, set Require Customer’s Billing Address to Yes.
If you want to enable the function of editing the shipping address while completing a PayPal transaction, set Allow to Edit Shipping Address Entered During Checkout on PayPal Side to Yes.
Switch Debug to Yes to save a log file of interactions between your store and PayPal through Braintree.
Change Skip Order Review to Yes, if you want to bypass the Order Review step before the order is submitted. By default, Order Review is the last stage of the checkout process.
To display the PayPal button on both the mini shopping cart and shopping cart page, set Display on Shopping Cart to Yes.
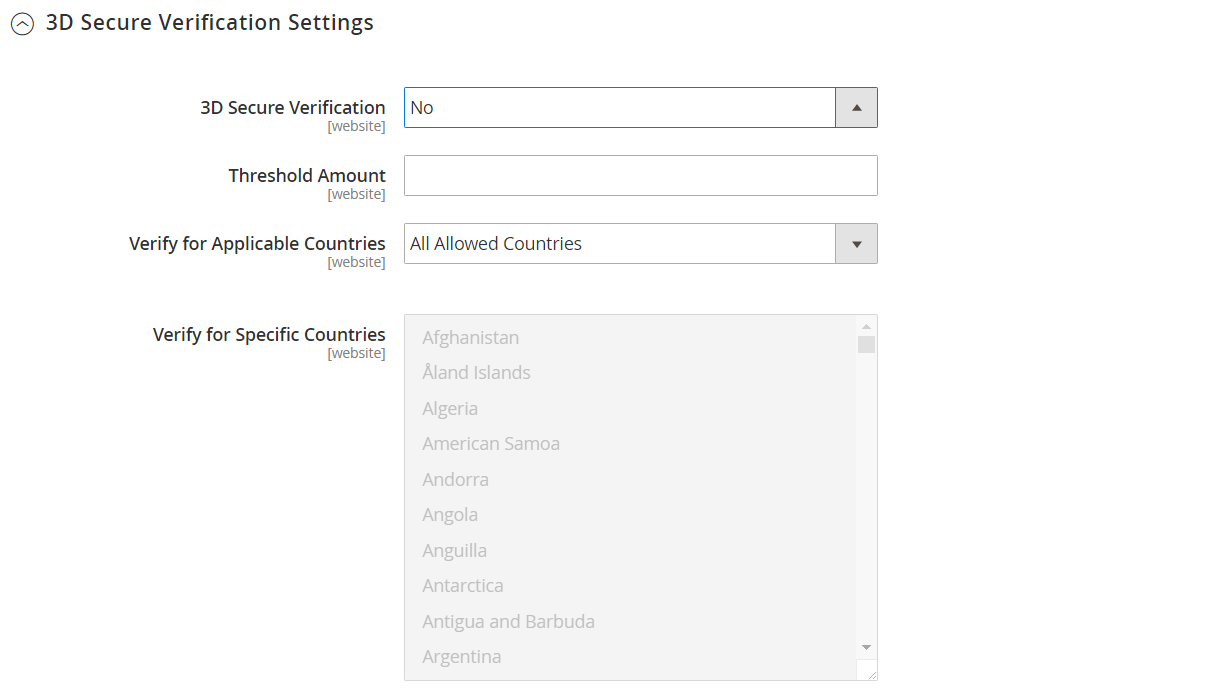
Step 6: Complete the 3D verification settings
Enable 3D Secure Verification if you intend to include a verification step for customers using credit cards that join in a verification program such as “Verified by VISA”.
The Threshold Amount is the minimum order amount required to trigger 3D verification.
Set Verify for Applicable Countries to All Allowed Countries or Specific Countries (similar to steps 4 & 5).
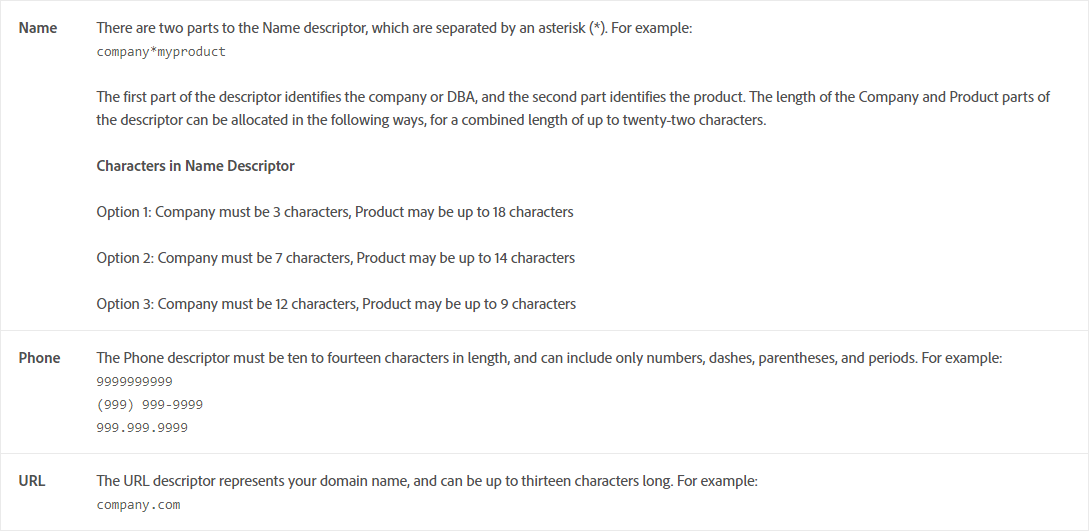
Step 7: Dynamic descriptors
The descriptors aim to identify purchases on customer credit card statements. You can reduce the number of chargebacks by determining the company associated with each purchase.
Fill in the Dynamic Descriptor for the Name, Phone, and URL according to these guidelines:
When finishing, click Save Config.