How To Add Products To A Page On Shopify: Shopify Tutorial
If you’ve ever wondered how to add products to a page on Shopify or admin and what information you should provide, keep reading because we’ll guide you through the process.
What are Shopify Wholesale Products?

Wholesale products are goods or services that you offer to B2B customers. Most of these products can be created easily with the simplistic Shopify UI, which does not require much knowledge about coding in general.
Shopify platform provides you with a flexible way of customizing your products. With Shopify, you can add or remove wholesale products listed at ease. It’s worth noting that you can even assign your products to appropriate sales channels if wished.
With Shopify, you can view your products, update any new information to the product database and edit, organize the primary products and all of their variants. The method is the same for both retail and wholesale storefronts.
How to Add Products to a Page on Shopify?
It’s important to note that you aren’t required to enter every product detail listed down here. Yet, we
still recommend configuring carefully to make it fit your wholesale store.
1.Add a new product to Shopify admin
ALSO, learn how to create a collection of products to your Shopify store here.
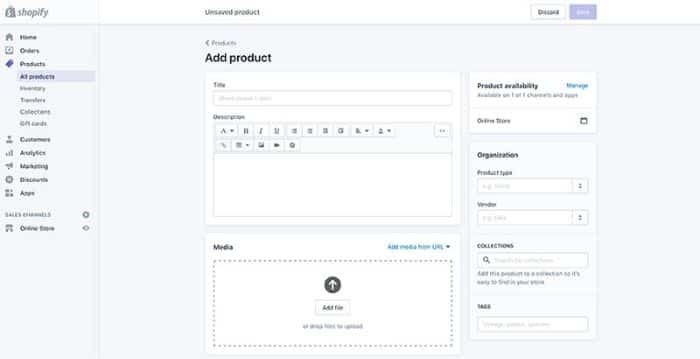
Let’s start on the Shopify admin and click Products, select Add product.
How to add products to shopify page? First, start by giving the product a name that suits your business. Add a description by describing your product in detail to inform and persuade potential customers.
Then, click Upload image and select images to upload as your product’s feature image. Don’t forget that visuals are a key factor in whether a customer decides to make a purchase or not.
Product price is also necessary for your product. If the product is taxable, click Charge taxes on this product. If your product is on sale, then the Compare at price is the original price for the product.
For example, if you enter $40 as the compare at price and leave the price at $30, the product displays as $20 off.
The Cost per item is how much the product costs you. If you resell a product, enter the price you paid the manufacturer, excluding taxes, shipping, or other costs. Or, If you create the product yourself, enter a value that is based on your labor and material costs.
Under the inventory column, you see the option to add a Stock keeping unit, also known as an SKU. This is a unique value for the product. SKUs help you organize your inventory and fulfill orders.
You also see an option for barcodes. Barcodes are typically used by resellers.
The identifier needs to be a new or existing Global Trade Item Number, also known as a GTIN. Some sales channels require a GTIN before a product can be published using the channel.
The Inventory policy setting allows the Shopify admin to track inventory. If you select don’t track inventory then the quantity option is not available.
Next, enter the number of units in stock under Quantity. If you’re using Shopify Locations, you’ll see a slightly different layout in the inventory section.
Uncheck the box track quantity if you aren’t tracking inventory.
Otherwise, enter individual quantity numbers for this product at each location available. You can also select Allow customers to purchase this product when it’s out of stock. Only select this if you’re confident that you’re able to keep up with demand and will have new inventory shortly.
Under shipping, select This is a physical product if this is an item that needs to be shipped. Uncheck it for digital products/services or for products that you’ll never ship.
Now, enter the product’s weight. This field only appears when This is a physical product is checked. Product weight needs to be accurate because it’s used to calculate shipping rates.
If you want to ship the product internationally with Shopify Shipping, enter the harmonized system tariff code.
Click the lookup code to search for HS tariff codes.
Under fulfillment service, select a fulfillment service from the list of services you’re using. If you’re not using a fulfillment service, then select manual.
Next, enter Variants if you have a product with different options like color and size by clicking Add variant and entering a title for the option name.
In the Option values field, enter the different variants available by separating each one by a comma. Continue to add options for other variants until finished. If you’ve created variants, you need to enter the product details individually just as you did above.
The Search engine listing preview is a preview of how your product appears in search engine results. Click Edit website SEO to make changes to the preview.
Back at the top, you see Product availability. Click Manage and a list of your active sales channels appear. Select the checkbox for what channel you’d like this product to be available on.
Under the organization section, you see Product type. This is a category for the product. You can use the product type as a condition for an automated collection, or to filter products in the Shopify admin.
A product can have only one product type. You can use a product type already made or create a new one. To create a new product type, enter it into the Product type field.
The Vendor is the manufacturer, wholesaler, or other vendors that support your product. If you created this product, enter your own business name here. You can also add the product directly into a collection.
Use the collection field to add the product directly to a manual collection. Automated collections include the product when it matches the collection conditions.
Finally, Tags are searchable keywords associated with your product. Tags help customers find your product through your online store search, and you can also use them to create automated collections.
Review the details you’ve entered, and when you’re ready, click Save. Your product is now added to the Shopify admin.
2.Add products to Shopify page
How To Add Products To A Page On Shopify? If you simply want to add your products to the homepage, then you can make it done by customizing the Shopify theme and adding either Featured Product or Featured Collection to the homepage.
If you want to add a collections widget or the likes to a page other than your Shopify store homepage then there are no real quick solutions unless tampering with your website’s HTML/CSS.
You may start a new collection and fill up the description area with whatever items you want to add. Then you can link to that collection from anywhere you want, and if you want to hide it, don’t include it in the menu.
Another option would be to take advantage of Shopify’s buy button. You’ll be able to add single products to a page or a blog post using this method. The buy button may be found in the Shopify menu under sales channels. You may put as many of these as you like on a page. They are totally customizable and can incorporate product pictures and information.
3.Duplicate a product page on Shopify
To make the product creation process easier, you can duplicate an already created product. If you want to add new options for a product, instead of making a duplicate, we advise you to add variants with modified attributes like color and size.
Shopify allows you to select attributes to copy from the original product like images, SKUs, quantity or barcodes. You also have the option to deselect any of the above attributes, which will leave the product details blank after duplicating.
To duplicate a product, all you need to do is navigate all products via the Products section and choose the product to duplicate and press Duplicate. From there, you can enter a new name, edit attributes and Save the new duplicate if wished.
Don’t forget that any new duplicate products will immediately have status set as drafts with the same sales channel configured like the original product model.
4.Edit a submitted Shopify product
Like other platforms for eCommerce, Shopify also allows you to modify the details and edit your input products. You’re free to change them at any time.
However, it’s worth noting that modified product details will also be updated in the reports, which might make great changes to these reports. All changes that you make and save will take effect immediately. To edit your Shopify product, simply go to the Products section, select All products, then click on the products that you want to modify. Click Save when you have done the modification process. We hope that article about how to add products to a page on shopify have been useful to you.
About BSS |
Those are all popular ways of adding products to Shopify page, hope it helps!
>>> Read more: Shopify Product Options: How To Add Variants On Shopify? and How To Organize Products On Shopify?