We all want to save time and do everything faster in today’s world. For eCommerce businesses, user experience is among the most crucial things if you want to boost your conversion rate and profit. So, why are you wasting your time on default Magento 2 and trying to import product attributes manually? In this blog, we will introduce you to an entire guideline on how to import products in Magento 2 via a CSV file so that all of you can do it by yourself without depending on IT staff.
If you wish to change your Magento 2 Import Export Product Attributes with only one click, we are here to help.
What Is A CSV File In Magento 2?
Table of Contents
The only way to import Magento 2 products is via a CSV file. The file is so important that we all need to know about it.
Let’s look at the CSV file structure for Magento 2 product import/export:
| 1 | SKU | a unique product identifier used as a key product attribute in the Magento 2 core. It is required for all products and should be unique for each. SKU can include digits and letters without spaces separated with underscores (_) and dashes (-) |
| 2 | store_view_code | an associated store view code. The column can be empty if an associated store/website has a single sub-item. |
| 3 | attribute_set_code | a product attribute set code. Create and configure an attribute set before importing products into Magento 2. It should look exactly the same as an attribute set name, including capital letters (e.g. “Default”, “Man shoes” etc.) |
| 4 | update_attribute_set | defines if the product set should be updated for the product during the import/export product in Magento 2. |
| 5 | product_type | the type of an imported product. Use only lowercase letters (small, configurable, etc.) |
| 6 | categories | product categories in Magento 2 differ from the ones utilized in Magento 1, where comma-separated category IDs are used. In Magento 2, full names of assigned categories, including full path, are required. Besides, assigned categories should be separated by |. For instance, “Default Category/Gear|Default Category/Gear/Bags” means the product should be assigned to both Gear and Bags categories. The latest one is a subcategory of Gear. |
| 7 | product_websites | an associated product website code. Use lowercase letters only (e.g. “base”). |
| 8 | name | a product name |
| 9 | description | a product description |
| 10 | short_description | a short description of a product. Both, description and short description, could include valid HTML tags |
| 11 | weight | weight of a product. Requires using the following format 1.00000 |
| 12 | product_online | enables or disables products. Use 1 or 0, respectively |
| 13 | tax_class_name | a product tax class. Allows using capital later and spaces, like in Magento 2 backend (e.g. “Taxable Goods”). |
| 14 | visibility | visibility of a product (e.g. “Catalog, Search”, “Not Visible Individually” etc.). |
| 15 | price | a price of a product (e.g. 34.000) |
| 16 | special_price | a special price of a product (e.g. 34.000) |
| 17 | special_price_from_date | the time when Magento starts using a special price instead of a default one (e.g. ‘2015-09-01 15:26:29’) |
| 18 | url_key | a URL key of the product. In case of an empty field, a value is generated automatically based on a product name |
| 19 | meta_title | a meta title of a product |
| 20 | meta_keywords | product meta keywords |
| 21 | meta_description | a product meta description |
| 22 | base_image | the main product’s image and its path. Should be uploaded to /pub/media/import. The path of /sample_data/m/b/mb01-blue-0.jpg has the following structure: /pub/media/import/sample_data/m/b/mb01-blue-0.jpg. In addition, you can use a direct URL of an image, such as http://site.com/images/some_image.jpg. |
| 23 | base_image_label | a label of a base product image |
| 24 | small_image | a name and a path related to a small product image. It should also be uploaded to /pub/media/import. The path of /sample_data/m/b/mb01-blue-0.jpg has the following structure: /pub/media/import/sample_data/m/b/mb01-blue-0.jpg. In addition, you can use a direct URL of an image, such as http://site.com/images/some_image.jpg. |
| 25 | small_image_label | a label of a small product image |
| 26 | thumbnail_image | a name and a path related to a thumbnail product image. It should be uploaded to /pub/media/import as well. The path of /sample_data/m/b/mb01-blue-0.jpg has the following structure: /pub/media/import/sample_data/m/b/mb01-blue-0.jpg. In addition, you can use a direct URL of an image, such as http://site.com/images/some_image.jpg. |
Understanding the structure of a CSV file, now you can prepare in advance for a quicker and easier import-export process.
>>> New to Magento? Discover How to Use Magento with Our Easy Guide! Don’t Miss Out!
Guide: How to import products in Magento 2
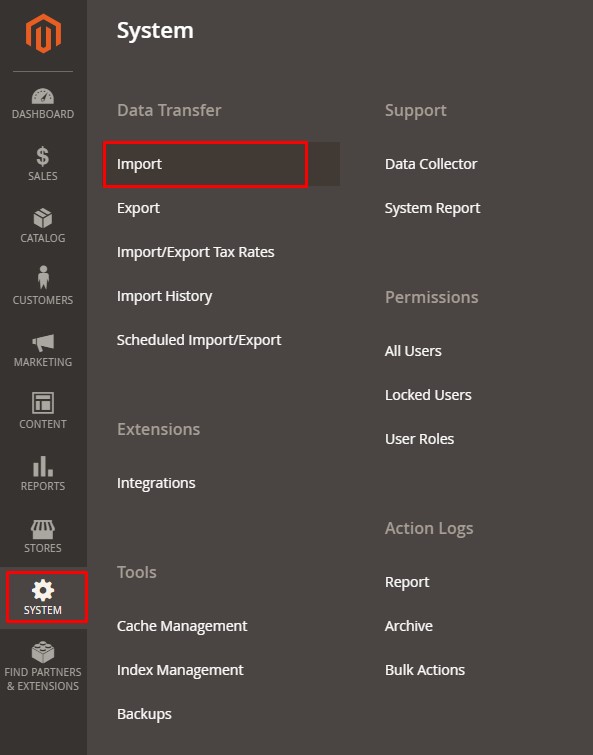
To make Magento 2 import products, navigate to Admin Dashboard ⇒ System ⇒ Data Transfer ⇒ Import.
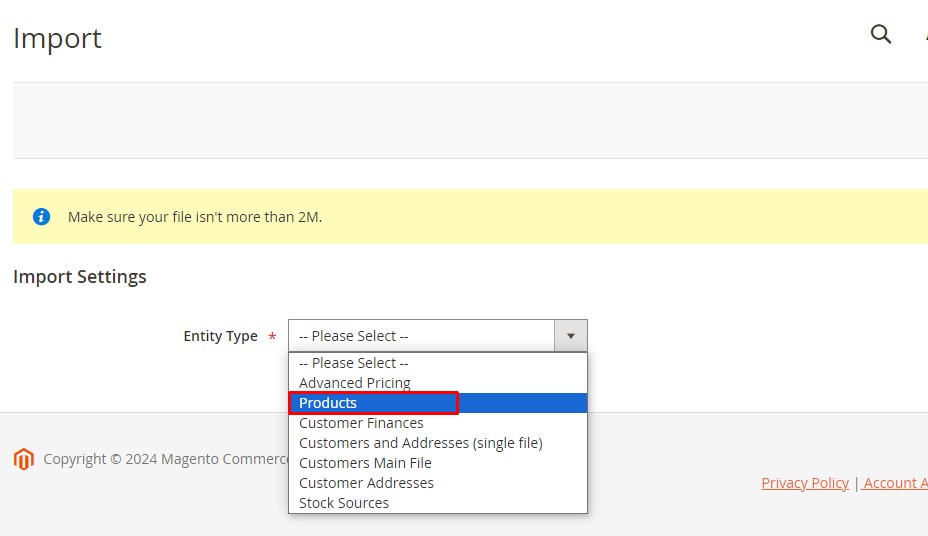
In Import Settings: you choose Products in the drop-down list of Entity Types section. Then there are many other settings appearing for you to make configurations for Magento 2 import products.
Step 2: Prepare a CSV file including product data
As mentioned before, you can easily implement Magento 2 products import in bulk via a CSV file. Therefore, the very first thing you need to do is to prepare a standard CSV file with the necessary information about products. Default Magento 2 supports this issue by providing the sample file to download, which can help you follow available examples and avoid errors while filling in data.
You click “Download Sample Data” next to Entity Types section.

Download the sample CSV file to prepare for importing products in Magento 2.
The CSV file will be saved on your computer. Let’s open the file and finish your product data in columns and rows of the file.
-
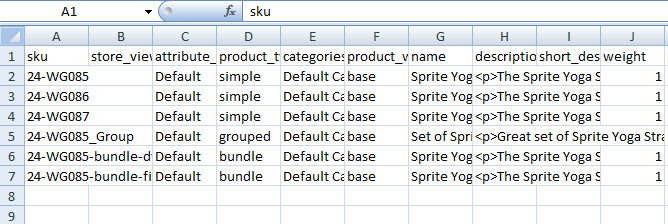
The sample CSV file to follow
*Note:
- For product data, including paths of product images, make sure that you have uploaded the image files to the appropriate location. The default location on the Magento server is pub/media/import.
- The size of the CSV file does not exceed 2M.
Step 3: Configure Magento Import Products Behaviors
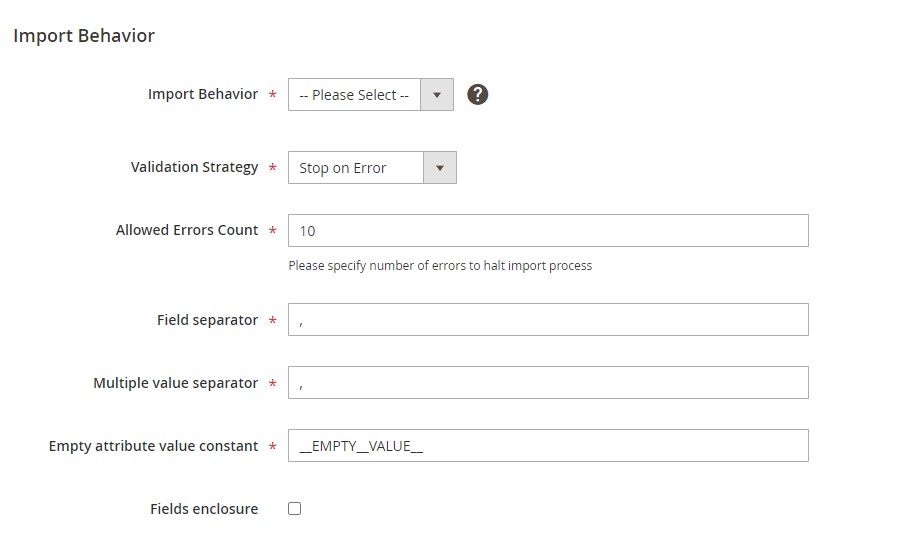
How to import products in Magento 2? There are 3 options for you to select depending on your purposes to import products in Magento:
- Add/ Update: Add new data to the existing product data for the current entries in the database and update all fields except for SKU. Moreover, new tax classes, new product categories, and new SKUs specified in the CSV file are also automatically created.
- Replace Existing Complex Data: Replace the existing data with the new ones. In case SKUs in the CSV file is similar to the SKU of the existing entity, all fields are deleted, and a new record is created using data in the import file.
- Delete Entities: Delete every entity in the CSV that already exists in the database.
Also, you can determine how the system will process when errors occur:
- Stop on Error: the system stops importing when there are errors.
- Skip error entries: the system skips errors and continues to import.
In Allowed Errors Count: This setting allows you to choose the maximum number of errors when importing products Magento 2. If the number of errors in the import process exceeds the maximum number you fill in this field, the system will stop importing.
In Field separators: fill in a character to separate fields. Magento accepts the default value of a comma.
In Multiple value separators: Magento also accepts the default value of a comma.
*Note: If you want to change into another character as a separator, ensure it matches the one you use in the CSV file.
Step 4: Upload the Magento product import file
-
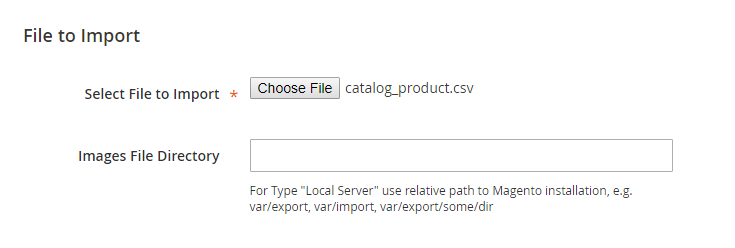
The Magento 2 import file is uploaded
You click Choose File to select the wanted file of import products Magento 2 and upload it.
For Images File Directory section: It will be used if you have an import date, including paths of product images. Let’s choose one of the following options to enter into this field:
- The path to the uploaded images on the Magento server. For example: var/import.
- The full URL to the images is on another server.
Step 5: Check the import data
After you finish all of the above things, the last one you need to do is validate the Magento product import data by clicking Check Data button.
- If your CSV file is free from errors, there is a message to notify validation results, and the Import button now appears to click. You click the Import button to start Magento 2 product import in the CSV file into the websites.
-
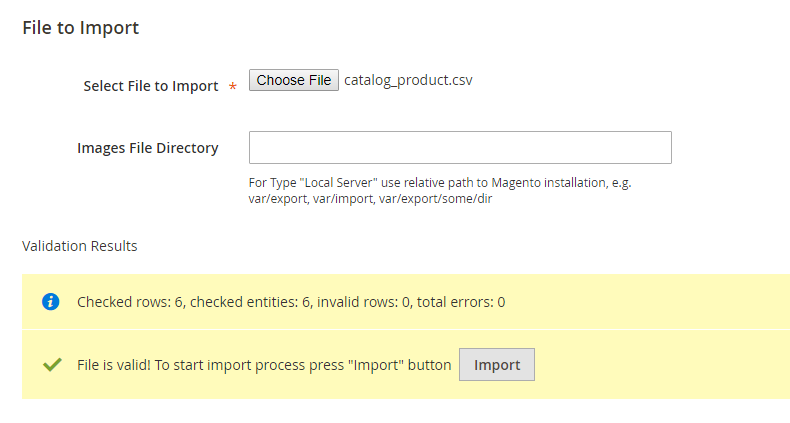
The data checking result
- If your CSV file includes errors, the Import button cannot be displayed for you to click, and there is a notification about these problems.
That’s the guide for how to import products in Magento 2 with just 5 simple steps. You may ask then How can I create Configurable product in Magento 2? Unfortunately, there is quite a lot of work involved in importing this type of product into the Magento store. However, you can make it easier with the help of a third-party extension.
Discover a list of useful Magento 2 import export extensions by BSS Commerce:
- Magento 2 Import Export Product Reviews Extension
- Magento 2 Import Export URL Rewrites Extension
- Magento 2 Import Export Wishlist Item Extension
- Magento 2 Import Export Categories Extension
>>> Explore more powerful extensions from BSS Commerce in our Magento add-ons store
Wrapping Up
In brief, this article has covered all you need to know regarding how to import products in Magento 2 with a CSV file. Hope you can utilize it to streamline your import task! If you still have any questions, feel free to reach out to us anytime here.
If you are wondering how to streamline the process of exporting Magento products, read this blog: How to export all products in Magento 2.

