Magento 2 Product Attributes dictate how it can be used in the catalog, how it appears and behaves in the store, and what data is included in data transfer activities. Each attribute’s characteristics and names dictate how it can be utilized and how it is displayed in the shop.
Your Magento 2 product catalog’s building blocks are product attributes. They are used as search parameters, criteria for layered navigation, product comparison, and price rules, in addition to describing the qualities of a product.
Let’s look at a few examples of how product attributes can be used to manage a wide range of product data.
What Is Magento 2 Product Attributes?
Table of Contents
Attributes of a product are what make it different from other products. In other words, they are specific characteristics of a product and a very important part in building your product catalog. Besides, attributes also determine input control which is used for product options and provide additional information for product pages.
Moreover, search parameters and criteria for layered navigation, product comparison reports, and promotions are also determined by attributes.
Therefore, a lot of attributes can be easily created to describe the products in your catalog.
You can also use product attributes to assign products to categories automatically using Magento 2 Dynamic Category.
In this tutorial, we will show you how to add new product attributes in Magento 2 with some simple steps.
How To Add New Magento 2 Product Attributes?
To create a new Magento 2 attribute, login to your website’s admin dashboard and navigate to the Stores ⇒ Attributes ⇒ Product. In this section, you can see a list of all available product attributes shown in a grid table.
Click Add New Attribute to create a new attribute.
Step 1: Complete information of Attribute Properties
Firstly, in this section, you have to fill in the basic value for the Magento 2 product attribute such as the label, input type, and requirement.

Basic settings of a new product attribute
In Default Label: give a name for the attribute.
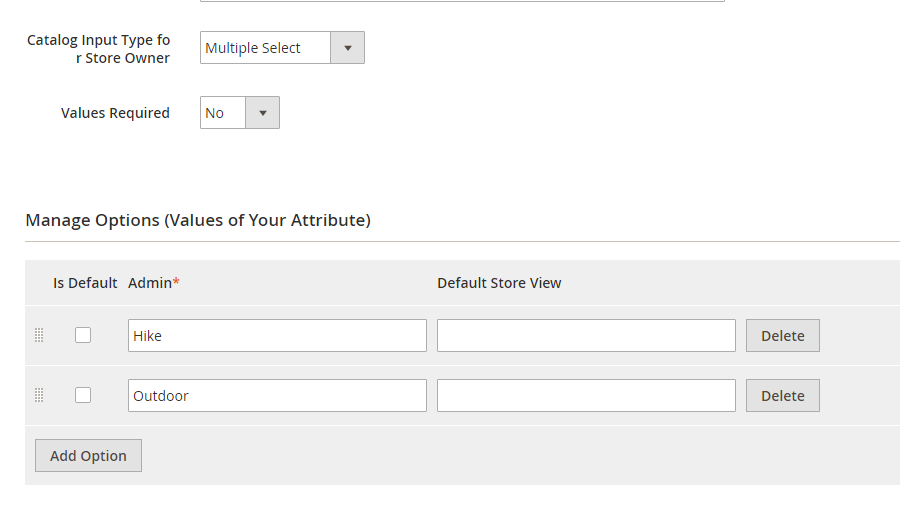
In Catalog Input Type for Store Owner: select input control type to use for the attribute such as Text field, Date, Multi Select Drop down, Visual Swatch and so on.
*Note: If you choose Multi Select or Drop down, you have to configure options for the new attribute in the Manage Options.

Manage options with some specific types of input control
Click Add Option and then fill in the value you want to be displayed in the first place on the list. In Admin, you can give one value and finish its translation for each store view.
In case your store only has one store view, it is enough to only enter the value for Admin. You also need to select a value in the Is Default section to make this value as the default one.
To have more options, you continue to click Add Option and repeat the process.
In Value Required: Choose Yes to require customers to choose an option before buying products.
Step 2: Make more settings for Advanced Attributes Properties
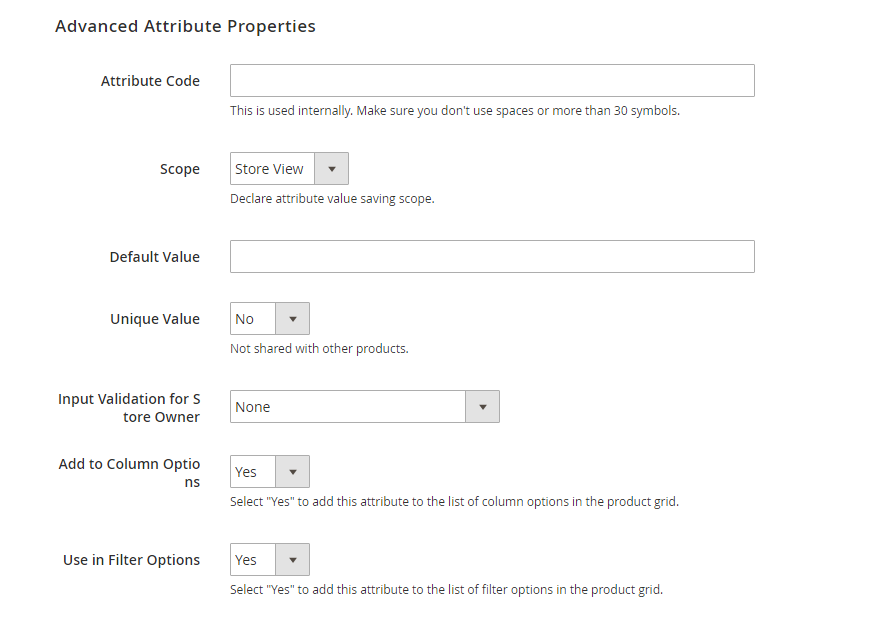
You click Advanced Attribute Properties to complete information for the attribute.

Advanced settings for a new product attribute
In Attribute Code: fill in an attribute code with lower case characters without spaces.
In Scope: select Scope to determine where the attribute is used in the Magento store hierarchy.
In Unique Value: choose Yes to prevent duplicate values from being entered.
In Input Validation for Store Owner: use this setting to validate data filled in a text field. By choosing a data type in the drop-down list that is included in the text field, a validity test is run for this data.
Step 3: Manage Labels
You click Manage Labels and then enter a title as a label of the field. Besides, you can also enter the different translation of the title which is corresponding to each store view.

Manage labels
Step 4: In Storefront Properties
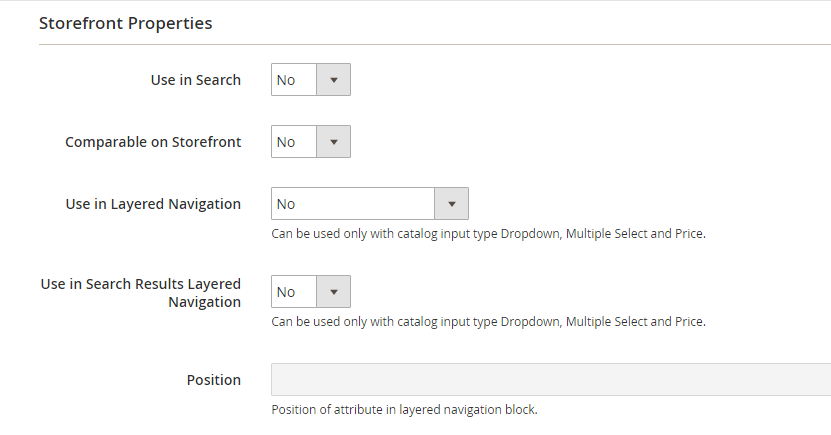
Click on the Storefront Properties tab to configure the frontend behavior of the attribute.

Use in Search: set Yes to make the attribute available for search.
Comparable on Storefront: Set Yes to put the attribute into Product Compare.
There are 3 settings that are only applied for catalog input type Dropdown, Multiple Select and Price.
- Use in Layered Navigation: Set Yes to use the attribute as a filter in layered navigation.
- Use in Search Results Layered Navigation: Set Yes to use the attribute as a filter in the layered navigation of search result page.
- Position: fill in a number to define the relative position of the attribute in the layered navigation block.

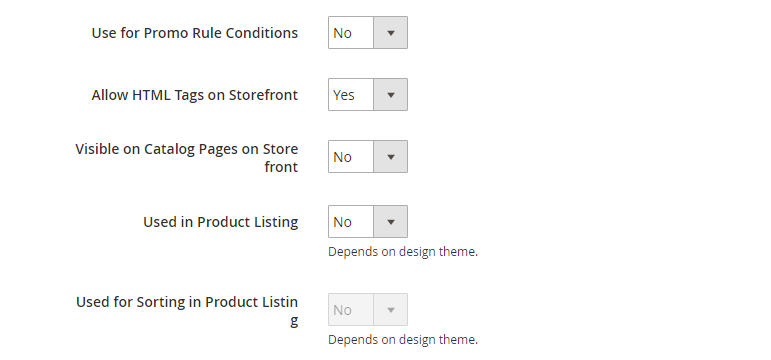
Use for Promo Condition Rules: Set Yes to use attributes in price rules.
Allow HTML Tags on Frontend: Set Yes to display text under the format of HTML. The WYSIWYG editor is available for this field.
Visible on Catalog Pages on Storefront: Set Yes to make the attribute included in the catalog page listings.
Used in Product Listing: Set Yes to make the attribute included in the product listings (it depends on the design theme).
Used for Sorting in Product Listing: Set Yes to use the attribute as a sorting factor for product listings (it depends on the design theme).
Finally, you can save the new Magento 2 attribute by clicking Save Attribute.
Conclusion
Here is the full guide on how to add a new Magento 2 product attribute. In case, you want to do more with product attributes such as importing or exporting product attributes into a CSV file; you can take into consideration Magento 2 extensions by check our article Must-Have Import/Export Product Attributes Extension For Magento 2. It is the best solution to help you overcome the limitation of default Magento as well as reduce a lot of time when doing quickly and quietly.
READ NOW >>> Magento 2 Product Attributes – Know Clearly To Use Properly to boost your conversation rate for your Magento 2 website.
BSS Commerce is one of the leading Multi-platform eCommerce solutions and web development services providers in the world. With experienced and certified developers, we commit to bring high-quality products and services to optimize your business effectively.
CONTACT NOW to let us know your problems. We are willing to support you every time.


