Shopify is well known for being easy to use even if you don’t know the technique or the technology. However, some features will take a while for you to know how to do and easily go wrong if you are inexperienced. Thus, this article will save you time and effort, detailing how to add sub collections in Shopify for your store.
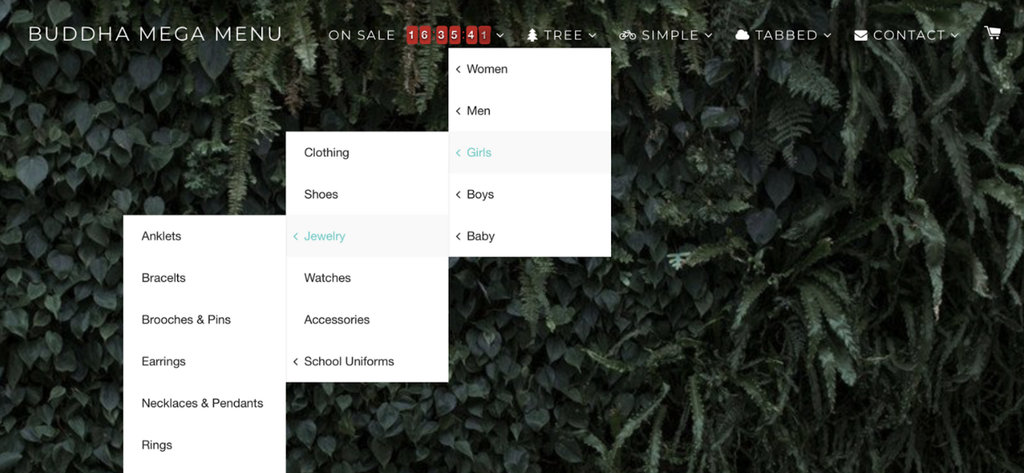
Sometimes you need to know how to tailor the platform according to our requirements and needs. Sub-collections are things that make your shop different from the other Shopify stores. They are used to organize site structures so that those child collections are nested in parent collections. These child collections are referred to as Shopify sub collections.
Contents
How to Add Sub Collections in Shopify: Step-by-Step Guide
This article will summarize the 2 most popular and easiest ways to create sub collections Shopify for you. Each method will have its pros and cons; read and choose the one that best suits you.

“How to create sub collections in Shopify” or “How to add sub collections in Shopify” is the problem many people concern about when starting their Shopify online business. The first and also the simplest way doesn’t require you to know any techniques. All you have to do is just a few clicks, and you will have Shopify nested collections as you like.
With the admin panel, you can easily change the website’s structure and its visual appearance. Go to the “Navigation” section and perform these actions.
To create sub collections Shopify, you should take the following steps:
Step 1: Log into the Shopify store
First, log into the Shopify store with your credentials. If you don’t have one, create a Shopify store for free and enjoy it for $1/month in the first 3 months.
Step 2: Click on the “Navigation”
After successfully logging in, click on the “Online Store” > “Navigation” section.

Step 3: Click on “Add menu”
In this step, there are two cases:
If you have already created the menu option, you can edit it and skip this step. In this case, all you need to do is click on it and go to the menu editing page.
If you don’t yet have the main menu, your first step is to Shopify how to create sub collection in Shopify. To do this, you need to click on the “Add menu”.

Step 4: Add Titles & menu items
In step 4, you need to add menu collections. First, you give it a “Title” for your menu. Then click “Add menu item” and select the required collection. Here’s how you create a parent collection.


Step 5: Add more collections
After creating the parent collection, you should add the sub collections Shopify you planned to in the collection tree.

Step 6: Drag the Shopify sub collections
To turn the collections you just added into sub-collections, drag them with your mouse and nest them into the parent collections in the correct order as the collection tree.

Step 7: Save the menu
And finally, you need to save all the operations performed by clicking on the “Save menu.”

Pros: Quick and easy. You can create menu items and nest necessary collections instead of creating a parent collection.
Cons: There are certain limits; it is difficult to expand opportunities when it comes to sub-categories creation.
>> Discover more: Shopify Store Login For Admins and Customers: All You Need To Know
#2. Create a Sub Collection List on Your Collection Pages with Your Theme
In this section, we will learn how to add sub collections in Shopify on your collection pages within a theme. In this guide, we are using the Eurus Shopify theme.
Step 1: Go to ‘Customize Theme’
First, navigate to ‘Online Store’ section, then head to ‘Themes’. Here, you move to the theme you use and click on ‘Customize’ to customize the theme.

Make your store outstanding with Shopify Plus Store Design and Top Development Services
Step 2: Choose ‘Collections’ page
In the header menu, choose ‘Collections’ in the dropdown. Then choose ‘Default collection’ template or any collection page you want.

If you want to create a new collection template, click ‘Create template’. Enter the name for the new collection template and click ‘Create template’.

Step 3: Add ‘Collection list’ section
In the Template part, choose Add section > Collection list.

Step 4: Choose ‘Collections’ appeared in the ‘Collection list’
1. Change the ‘Collection heading’.
2. In the Collection list section, you can choose the number of columns to show collections, such as 3, 4, 5,…

3. Click ‘Save’.
4. Then you choose which collection will be displayed in the collection list. Click Collection > Select Collection > Choose Collection you want > Select > Save.

Step 5: Move the new Collection list to the section you want in the storefront. Then ‘Save’.

>> Read more: What You Need To Know About Shopify Product Badges?
Pros: Easy to create, anyone can do.
🎁🎁🎁 Worth a check: Must-have APPS by BSS Commerce
Use Link Lists to Create a Collection Tree Before Adding to Shopify
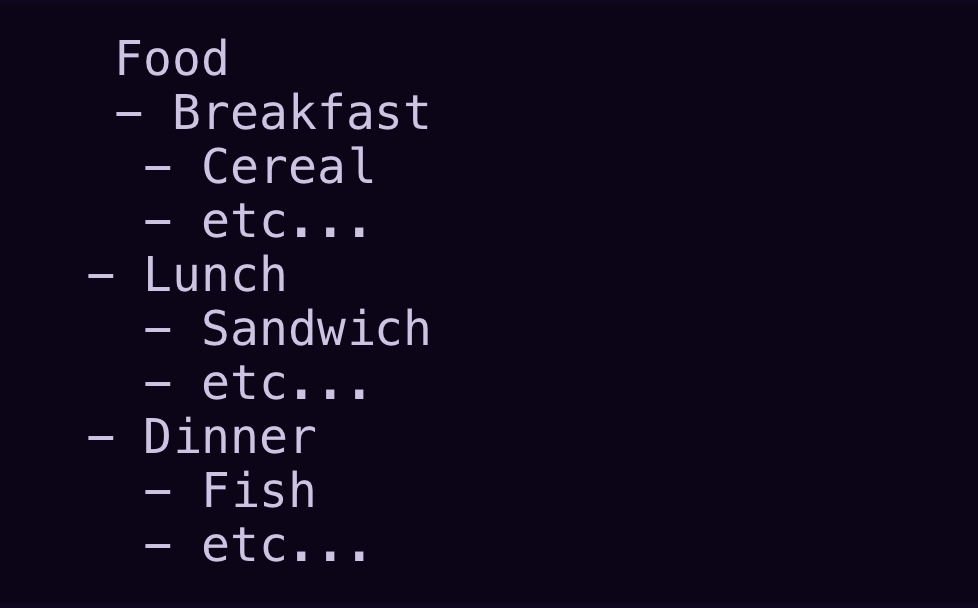
Before creating and adding sub collections in Shopify, to ensure that you understand the desired structure, let’s create a collection tree using link lists.
Here is what your categories and subcategories will be like:

One thing that is especially important when creating a Shopify sub-collection is handling parent categories, in other words, large and major categories.
Besides knowing how to add sub collections in Shopify, the principle of creating subcategories for the collection tree is quite simple too. You only need to do two basic steps: create all parent categories, then create a hierarchy using the navigation linked list. Specific work will be:
- Create all collections, then create the hierarchy with a navigation link list.
- Next, Create a new collection and take note of the collection handle (parent collection).
- Then, create all your sub-collections as standard Shopify collections.
- The next step you need to do is go to the navigation page in Shopify and create a new linked list.
- Give it a related name and provide a handle that corresponds to the parent collection. (TIP: You can prepend the handle with a “collection-“ so that you don’t deal with namespaces in the future. For Example: “collection-food.”
- Finally, Add all your sub-collections to the list.

Shopify does not impose any restrictions on adding or creating sub-categories. So you can create anything in any way you want, depending on the quality of the product and how your website is designed. You can also choose to add sub-categories manually or add them according to specific criteria.
Since there are no rules and restrictions in place, you can name your Shopify sub-collections whenever a new variation of a product is available and decide its order easily. And you have finally finished creating your sub-categories and can start adding them to the Shopify store.
BSS Commerce offers professional Shopify migration services, providing seamless transitions for businesses looking to migrate their online stores to the Shopify platform. With a team of experienced experts, we ensures a smooth and efficient migration process, safeguarding data integrity and optimizing operational systems. By leveraging their comprehensive knowledge and expertise, BSS Commerce helps businesses enhance their overall performance on Shopify, empowering them to thrive in the digital marketplace.
Check out here for more details at BSS Shopify Migration Services
Common Errors When Creating or Managing Subcollections in Shopify
While creating and managing Shopify subcollections, there are some common challenges that you should consider. Here are a few errors you may get:
1. Products not appearing in subcollections: Make sure that you have accurately assigned products to the appropriate subcollections and that any rules or conditions for automatic collections are correctly configured.
2. Shopify subcollections not showing on the store: Check if you successfully published your Shopify subcollections and they are all set to display in the desired location, such as the homepage or navigation menu.
3. Problems with subcollection images: If you get issues with images not displaying correctly or appearing distorted, check the image sizes and ensure that they meet Shopify’s recommended dimensions. Check now Shopify Image Resizer: The Complete Guide to optimize your images.
Why Need to Add Sub Collections to Your Shopify Store?
A cluttered product catalog can overwhelm shoppers and make it difficult for them to find what they’re looking for, which can lead to frustration and missed sales opportunities. However, these challenges can be easily resolved by using sub-collections. Here, we will delve into why sub-collections are essential for your store’s success and how they can improve navigation, boost SEO, and increase sales.
1. Enhanced navigation: Shopify sub collections allow you to arrange your products systematically, it simplifies the process for customers to explore and find specific items they want.
2. Increase UX and improve UI: It is easier and more convenient for customers to shop on your website. They don’t need to spend too much time on the item they are looking for. From there, you will have more customers, and of course, you will increase revenue and conversion rates by optimizing the user experience.
3. SEO advantages: By categorizing your products into sub-collections, you can create distinct landing pages with different focused keywords. This facilitates the search engine to understand the organization of your store, potentially enhancing your search rankings.
>> Read more: Shopify SEO Checklist: Optimize Your Store in 2024
4. Easily create targeted marketing campaigns: It is simple to determine which products are in high demand or popular with sub-collection. This data can be used to develop specific promotions or discounts, boosting sales and customer interaction. Also, sub-collections give you a useful resource for examining customer preferences and behavior so that you can customize your marketing campaigns properly.
5. Enhanced customer engagement: Shopify sub collections contribute to longer customer visits to your website. When customers can effortlessly navigate and find products of interest, they are more inclined to explore further, leading to higher conversion rates and repeat purchases.
6. Customizable design: Sub-collections offer the flexibility to customize the design and layout of each category page, creating a visually appealing shopping experience that reflects your brand. By showcasing products attractively, you can capture customer attention and drive them to purchase.
Here are 2 ways you can add Shopify sub collections to the Shopify store, but before we get started, let’s create a collection tree to understand the overall structure of the entire site.
Conclusion
This article has compiled and provided tips on the three most popular ways to answer the question how to add sub collections in Shopify stores. Please read carefully the instructions and the pros and cons of each to choose the method that suits you best to create sub collection in Shopify.
However, if you are struggling with adding sub-collections in your store, BSS Shopify Development Service would be more than happy to help you out. BSS Shopify Commerce has been the top provider of Shopify website development services; our professional developers will listen, consult, and make your requirements come true.


